The topic of feature flags is gaining popularity with developers and marketers alike using these flags to test and deploy safely in production among other many uses.
In this article, we’ve decided to compile our top picks of the best content out there on feature flags for your reading pleasure.
Whether your team has already been using feature flags to safely release new software or whether you’re just tentatively dipping your toes and looking to get more information on this powerful software development tool, you’re bound to find something in our selection that best suits your needs.
So, without further ado and in no particular order, here are our top picks:
This is certainly one of the most popular articles about feature flags. Indeed, a quick Google search will always include an article from Martin Fowler and his many articles written by him or by colleagues on the software development life cycle and how to build software effectively.
Why we picked it:
It’s a no-brainer. This article, one of the oldest out there first published back in 2016, is a classic and explains in great detail and clarity the topic of feature toggles or flags from their birth to their different categories and implementation techniques.
In our opinion, this is a great article especially for those trying to become more acquainted with this topic. It also uses simplified figures for easier understanding.
This is another great article that breaks down the complexity of feature flags from what they are to their importance and the different ways to implement them.
It’s a good starting point for anyone who’s just embarking on their feature flag learning journey.
GitHub, a provider of internet hosting for software development, provides excellent resources to help developers build and develop software, among which highlight the topic of feature flags.
Why we picked it:
We always think the best way to truly understand something is by providing concrete and practical examples. This is what this article from a company in the industry does.
This article paints a clear picture of the uses and benefits of feature flags by illustrating how GitHub reaps the benefits of these flags in its deployment processes. It explains in great detail how feature flags have allowed them to efficiently work on new features and to test these features, thereby inviting developers to embrace this software development methodology in their own releases.
We’ve often heard about how developers use feature flags as they are the ones coding them. However, product and marketing teams have long started to recognize the benefits of using feature flags themselves to test out their ideas on customers. A sophisticated feature flagging platform, in particular, allows different teams to access and control flags (and not just developers).
Therefore, the author argues that feature flags are a major win not only for developers but also product managers by boosting productivity and reducing the stress of new releases. The article also weighs in on the infamous build vs buy decision.
This article really lays out the value behind feature flags by depicting how each team within an organization utilizes them to solve many issues that usually come up in development, making life much easier for these teams.
Much like the previous article, it highlights the importance of feature flags and how they have revolutionised the Agile development process.
We have carefully crafted a platform to suit both development and product teams and equip them with the right tools to safely deploy code into production and eliminate the risk of new releases.
Why we picked it:
At the risk of tooting our own horn, we think that this article on our blog covers a wide range of use cases that could be implemented using feature flags from preparing for launch to other scenarios where such flags could come in handy, targeted towards both product and development teams.
This article provides an interesting discussion on the benefits of feature flags while acknowledging their potential costs and listing the requirements that should be put in place to carefully manage these flags to avoid the build-up of heavy costs over time. Among such requirements include documenting when a flag is introduced and setting an owner for each flag to be able to make the decision to remove the flag when it is no longer needed.
You might have already come across the dreaded ‘technical debt’. In this article, the engineering team at Uber tackles the dark side of feature flags and how they developed a tool in order to deal with the issue of removing stale feature flags to prevent accumulation of this debt.
Piranha is an open-source tool but it’s currently only available for Objective-C, Swift, and Java programs.
Nonetheless, we think that this article provides a detailed look into the issue of technical debt and why it’s important to keep track of feature flags, particularly stale ones, in your code.
Conclusion
And there it is: our non-exhaustive list of our favorite posts that cover the ever-expanding and fascinating topic of feature flags!
Feature management tools have become valuable for modern development teams. With such tools, teams now have a way to push releases safely and quickly with more confidence than ever before.
These tools provide a safe and efficient way to toggle features on and off targeting a specific set of users while fixing bugs without any disruption to users.
Furthermore, many of these tools provide an easy-to-use dashboard that can be used by all teams, even the less technical product teams, allowing them to release features at their own pace without relying too much on development teams to do it for them.
Feature management softwares, in that sense, pave the way for feature testing enabling product teams to experiment and test their ideas so that they may deliver high quality software that customers actually want.
Undoubtedly, with the many benefits that come with such tools, there are many options to choose from that you may find yourself at a loss at which one to opt for.
In this post, we will list the many tools out there and their main features so that you can decide which is best suited for your organization and unique needs.
What is feature management?
First, we will start off with what exactly we mean by the term ‘feature management’ before we move onto our list.
The term feature management encompasses software development tools that allow teams to better manage the rollout and roll back of features.
These tools provide a framework for feature flag-driven development meaning that teams can use flags on a wide scale to manage features across a wide variety of use cases.
Teams that implement such tools see higher productivity and an increase in software quality as they enable continuous testing of releases through gradual roll out of these releases to subsets of users.
As already mentioned, this allows teams, particularly product teams, to continuously test out their ideas through techniques such as A/B testing and experimentation and optimize products accordingly.
The core of feature management: Feature flags
Just as a quick recap of feature flags: feature flags are basically if-else statements that decouple deployment from release providing teams with full control over which users see which features.
When you’re just starting out, you’ll implement a feature flag from a config file with an easy on/off toggle to test and roll out new features.
However, at some point, things may become more complicated as your use cases evolve making flags harder to manage.
As you start to realize the value of feature flags in your experimentation roadmap, adopting the right feature management tool will help you manage hundreds, if not thousands, flags across several teams. Eventually, you will need to retire some of these flags, lest they accumulate into technical debt.
The key to managing all these active flags in your system is to opt for a more comprehensive feature flag management tool.
Feature flag management tools: Our top picks
Without further ado, we will present you with a list of tools that are worth looking into. Note that there is no particular order to this list.
Instead, we will lay out the tools highlighting their main features (and when they might come particularly handy) so you can decide which one best suits your objectives and teams’ capabilities.
LaunchDarkly
Launchdarkly is a feature management platform that is jam-packed with features for safe testing in production. The platform is made to integrate seamlessly into your existing software development workflow.
Some of the features you can expect from the platform:
Target specific users based on built-in user attributes
Run sophisticated A/B/n tests for data-driven product decisions
Integrate with other tools to enhance monitoring and collaboration
A number of SDKs that can be used for a variety of programming languages and platforms
The platform was built with developers in mind so that they may ship code whenever they want but is also suited for all teams across an organization so that they can also control and release software. It’s a good choice for those looking for advanced feature management capabilities to run more sophisticated experiments.
Pricing
The platform offers 3 tiers of pricing based on team size with basic functionality on the starter plan and more advanced functionalities at the enterprise level. They come with a 14-day free trial period. However, the payment is distributed per number of seats so you are limited to the number of seats per account and reach is capped at a maximum of 1000 client-side monthly active users (MAUs) in the cheaper plans.
Split
Split is a feature delivery platform ‘built by developers for developers’. The platform can be easily adapted to your workflow allowing teams to set up and manage flags to streamline deployment of features and maximize business impact throughout the feature delivery lifecycle.
Some of the core features of this platform include:
Provides instant alerts for performance issues with any features released
Comes with a kill switch to disable a faulty feature
Allows for user targeting through percentage rollouts to minimize blast radius
Pairs with a number of data pipelines to measure impact of each feature
Scales across multiple teams and environments
This solution is ideal for engineering teams that want to deliver features quickly and safely through ‘impact-driven development’. By helping to reduce the engineering cycle duration, this frees up engineering teams to solve business and customer problems.
It is also suited for teams working in more ‘sensitive’ industries that are looking to have extra security to protect and have control of the data that is sent to the platform.
Pricing
Split offers a free plan that accommodates up to 10 seats and a Platform Edition plan based on the number of Monthly Tracked Keys (MTKs) evaluated by the platform. It includes 25 seats and a 30 day trial.
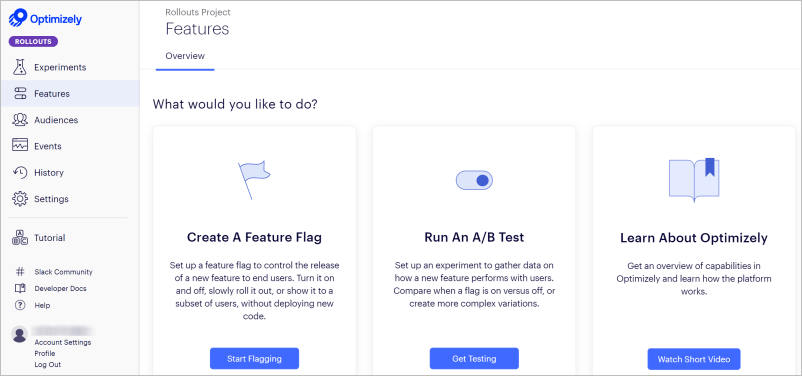
Optimizely
Optimizely is a digital experience platform that provides teams with insights to personalized experiences. Although it’s not primarily a feature management tool, it provides these teams with feature management capabilities to test features. These include feature flags that allow you to run A/B tests, staged rollouts and target rollouts by audience.
Among the features you can find in this platform include:
Manages all features in one place within a single interface
Ability to switch off features without redeploying code
Offers a Stats Engine that deviates from traditional statistical methods for more accurate and actionable results that is a better fit for digital data
Provides a marketer-friendly UI for marketing teams to manage features and tests independently
This platform is suitable for teams looking for a full stack experimentation platform beyond feature management. It is particularly suited to product and marketing teams so that they can run advanced A/B tests across all customer touchpoints to uncover insights for better decision-making.
Pricing
While pricing is not revealed (it must be requested), there are 3 plans that companies can consider, among which include the Intelligence Cloud plan which offers feature management capabilities. Optimizely also offers free feature flagging as part of Optimizely Rollouts, on top of the paid Optimizely Full Stack, which comes with unlimited seats and feature flags.
CloudBees
CloudBees is a software delivery platform whose purpose is to enable automation so that developers can focus on creating and delivering software. The platform also comes with a feature management solution that allows for progressive delivery of features with advanced user testing based on any criteria in your database.
Other notable features that come with the feature management solution include:
Percentage rolling releases that provides feedback from live users
Customer data security-locally available attributes for targeting are not transmitted back to the platform
Kill switch without redeploying when a feature doesn’t work as expected
Developer-friendly workflows allowing developers to edit flags without using dashboards
Visibility of feature flag usage across all teams
This tool is ideal for large organizations with multiple teams seeking to improve visibility and governance across these teams in order to enhance collaboration and speed of software delivery.
Pricing
CloudBees’ feature management solution comes with the usual 3 plans other tools have adopted, beginning with a free Community plan for up to 15 users user followed by Team, up to a maximum of 25 users, and Enterprise plans for more than 25 users.
Harness
Harness is a software delivery platform that also provides feature flags as part of its product, which was designed for developers to be used as a simple and scalable feature management solution.
Some features that come with this platform include:
End-to-end visibility from build to release
Native integration with CI/CD
Integrates to existing developer workflow tools such as Jira and Slack
Reusable feature templates that can be standardized across different features
This tool is ideal for developers looking to automate their processes including flag life cycle management for future feature releases. It is also suited for teams wanting to manage all their processes in a single, integrated pipeline.
Pricing
Harness feature flags comes with 3 plans, starting with the free plan with just 2 developer licenses and up to 25K client-side MAUs followed by the Team, limited to 50 developer licenses and Enterprise plans that comes with a 14-day free trial.
AB Tasty
Last but not certainly not least is our own feature flagging platform to safely turn features on or off but that’s not all it is. AB Tasty is your one-stop solution for all your experimentation needs that was made with not only developers in mind but also to satisfy your product and marketing needs. It also comes with dedicated support to help you get set up.
Our server-side solution is designed for modern teams to deploy releases faster multiple times a day and reduce the risk that usually comes with testing in production.
The platform comes packed with features, which include:
Update flags without the need to change code or redeploy
User targeting and progressive rollouts based on user attributes- time-based deployment and gradual percentage rollout
Ready-to-use templates to speed up workflows
Kill switch in case an issue comes up
Visual dashboard to comfortably analyze feature performance, set goals and track them with real-time reports
Full visibility over all flags to easily create and manage flags
Server-side A/B tests with deep-level modifications beyond cosmetic changes
Option of rollback KPI to automatically turn off a feature/flag if metric crosses a certain threshold
Our feature flagging platform is particularly great for product teams wanting to delve into more advanced server-side A/B testing and experimentation as the easy-to-use dashboard can be used by all teams across an organization without any fuss.
The platform basically allows you to designate who has access to the platform determined by ‘role’ so that people across your team can track the different flags for easier and more efficient management.
Pricing
When it comes to pricing, there is a Premium plan and a custom-priced Enterprise plan based on the number of monthly active users. Unlike most other tools’ pricing plans, the plans come with a longer, 30-day free trial period to get a taste of AB Tasty and what it can do for you.
Our feature management solution comes with a host of features to help you advance your experimentation capabilities to release your software quickly and safely.
That depends. All the tools listed offer teams great capabilities, most prominent is releasing features safely and quickly through progressive delivery. If this will be the main focus for you, then opting for a simple solution focusing on toggling flags on or off is a good option.
However, if you’re looking for more advanced features, specifically for product and marketing teams to be able to test various releases across the full software stack, particularly on the server-side, and monitor their performance by tracking KPIs then going for a platform that offers deeper experimentation options is the best way to go.
All in all, it will ultimately depend on where you are in your experimentation roadmap and how far you want to delve into it.
In the previous addition to our Fun with Flags series, we discussed how to store feature flags based on the category of flags they belong to.
We also discussed how flags are broken down into categories based on their dynamism and longevity.
In this post, we will explore the differences between short- and long-lived flags and which to choose depending on the use-case. We already touched upon this difference in the previous post but here we will go into more details.
Feature flag longevity
First, we will briefly define what we mean by longevity. This concept refers to how long the decision logic for a flag will remain in a codebase.
Feature flags, or features toggles, can be broken down into the following categories. Each of these categories serve a different purpose and thus should be managed differently.
Feature toggles can be categorized as the following:
Release toggles– these are short-lived toggles that help developers in writing new features. They are usually on/off switches that control whether a feature is enabled or not. They are usually removed after the feature is released.
Operational toggles– these are used to control operational aspects of your system. They are usually used to turn features off. They can be short-lived but it’s not uncommon to have longer-lived ones that serve as kill switches.
Experiment toggles– these are used to perform A/B or multivariate tests. They will usually stay in the system for the duration necessary to generate statistically significant results from the feature testing so could be anywhere from a few weeks to months.
Permission toggles-these toggles are usually longer-lived compared to the other categories of toggles, sometimes remaining in your system for years. They are used for user segmenting or, in other words, to make features available to certain subsets of users.
As we’ve seen so far, there are different types of flags, each used for different purposes and could stay in your system from days to months, even years, depending on how they are deployed.
Being aware of the longevity of a flag is crucial for a few reasons.
First of all, it is important when it comes to implementing the flag. For example, for short-lived flags, usually an if/else statement is sufficient but for flags that are meant to stay for a longer period of time will require more sophistication to support these flags and their associated use cases.
The second reason is to avoid the accumulation of technical debt, which will be explained in further detail in the next section.
Short vs long-term feature flags
This brings us to the key differences between short- and long-lived flags.
From the above, we can conclude that short-lived flags have a limited time span, meaning that they should be removed from your system as soon as they have served their purpose.
Long-lived or, in some cases, permanent flags are used for an extended period of time, sometimes beyond the release of a feature.
Long-lived flags become part of your regular software operations and infrastructure so you create it with the intention of keeping it in your system for an indefinite period of time.
It is crucial, therefore, to constantly review the flags you have in your flags.
Why is this important?
Flags must be checked at regular intervals to avoid the accumulation of technical debt. This debt might take a toll on your system, causing major disruptions and even resulting in a total breakdown, if you don’t keep careful track of it. The more flags you add to your system, the higher this cost becomes.
Thus, the best way to minimize this cost is to conduct a regular clean-up of your flags. Remove any stale, unused flags that you no longer use; otherwise, you might end up with hundreds, or even thousands, of unused flags.
However, this may not be as simple as it sounds. Often, when flag adoption increases, many organizations could find it difficult to determine which flags are still active so this process might become time-consuming and challenging the further you are in your feature flag journey.
Let’s take a look at how to overcome this challenge…
You will need to have a process in place in which feature flags are regularly reviewed and removed from your codebase.
For short-term flags, check to see if the feature has been rolled out to all users or no users and for more long-lived flags, you should determine if the flag is still needed for one reason or another.
You should also consider setting up access control, lest someone mistakenly ends up deleting a permanent flag that you’re still very much using! Thus, consider setting up permissions for each flag to assign who can delete certain flags.
Additionally, adhering to naming conventions, which indicate the flag’s longevity is a great way to keep track of the many flags you have in your system.
An advanced feature flagging platform can give you full visibility over all the flags you have in your system.
In particular, the Flag Tracking Dashboard and enhanced Git integration give you the ability to manage tech debt and see where your flags are being used. It also gives you the ability to reference your codebase and all your AB Tasty Flags, allowing you to quickly locate the flags that you are no longer using.
To sum up…
To review what we’ve seen so far, the following table lists each category of flag and its longevity:
Category
Longevity
Release
From days to weeks (until the feature is rolled out)
Experiment
From weeks to months, depending on how long it takes to gather statistically significant results/Temporary
Operational
From months to years, depending on their use case.
Permissioning
Usually long-lasting/Permanent
Are you creating this flag for purposes of testing, rollout or feature releases? These flags are usually temporary (days to weeks) and should be removed once the feature is deployed.
Are you conducting an A/B test? This must remain long enough to gather sufficient data but no longer than that.
Are you using this flag to manage entitlements? This is when you give access to a feature to a certain segment of users. These are often long-lived or permanent flags.
As a final note: Review your flags often
In conclusion, make sure to review the flags you have in your system, particularly the short-lived ones, so that you can ensure they’re deleted as soon as possible.
The expected life-span of a flag will depend on the purpose it was created for so everyone in the team needs to have a clear understanding of the purpose of each flag in your system.
With that said, the most important takeaway is to make sure to schedule regular clean-ups to keep technical debt in check. As already mentioned, a third-party service will make the process less daunting by giving you full visibility of all your flags so that you can identify which flags need to be removed.
So far, in our Fun with Flags series, we have looked at some important best practices when it comes to feature flags including naming conventions and access control.
In this part of our series, we will be looking at the different ways feature flags can be stored based on which category they belong to.
Let’s start with a simple definition of feature flags. A feature flag is a software development practice that allows you to decouple code deployment from release, enabling quicker and safer releases.
They allow you to enable or disable functionality remotely without changing code. At its most basic, a feature flag is a file separate from your code file.
You could start off deploying feature flags using a configuration file. This is the simplest implementation method. A config file is usually used to store application settings and some flags just fall into this category.
However, this might be time-consuming as developers may need to redeploy the application after each value update to reflect the changed value. Redeploying can take some time and if your changes are mission critical you may lose some reactivity. Configuration files also don’t allow you to make context-specific decisions, meaning that flags will either be on or off for all users (only hold one specific value at a time).
This makes the most sense when you’re just starting out your feature flag journey and you wish to experiment with feature flags at a smaller scale. Additionally, this could be a viable option for static flags like a release toggle, which are feature flags that enable trunk-based development to support dev teams as they write new features.
For example, a developer may need for a kill switch to work instantaneously to kill off a buggy feature while the flipping time for a release toggle from off to on can take longer.
Such static flags, as their name implies, will be relatively static and will only change through code or configuration file changes.
To better understand how feature flag values should be stored, it’s best to start with the different categories of flags, which are based on longevity and dynamism.
Short vs long lived flags
Longevity of a feature flag, as the name suggests, refers to how long a flag will remain in your code.
Some types of flags are short-lived such as release toggles while others such as kill switches are long-lived; they will stay in your codebase often for years.
This distinction between short- and long-lived flags will influence how you go about implementing its toggle point. The longer the lifetime of a flag, the more careful you’ll need to be in choosing about choosing the toggle point location.
There are obviously different types of flags, which means these different flags cannot be managed and configured the same way. Dynamism refers to how much we need to modify a flag in its lifetime.
Therefore, feature flags can be broken down into two categories depending on how they are hosted:
Static flags-as already mentioned, these are usually hosted by a file that only changes when you want it to. These flags get hard-coded into the app at build time so the flag configuration is stored in the actual code.
Dynamic flags-usually hosted by a service that will change the value of the flag depending on the values you send with the request. This type of flag can be changed at runtime allowing for dynamic control of code execution on a user-by-user or session-by-session basis.
This means that the configuration for some types of flags needs to be more dynamic than others. For example, if you want to change a value based on a shared attribute among groups of users.
Alternative storage method: database
As an alternative to config files, feature flags can be stored in some sort of database. It is a convenient place to store your settings and they can often be easily updated.
So if you see the number of flags in your system and you need more granular controls, you might opt to deploy your flags via a database. This would allow you to target features to individual users.
Moreover, having flags in a database means that not only your developers can change values assigned to flags but also your product teams, thereby reducing dependency. This assumes that some kind of dashboard or management system is in place for other people to easily interact with the database. You’ll also probably want to keep track of changes to this database.
However, you still wouldn’t be able to do gradual rollouts or targeting users based on IDs or attributes or monitor metrics. In other words, it limits the extent of your user segmetting.
Consequently, while config files and databases are quick solutions, when you’re just starting out, they are not good in the long-term if you’re looking to scale or use more dynamic flags.
You might then consider a feature flag open source solution, which allows for simple user segmentation and controlled rollouts. Nevertheless, such solutions wouldn’t allow you to track who made changes or limit access and they are generally language specific. This could be a problem if your application uses multiple languages so you would need to deploy multiple solutions.
Feature management services
The most dynamic flags are those whose state depends on the current user. Dynamic flags need to be hosted by a service rather than a static file mentioned previously. This is because feature flag services allow you to serve different values to different types of users at runtime.
In that sense, you would target values based on user IDs or according to percentage, i.e. a feature can be seen by x% of users, or according to a certain group the users belong to, using some user traits as targeting criteria.
This also works if you’re experimenting with features, with a traditional A/B testing approach, and you need to randomly put users in different groups so the user’s ID would be sent to the service to place in a group accordingly.
Such IDs (that could be stored in cookies or localStorage…) are also useful when testing internally where a feature is turned on for internal users as detected via a special ID value. Developers would then turn these features on for themselves to make sure it’s working as it should and test directly in production.
In such situations, you would opt for a third party service to fetch values of the feature flags.
Such feature flag services would, therefore, also allow you to to choose values for each flag depending on specific attributes such as the country users are from.
For example, AB Tasty’s flagging functionality allows you to assign specific flag values to different user segments. So, internal users would be served one value and would then see the new feature while external users will be served another value.
For example, in the image below from the AB Tasty dashboard, the value that is fetched will be IOS in Scenario 1 and ANDROID in Scenario 2 so only the users matching this value will be exposed to the feature.
This is extremely useful if you want to do gradual rollouts and testing in production and for generally more advanced use-cases.
Conclusion
For advanced use-cases, it would make sense to opt for a third party solution to help you manage and implement the different types of flags in your system.
These solutions offer features such as a UI for managing configuration with access control to limit who does what as well as audit logs to determine which changes were made by whom.
Therefore, sophisticated feature management solutions like AB Tasty are built to scale and include role-based and access controls to execute more complex use-cases.
What are the top feature flags projects on GitHub? Let’s find out.
If you are into open-source software, GitHub is probably the go-to place to find interesting projects you can use for free and contribute to.
Feature flags tools are no exception. We have listed below the top 10 feature toggle repositories on github.com ranked by popularity.
If you want to explore alternatives that scale better and are suitable for more use cases, read our article about feature flag implementation journey where we answer the question: should I build or buy a feature flag platform.
Unleash is the open-source feature management platform. It provides a great overview of all feature toggles/flags across all your applications and services. Unleash enables software teams all over the world to take full control on how they deploy new functionality to end users.
Flipper gives you control over who has access to features in your app.
Enable or disable features for everyone, specific actors, groups of actors, a percentage of actors, or a percentage of time.
Configure your feature flags from the console or a web UI.
Regardless of what data store you are using, Flipper can performantly store your feature flags.
Use Flipper Cloud to cascade features from multiple environments, share settings with your team, control permissions, keep an audit history, and rollback.
Piranha is a tool to automatically refactor code related to stale flags. At a higher level, the input to the tool is the name of the flag and the expected behavior, after specifying a list of APIs related to flags in a properties file. Piranha will use these inputs to automatically refactor the code according to the expected behavior.
This repository contains four independent versions of Piranha, one for each of the four supported languages: Java, JavaScript, Objective-C and Swift.
Flagr is an open source Go service that delivers the right experience to the right entity and monitors the impact. It provides feature flags, experimentation (A/B testing), and dynamic configuration. It has clear swagger REST APIs for flags management and flag evaluation.
Flipt is an open source, on-prem feature flag application that allows you to run experiments across services in your environment. Flipt can be deployed within your existing infrastructure so that you don’t have to worry about your information being sent to a third party or the latency required to communicate across the internet.
Flipt supports use cases such as:
Simple on/off feature flags to toggle functionality in your applications
Rolling out features to a percentage of your customers
Using advanced segmentation to target and serve users based on custom properties that you define
Togglz is another implementation of the Feature Toggles pattern for Java.
Modular setup. Select exactly the components of the framework you want to use. Besides the main dependency, install specific integration modules if you are planning to integrate Togglz into a web application (Servlet environment) or if you are using CDI, Spring, Spring Boot, JSF.
Straight forward usage. Just call the isActive() method on the corresponding enum to check if a feature is active or not for the current user.
Admin console. Togglz comes with an embedded admin console that allows you to enable or disable features and edit the user list associated with every feature.
Activation strategies. They are responsible for deciding whether an enabled feature is active or not. Activation strategies can, for example, be used to activate features only for specific users, for specific client IPs or at a specified time.
Custom Strategies. Besides the built-in default strategies, it’s easy to add your own strategies. Togglz offers an extension point that allows you to implement a new strategy with only a single class.
Feature groups. To make sure you don’t get lost in all the different feature flags, Togglz allows you to define group for feature that are just used for a visual grouping in the admin console.
FunWithFlags is an OTP application that provides a 2-level storage to save and retrieve feature flags, an Elixir API to toggle and query them, and a web dashboard as control panel.
It stores flag information in Redis or a relational DB (PostgreSQL or MySQL, with Ecto) for persistence and synchronization across different nodes, but it also maintains a local cache in an ETS table for fast lookups. When flags are added or toggled on a node, the other nodes are notified via PubSub and reload their local ETS caches
In the previous post in this series, we mentioned how important it is to adhere to naming conventions to keep track of your flags, such as who created them and for what purpose.
We also mentioned that in a worst case scenario without such conventions, someone could accidentally trigger the wrong flag inciting disruptions within your system.
This brings us to why it’s also essential to manage and control who has access to the flags in your system. Without access control, you might also risk someone switching on a faulty feature and going live to your user base.
Consequently, access control should be used to manage the level of control people across your organization have and restrict usage if necessary.
The general rule of thumb is to only give users the kind of access they require to do their job, not more and not less.
Let’s look at a practical example…
AB Tasty, for example, offers a feature flagging functionality that is designed to be used by product and marketing teams as well as developers while offering fine control over user access.
As you can see in the image above, there are different categories of access under ‘Role’ in the AB Tasty dashboard. There are 4 categories overall, which are divided as follows:
SuperAdmin- this is the category with the highest access privileges. The SuperAdmin can do anything from creating a project to toggling on/off a use case as well as access reporting.
Admin- the Admin can do almost anything a SuperAdmin can except create, delete or rename a project
User
Creator
Viewer
User, Creator and Viewer have varying but lower levels of access with Viewer having the lowest level of access.
It’s essential that as your use-cases grow and as you go further along the feature flag journey, you are able to manage access for users at a detailed level.
This is also useful when you’ve scheduled regular flag clean-ups to avoid technical debt. By implementing access control, you’ll minimize the risk of having someone on your team accidentally delete a permanent flag. Similarly, it allows teams to track short-lived flags they created so that they can delete them from your system to avoid accumulation of technical debt.
This way, each flag owner would be responsible for assessing the flag they own and keep tabs on it by grouping flags by owner instead of allocating the task of auditing the entire set of flags in your system at random.
Determining who gets access to what
As you’ve seen so far, different teams within your organization could and should have different levels of visibility and access to flags.
Once you’ve decided who gets access to which flags, you’ll need to consider how to control access.
Are technical teams the only ones allowed to make changes or will other teams such as your product and marketing teams get access to flags too? If so, you might need a sophisticated control panel to help them make changes.
Opting for feature flags as a service from a third party will make this process easier rather than building your own system as such services would provide you with a rich UI control panel without costing you too much time and money.
In contrast, building your own advanced feature flag service could drain your resources, especially as your use cases become more advanced and as more of your teams start using this service simultaneously.
Read more about whether you’re better off building or buying a feature flagging management system.
Audit logs
One way to track changes and control access to feature flags is by constructing an audit log. Such a log would help you keep track of all changes being made to each feature flag, such as who made the changes and when.
It allows for complete transparency, giving full visibility over the implementation of any feature flag changes in your system.
Because flag configuration carries risk, having an audit trail of change is crucial, especially when flags are being used in a highly regulated environment such as in finance or healthcare.
Thus, this makes the process more secure when you restrict access to the number of people allowed to make changes to sensitive flags.
Why does this matter?
At this point, you may be wondering why you should even be considering giving all your teams, especially your non-technical teams access to feature flags.
While your team of developers are the ones who create these flags, it is usually your marketing or product teams who will decide when to release a feature and for what purpose. They are the ones that are working closely with your customers and know their needs and preferences.
It is usually the case that your marketing team is the one forming these experiments in the first place to test out a new idea and this team would know who are the most relevant users to test on.
Therefore, the marketing team would often be the one who’s handling the experimental toggles, for example, to run A/B tests.
Meanwhile, operational toggles such as a kill switch are usually handled by the operations team.
When you have a clear-cut UI panel, you are restricting what those teams can do so each team focuses on managing the flags they’re actually responsible for without allowing any room for error.
A management system should allow you to keep track of your toggles, who created them and who can flip them on and off safely.
Conclusion
It’s important that you ensure you have full visibility over the flags in your system and that everyone across your teams know their level of responsibility when it comes to implementing feature flags.
Most sophisticated feature management solutions provide role-based access controls as well as an audit log for flags and contributors for increased transparency over your flags.
With such solutions, you would have an easy to use interface that allows you to expand feature management beyond your development team in a safe and controlled manner.
Feature flags are an indispensable tool to have when it comes to software development and release that can be used for a wide range of use-cases.
You know the saying ‘you can never have too much of a good thing’? In this case, the opposite is true. While feature flags can bring a lot of value to your processes, they can also pose some problems particularly if mismanaged. Such problems particularly come about when using an in-house feature flagging platform.
In this series of posts of ‘Fun with Flags’, we will be introducing some essential best practices when it comes to using and implementing feature flags.
In this first post, we will focus on an important best practice when it comes to keeping your flags organized: naming your flags.
What are feature flags?
First things first, let’s start with a brief overview of feature flags.
Feature flags are a software development practice that allows you to turn certain functionalities on and off to safely test new features without changing code.
Feature flags mitigate risks of new releases by decoupling code deployment from release. Therefore, any new changes that are ready can be released while features that are still a work-in-progress can be toggled off making them invisible to users.
There are many types of feature flags, categorized based on their dynamism and longevity that serve different purposes.
As the number of flags within your system grows, the harder it becomes to manage your flags. Therefore, you need to establish some practices in order to mitigate any negative impact on your system.
It is because of these different categories of flags that establishing a naming convention becomes especially important.
Click here for our definitive guide on feature flags.
What’s in a name?
Defining a name or naming convention for your flags is one essential way to keep all the different flags you have in your system organized.
Before creating your first flag, you will need to establish a naming convention that your teams could adhere to when the time comes to start your feature flag journey. Thus, you need to be organized from the very beginning so as not to lose sight of any flags you use now and in the future.
The most important rule when naming your flags is to try to be as detailed and descriptive as possible. This will make it easier for people in your organization to determine what this flag is for and what it does. The more detailed, the less the margin for confusion and error.
We suggest the following when coming up with a naming convention:
Include your team name– this is especially important if you come from a big organization with many different teams who will be using these flags.
Include the date of creating the flag– this helps when it comes to cleaning up flags, especially ones that have been in your system for so long that they’re no longer necessary and have out-served their purpose.
Include a description of the flag’s behavior.
Include the flag’s category– i.e. whether it’s permanent or temporary.
Include information about the test environment and scope as in which part of the system the flag affects.
Let’s consider an example…
Let’s say you want to create a kill switch that would allow you to roll back or turn off any buggy features.
Kill switches are usually long-lived so they may stay in a codebase for a long time, meaning it is essential the name is clear and detailed enough to keep track of this flag since its use can extend across many contexts over a long period of time.
The name of such a flag could look something like this:
algteam_20-07-2021_Ops_Configurator-killswitch
Following the naming convention mentioned above, the first part is the name of the team followed by the date of creation then the category and behavior of the flag. In this case, a kill switch comes under the category of operational (ops) toggles.
Using such a naming convention allows the rest of your teams across your organization to see exactly who created the flag, for what purpose and how long it has been in the codebase.
Why is this important?
Sticking with such naming conventions will help differentiate such long-lived flags from shorter-lived ones.
This is important to remember because an operational toggle such as a kill switch serves a vastly different purpose than, for example, an experiment toggle.
Experiment toggles are created in order to measure the impact of a feature flag on users. Over the course of your feature flag journey, you may create numerous flags such as these to test different features.
Without an established and well-thought out naming convention, you’ll end up with something like ‘new-flag’ and after some time and several flags later, this naming system becomes tedious and repetitive to the point when you cannot determine which flag is actually new.
In this case, you might want to opt for something more specific. For example, if you want to test out a new chat option within your application, you’ll want to name it something akin to:
Markteam_21-07-2021_chatbox-temp
Such a name will clue you into who created it and what this flag was created for, which is to test the new chat box option and of course, you will know it’s a temporary flag.
This way, there will be no more panic from trying to figure out what one flag out of hundreds is doing in your system or ending up with duplicate flags.
Or even worse, someone on your team could accidentally trigger the wrong flag, inciting chaos and disruption in your system and ending up with very angry users.
Don’t drown in debt
Making a clear distinction between the categories of flags is crucial as short-lived, temporary flags are not meant to stay in your system for long.
This will help you clean up those ‘stale’ flags, otherwise they may end up clogging your system giving rise to the dreaded technical debt.
To avoid an accumulation of this type of debt, you will need to frequently review the flags you have in your system, especially the short-lived ones.
This would be no easy task if your flags had names like ‘new flag 1’, ‘new flag 2’, and well, you get the gist.
A wise man once said…
…“the beginning of wisdom is to call things by their proper name” (Confucius). In the case of feature flags, this rings more true than ever.
Whatever naming convention you choose that suits your organization best, make sure that everyone across all your teams stick to them.
Feature flags can bring you a world of benefits but you need to use them with caution to harness their full potential.
With AB Tasty’s flagging functionality, you can remotely manage your flags and keep technical debt at bay by providing you with dedicated features to help you keep your feature flags under control.
For example, the Flag Tracking dashboard within the AB Tasty platform lists all the flags that are set up in your system so you can easily keep track of every single flag and its purpose.
In this article, we’ll cover how to implement feature flags in Java using our Java SDK and also discuss other open-source Java frameworks available on Github. If your are using the Spring framework, this article will suit you well.
Overview of the feature flag pattern
Feature flags are a powerful software development tool that turns certain functionalities on and off without the need to deploy new code, and without any service disruptions. Feature flags can be used for a wide range of purposes, from kill switch to targeted releases (ex: ring deployments, canary deployments), through feature testing. Thus, a feature flag ranges from a simple IF statement to more complex decision trees, which act upon different variables.
As its core, it provides a Decision API to assign and retrieve feature flag values for your users (e.g. what value a flag should be for a specific user), so you don’t have to mess with complex configuration files or manage a dedicated infrastructure to store all the different flag values.
The “Decision” part in the name refers to built-in intelligence that is key to maintain flag values consistency between different user sessions or for instance when an anonymous users gets authenticated to your application.
White this REST API is language-agnostic by design, we provide several server and client-side SDKs. Here, we’ll discuss the Java SDK that includes preconfigured methods to implement the Decision API. Refer to our developer documentation for more details.
Setting feature flags with AB Tasty Java SDK
Using our cloud-based feature management service is a 2- step process. First, in your codebase, you wrap your features once with flags using methods from the Java SDK. Once this is done, you remotely configure your flags (values, segments…) from the dashboard. Let’s see both steps in details.
Setting up the Java SDK
Installation and initialization
First, you need to add the Java repository to your dependency manager. You can use Maven or Gradle build tools to do so:
To initialize and start the SDK, simply call the start function of the class, in the most appropriate location for your application. You need to pass two parameters: your environment id and your API authentication key. Both values are available from the user interface (UI), once you are logged in.
The visitor instance is a helper object that lets you manage the context and campaigns for a user identified by a unique ID.
The user context is a property dataset which defines the current user of your app. This dataset is sent and used by the Decision API as targeting criterias for campaign assignment.
For example, if you want to enable or disable a specific feature based on a VIP status, you would pass this attribute as a key-value pair in the user context so that the Decision API can enable or disable the corresponding feature flag for the user.
The first parameter of the method is the Unique visitor identifier, while the second is the initial user context.
You can also update the visitor context when required. The following method from the Visitor instance allows you to set new context values matching the given keys.
The synchronizeModifications() method of the visitor instance automatically calls the Decision API to run feature flag assignments according to the current user context.
<pre><code class="language-java line-numbers"><!--
Visitor visitor = Flagship.newVisitor("YOUR_VISITOR_ID")
visitor.updateContext("isVip", true)
visitor.synchronizeModifications().whenComplete((instance, error) -> {
    // Asynchronous non blocking call
    // Synchronization has been completed. Do stuff here...
});
--></code></pre>
Once the campaign has been assigned and synchronized, all the modifications are stored in the SDK. You can retrieve these modifications using the getModification method from the Visitor instance. It retrieves a modification value by its key. If no modification matches the given key or if the stored value type and default value type do not match, default value will be returned.
The getModification method accepts a third argument, that, if set to true will automatically report on our server that the current visitor has seen this specifc variation. It is also possible to call activateModification() later.
Our Universal Collect protocol provides a unified hit format to send data back to our server-side solution for reporting purposes. The format of the hit is based on the Google Analytics measurement protocol. By sending hits to our platform, you can measure the impact of a feature on different metrics such as pageviews, screenviews, transactions or generic events.
To send hits, you must call the sendHit method from the Visitor instance:
<pre><code class="language-java line-numbers"><!--
// Pageview hit
Page page = new Page("https://www.my_domain_com/my_page")
visitor.sendHit(page);

// Sreenview hit
Screen screen = new Screen("screen location")
    .withResolution(200, 100)
    .withLocale("fr_FR")
    .withIp("127.0.0.1")
    .withSessionNumber(2);
visitor.sendHit(screen);

// Transaction hit
Transaction transaction = new Transaction("#12345", "affiliation")
    .withCouponCode("code")
    .withCurrency("EUR")
    .withItemCount(1)
    .withPaymentMethod("creditcard")
    .withShippingCosts(9.99f)
    .withTaxes(19.99f)
    .withTotalRevenue(199.99f)
    .withShippingMethod("1day");
visitor.sendHit(transaction);

// Generic Event hit
Event event = new Event(Event.EventCategory.ACTION_TRACKING, "action")
    .withEventLabel("label")
    .withEventValue(100);
visitor.sendHit(event);
--></code></pre>
To create a feature flag from the dashboard, apply the following steps:
Go to the dashboard.
Click the + button.
Choose an existing project or create a new one
Click the “Add a use case” button.
You are presented with a list of different templates or use cases (ex: progressive rollout, A/B test…)
Choose the “Feature toggling” template.
Entering the basic information
First, you need to enter the basic information of your feature flag use case:
The feature name: use the most representative name for your feature, because this is the one you’ll need to remember in case you want to find it later.
The feature description: explain exactly what your feature deployment is about and what its purpose for your business is.
The primary/secondary metric to follow (optional) which will serve as a point of reference to analyze performance. For more information, refer to Configuring KPIs.
Defining flags
This is where you configure the flags and their values based on your different scenarios. Think of it as the config file mentioned in the first method, but that you manage remotely from the cloud. Important: flag names you specify here should match the ones used in your codebase.
Defining targeting
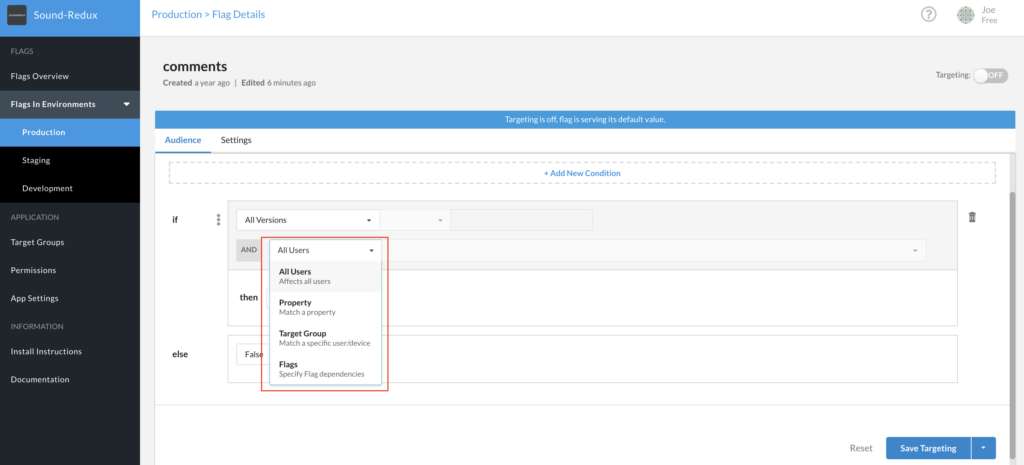
During this step, you can define which users will be assigned to your different flag values. This is a segmentation engine built into the platform that makes it easy to assign flags conditionally based on user traits (or attributes) that you have access to in your codebase. Refer to this article about feature flag targeting for more information. The 3 following options are available:
All Users if you want all your users to progressively see your feature.
Users by ID if you want only users with a specific ID to see your feature.
Key if you only want users matching this key value to see your feature.
Enabling your feature
Once you have configured your feature, it is OFF by default to allow you to check that it is correctly configured. Back to the dashboard, you can activate your feature ON when you are ready!
And that’s it. Now, provided changes to your codebase have been deployed, you can activate/deactivate feature flags, remotely change their values and have your Java Application react instantly to these changes.
Open-source feature flag frameworks for Java
For the sake of completeness, we list here open source alternatives if you are using Java. While there are pros and cons to each approach, the third-party vendor option is probably the most efficient method for large teams with evolving use cases that don’t want to deal with the challenges of an in-house system.
Keep reading: The Journey of Feature Flag Implementation (Build vs. Buy) where we discuss the pros and cons of different options when it comes to choosing between to build, use an open-source project or buy a feature flag management solution.
FF4J – Feature Flipping for Java
FF4j, is an implementation of the Feature Toggle pattern for Java. It provides a rich set of features:
Enable and disable features at runtime – no deployments.
Enable features not only with flag values but also drive access with roles and groups.
Implement custom predicates to evaluate if a feature is enabled.
Keep your code clean and readable: Avoid nested if statements but use annotations.
Each action (create, update, delete, toggles) can be traced and saved in the audit trail for troubleshooting.
Administrate FF4j (including features and properties) with the web UI.
Wide choice of databases technologies to store your features, properties and events.
(Distributed) Cache Evaluating predicates may put pressure on DB (high hit ratio).
Togglz is another implementation of the Feature Toggles pattern for Java.
Modular setup. Select exactly the components of the framework you want to use. Besides the main dependency, install specific integration modules if you are planning to integrate Togglz into a web application (Servlet environment) or if you are using CDI, Spring, Spring Boot, JSF.
Straight forward usage. Just call the isActive() method on the corresponding enum to check if a feature is active or not for the current user.
Admin console. Togglz comes with an embedded admin console that allows you to enable or disable features and edit the user list associated with every feature.
Activation strategies. They are responsible for deciding whether an enabled feature is active or not. Activation strategies can, for example, be used to activate features only for specific users, for specific client IPs or at a specified time.
Custom Strategies. Besides the built-in default strategies, it’s easy to add your own strategies. Togglz offers an extension point that allows you to implement a new strategy with only a single class.
Feature groups. To make sure you don’t get lost in all the different feature flags, Togglz allows you to define group for feature that are just used for a visual grouping in the admin console.
Unleash is an open-source feature management platform. It provides an overview of all feature toggles/flags across all your applications and services. You first need to setup an Unleash server that you self-host, and then use a client SDK to connect your application to the server. A Java Client SDK is available and provides features such as:
Boolean feature toggles (on/off)
Canary release (Gradual rollout)
Targeted release
Experimentation (A/B testing)
Kill switches
Custom activation strategies
Privacy first (GDPR) where end-user data never leaves your application
Audit logs
Addons integrating with other popular tools (Slack, Teams, Datadog, etc.)
Feature flags, or toggles, as described by Martin Fowler are a “powerful technique, allowing teams to modify system behavior without changing code.” In other words, implementing feature flags as a set of patterns is a robust way to manage code complexity and deliver new features to users using CI/CD (continuous integration/continuous delivery) pipelines, reducing the time to value and decreasing the risk of deploying buggy, error-ridden code to production.
Feature flags are an integral part of deploying software updates via CI/CD pipelines without disrupting existing functionality. There are several ways to implement feature flags in your React apps. Let’s consider three of the most popular and common ways:
The do-it-yourself method where the developer writes the feature flag code from scratch.
The use of open-source libraries that are integrated into the React Single-Page Application (SPA).
Signing up with a cloud based solution (feature flag as a service).
Do it yourself: A simple and free solution
This method requires you to write code, switching feature flags on and off directly in JavaScript. By expanding on this method, let’s consider a simple use case, including code samples from a feature flag React app project, before looking at the primary pros and cons of this method.
1. Setting up the React project
If you already have your React project set up, you can skip to the next section, “Adding new feature flags” otherwise, here is a step-by-step guide to setting up a new project.
The reactjs.org website notes that the create-react-app is the easiest way to develop a new single-page application with React.
Therefore, use the following code to create a new boilerplate app:
npx create-react-app my-app
cd my-app
npm start
2. Adding new feature flags
Now that we have the project created and an empty app template, let’s look at how to add a feature flag in React.
The first step is to create a React js feature flag file with the following format used to create new features. This will act as your config file that you’ll update every time you want to turn on/off a specific feature.
Each feature flag must have a unique name that we can later call or reference in React. A short description is also needed to describe the functionality it adds and an active flag to determine whether the toggle is on or off.
As seen from the code snippet for creating a banner flag, our flags are stored inside an array.
To store these flags in local storage, add the following function to your app.js file and call it at the top of your feature component file.
Note: This will create 3 new feature flags if there are no feature flags created in local storage (localStorage). You also need to use the JSON.stringify () method to convert the JavaScript objects into strings as localStorage can only handle strings.
3. Adding the feature component
In order to reference these feature flags in React and show/hide features based on these feature flags, you need to create a new React component <Feature />. Define it in a file called feature.js and store it in your src folder.
This component accepts 2 props:
the flag name to check against,
the child content to be used (children prop).
The first step is to get the feature from localStorage and see if it is set to active or not. If the feature is active, we can render the feature; otherwise, we return null.
This component will handle the toggling of feature flags on and off. Finally, you just import and render the component where you need.
Pros
There are several advantages to using this method. The most obvious being the fact that when writing your own feature flag code, it is free, easily accessible, and highly available for small React feature toggle projects.
Cons
However, what happens when your application grows in scale, and you need to create and manage several different feature flags, both long- and short-lived?
This is where this method’s disadvantages come to the fore. Succinctly stated, this method is difficult to scale where lots of flags are utilized. And as you can see from the code samples highlighted above, advanced features require more development work which can be challenging and complicated to maintain.
Feature flag open-source libraries for React
The second method is to use existing libraries that you can find on Github. A simple search will lead you to multiple open-source libraries or packages to do feature flagging. Here are a few examples of these packages for React:
Flagged, for instance, provides nice features such as:
Hooks API
High Order Component API
Render Props API
TypeScript Support
Zero Dependencies
Nested Flags
Pros
The advantages of using these open-source libraries are that they are freely available, easy to use, and quick to set up. As described above, all you need to do is consume the libraries into your application and then call the functions created in the library files, passing in variables as required and reading returned variables to understand the state of your feature flags.
Cons
However, as with everything, there are also disadvantages to using open-source feature flag libraries. The most prominent includes the fact that maintenance and evolution are not guaranteed, and the library’s functional scope might not suit your app’s specific requirements. In both cases, a fair amount of refactoring and new code development will have to take place to maintain the existing code and add the features specific to your application.
Feature flag management platforms
The third and last way to implement feature flags in a single-page application is using a dedicated feature flag management 3rd-party service that provides a React integration.
By way of expanding on this statement, let’s look at a step-by-step guide on how to set up feature flags in our server-side solution with the React SDK. As an alternative, you can also directly call the Decision API (REST API), but for the sake of simplicity we’ll use the dedicated SDK that provides additional capabilities out of the box (ex: bucketing). The platform also provides additional SDKs for Java, Python, PHP, .Net, Go, iOS, Android, Flutter…
Using our cloud-based feature management service is a 2- step process. First, in your codebase, you wrap your features once with flags using methods and providers from the React SDK. Once this is done, you remotely configure your flags (values, segments…) from the dashboard.
1. Set up the React SDK in your SPA project and wrap features with flags
Let’s use the same project that we created in the first method (Setting up the project) using our create-react-app boilerplate app.
Install the SDK using NPM or yarn.
npm install @flagship.io/react-sdk
Import the our provider from the React SDK which makes the tool’s features available to the rest of your app. You can wrap your app directly within the app.js file.
The envID and apiKey props are required. You access them from the UI under the “Settings” section. For more information on the different props available, please refer to the API references.
Then, from the React component you want to get access to your flags, import and use one of our React Hook. It gets modifications assigned to the current user as well as further functionalities, such as sending hit tracking, checking the SDK status…
You can refer to this short video that goes through all the process of a feature flag setup or read the detailed instructions below.
Creating your feature flag use case
To create a feature flag from the dashboard, apply the following steps:
Go to the dashboard.
Click the + button.
Choose an existing project or create a new one
Click the “Add a use case” button.
You are presented with a list of different templates or use cases (ex: progressive rollout, A/B test…)
Choose the “Feature toggling” template.
Entering the basic information
First, you need to enter the basic information of your feature flag use case:
The feature name: use the most representative name for your feature, because this is the one you’ll need to remember in case you want to find it later.
The feature description: explain exactly what your feature deployment is about and what its purpose for your business is.
The primary/secondary metric to follow (optional) which will serve as a point of reference to analyze performance. For more information, refer to Configuring KPIs.
Defining flags
This is where you configure the flags and their values based on your different scenarios. Think of it as the config file mentioned in the first method, but that you manage remotely from the cloud. Important: flag names you specify here should match the ones used in your codebase (“btnColor” in your code example above).
Defining targeting
During this step, you can define which users will be assigned to your different flag values. This is a segmentation engine built into the platform that makes it easy to assign flags conditionally based on user traits (or attributes) that you have access to in your codebase. Refer to this article about feature flag targeting for more information. The 3 following options are available:
All Users if you want all your users to progressively see your feature.
Users by ID if you want only users with a specific ID to see your feature.
Key if you only want users matching this key value to see your feature.
Enabling your feature
Once you have configured your feature, it is OFF by default to allow you to check that it is correctly configured. Back to the dashboard, you can activate your feature ON when you are ready!
And that’s it. Now, provided changes to your codebase have been deployed, you can activate/deactivate feature flags, remotely change their values and have your React App react instantly to these changes.
Last thoughts
This article describes three ways of implementing feature flags in a React SPA (single-page application):
the do-it-yourself method,
using open-source libraries,
signing up with a dedicated feature management platform.
While there are pros and cons to each approach, the third-party vendor option is probably the most efficient method for large teams with evolving use cases that don’t want to deal with the challenges of an in-house system. For more details, read our article The Journey of Feature Flag Implementation.
Developers can create feature toggles by coding a “decision point” where the system runs a given feature depending on whether specified conditions are met. In other words, feature toggles allow you to quickly and efficiently deliver context-sensitive software.
Feature toggles have a wide range of possible applications for everything from supporting agile development, to market testing, to streamlining ongoing operations. However, with this power comes the potential for introducing unnecessary complexity into your code. You need to properly manage feature toggles to get the most from them.
In this article, we’ll give you an overview of precisely what feature toggles can do, how you can implement them in your development and production environments, and share some of our own recommended best practices for using them.
[toc]
What exactly is a feature toggle?
In the simplest possible case, a feature toggle is a powerful “if” statement, from which at least one of two different codepaths is followed at runtime depending on a condition or conditions provided. Here is a straightforward example:
In this Python code sample, we have defined two different, generic features: normalFeature and testFeature. At runtime, the application checks in configuration to see whether an internal test user is loading it. If so, the application loads the test feature under development. If not, the regular customer sees the current feature.
Example of a feature toggle controlling two codepaths (Source)
Feature toggles can be anything from a simple “if” statement to complex decision trees, which act upon many different variables. A wide variety of conditions, including fitness test results from other features in the codebase, a setting in feature management software, or a variable provided by a config file, can be used to determine which way a toggle flips.
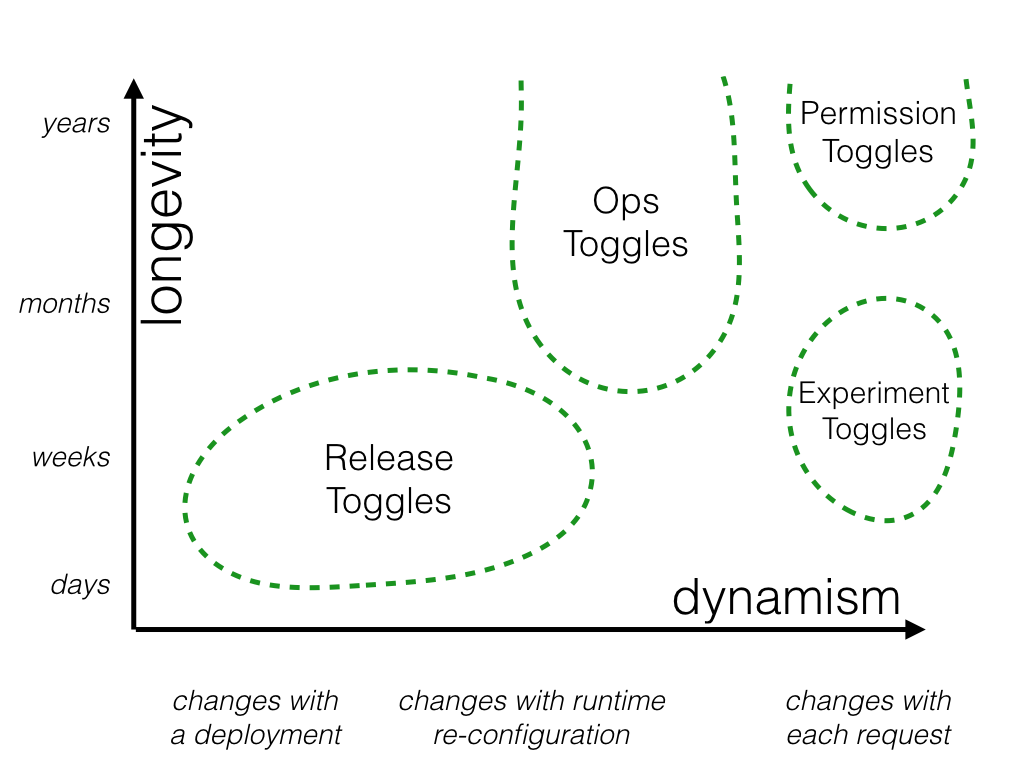
Different feature toggles for different tasks
You should manage feature toggles differently depending on how you deploy them. One useful way to think about toggles is to break them down into categories across two dimensions: their longevity in your development and operational processes and how dynamic their function is. Considered this way, we can break feature toggles out into four different categories:
Release toggles
Experimental toggles
Operational toggles
Permission toggles
A chart of the four feature toggle categories (Source)
Release toggles usually aren’t meant to be permanent fixtures in your codebase. You should remove them once their associated feature is complete. In practice, this usually means they have a lifecycle of a few days to a few weeks, which puts them lower on the longevity scale. Release toggles also tend not to be very dynamic. Either the feature is ready for release, or it isn’t.
Release toggle example
An e-commerce company has a new configurator tool in development at the request of one high-profile customer. The configurator monitors items the customer has already selected for a built-out and suggests item sets to complete their order.
The company eventually wants to roll out that feature to all customers, but for now, the configurator only works within that one customer’s specifications. The configurator’s dev team enables a release toggle for this new feature that keeps it inactive.
Experiment toggles
These toggles are used to facilitate A/B testing or multivariable testing. You create a toggle point beyond which the different features you want to test are down two or more different code paths. At runtime, the system —or the toggle itself— splits users into different cohorts and exposes them to the different features.
Usually, experiment toggles should only exist as long as data needs to be gathered for feature testing. The exact timeframe will depend on traffic volume to that feature, but typically that means on the order of several weeks to several months. This constraint is more about the test itself than the toggle. The value of the data collected will diminish over time as other feature and code updates invalidate comparisons to earlier gathered user data.
Experiment toggle example
Our e-commerce company has finished debugging its new configurator, but there is some debate over which of the two suggestion algorithms provides the best experience. They decide to set up an A/B test to get some real-world data.
They add an experiment toggle to the production configurator with the two different suggestion algorithms behind it. The toggle splits users into two cohorts with a modulo when they try loading the configurator. After three weeks, the team feels they have conclusive data showing more users complete their orders using the B algorithm. The e-commerce company removes the experiment toggle, and that algorithm goes live for all users.
Operational (Ops) toggles are used to turn features off —like a “kill switch“— or otherwise adjust their performance. For example, if certain conditions are not met, such as KPI targets dipping below a threshold, the toggle turns that feature off until conditions improve. Operational toggles are useful to code in front of new features just out of testing or in front of resource-intensive features.
The longevity of ops toggles varies depending on their specific use case. If you’re using one to regulate a new feature just out of development, you probably only need the toggle in place for a couple of months. On the other hand, a kill switch toggle is usually designed to be a permanent code fixture. Ops toggles usually are as static or dynamic as the conditions under which the feature they control will operate. For example, ops toggles tied to just one performance metric tend to be relatively static.
Operational toggle example
Our e-commerce company is preparing for a spike in traffic ahead of their popular annual sale. This will be the first such sale with the configurator in production. During testing, devs noticed the user-preferred B algorithm was a little greedy with system resources.
The operators ask for a kill switch to be coded for the configurator before the sale goes live. They just want a single toggle they need to click in their release management software should performance degrade. Lo and behold, on the first day of the sale, the configurator begins to degrade performance, and ops staff quickly kill it before too many users notice.
Permission toggles
Permission toggles are intended to be longer-lived or even permanent fixtures in your code. They are used as a method to make features available to specific subsets of users. For example, you might use a permission toggle to show premium content only to premium users logged into your site. Permission toggles tend to be the most dynamic of the four categories defined here, as they usually trigger on a per-user basis.
Permission toggle example
The simple example at the beginning of this article is close to what a permission toggle might look like. After the annual sale is complete, our e-commerce company decides algorithm B is too resource-intensive to make it available to their entire user population. Instead, they decide to make it a premium feature.
Feature toggles vs. feature flags
As a brief aside, there is some debate over the name feature toggle as opposed to feature flag. “Toggle” is a more appropriate name when code is turned on or off for a few major code branches. “Flag” is a more appropriate term if a decision point is followed by a very multi-conditional or broad set of codepaths.
Including feature toggles in your roadmap supports agile workflows
Applying feature toggles to your development process supports newer agile approaches. You can release software even while code sprints on new features are still in progress. Those features just need to be hidden behind toggles until they’re ready for release, market testing, or whatever the next stage in their development is.
You would usually write the user’s newly requested features on code branches under more traditional waterfall development models. Those features would then go through a lengthy testing and QA process before your team could integrate them back into trunk code. Using feature toggles, you can perform the entire development and testing process right on trunk code.
Our best practices for using feature toggles
As we’ve discussed, feature toggles are a powerful and flexible development method. If you don’t carefully implement and manage your toggles, they can quickly lead to a messy codebase or increased technical debt.
Many different best practices for coding feature toggles have been proposed, but we wanted to offer some of our own. Once one messy decision point is written into your codebase, many more seem to follow. Applying these best practices from the start will help keep problems like that in check.
Website code under development (Source)
Use feature toggles to gradually transition to agile development
If your team wants to try out agile development and testing methodologies without jumping entirely into a new development methodology, then introducing feature toggles into your roadmap is an excellent place to start. The cost to try them out is low. You could just have one team try using an experimental toggle for a single canary deployment they’re working on, for example.
If the trial goes well, you can replace that experimental toggle with an ops toggle when the feature goes into production. Then expand toggle use to other teams or other processes from there. Introduce them earlier in development cycles as release toggles. Then, slowly but surely, you’ll be on your way to full agile development.
Use toggles for both internal and external features
As should be clear by now, feature toggles have uses throughout the development and production lifecycle of your software. Don’t limit your toggle usage to just customer-visible features. You can use release and operational toggles to manage backend features too. They give DevOps teams a very granular level of control and risk management over code, which can be important when modifying backend features that have a wide-ranging impact on how your system performs.
Include toggle planning in your design phase
Everything from toggle naming, configuration settings, removal processes, and access control trickles down from how you first feature design new features. Build that toggle planning into your design process, and feature management six months from now will be greatly simplified.
Have a standardized toggle naming scheme
Many organizations use a style guide to regulate how developers write and organize code. For example, how they employ everything from spacing, ordering, and parentheses, to naming. If you’re going to use feature toggles, you should also standardize your naming style early in your toggle adoption process.
Brevity is essential in other aspects of coding, but when it comes to toggle names, be verbose. Detail means clarity. Verbose toggle names help devs and ops staff outside your core understand what they’re looking at when their only reference is the toggle name you chose on a whim six months ago.
Some other toggle naming conventions we suggest adopting include:
Include the team or the project name.
Include the toggle’s creation date.
Identify the flag’s category.
Be descriptive of the toggle’s actual behavior.
Here is an example: algteam_10-12-2021_Ops_configurator-killswitch
This name gives some useful information someone on any team can use to understand what they’re looking at when a toggle is called in an error message. They know who wrote the toggle, how long it has been sitting in the codebase, and what the toggle does.
This practice sounds self-evident, but it is an important point to underline. As we discussed above, feature toggles can be divided into four general categories. You should manage each of those four categories differently.
Think about our configurator example from earlier as it moved from development to market testing to operational management. The configurator code sat behind a feature toggle of one kind or another the entire time. But the way the development and product teams interact with that toggle needs to change at every stage.
During early development, the toggle might just be configured in source control. Then while the e-commerce company is doing A/B testing, the toggle might be in a feature management platform. When the ops team adds a kill switch, they may decide they want it in the same feature management platform but on a different dashboard.
Always expose feature toggle configurations
As with any other code object, it is beneficial to document feature toggle configurations as metadata, so other developers, testers, and production staff have a “paper trail” they can follow to understand precisely how your feature toggle runs in a given environment. Ideally, store your toggle configurations in a human-readable format so that it is easy for people outside your team to understand what a toggle does.
This best practice is beneficial for features you expect to be toggled for a long time. Think about our configurator example again. A brand new product operator trying to understand a sudden, unexpected performance slowdown will be very grateful to have a human-readable file explaining that the B algorithm was surprisingly resource-intensive in testing a year earlier.
Keep the holding costs of feature toggles in check
When first using feature toggles, try to resist the temptation to use them everywhere in your code all at once. While feature toggles are easy to create, their use requires proper management and testing to realize any benefit. Scale up your feature toggle usage slowly, or consider integrating a feature management platform into your development and testing environments.
Deploy feature toggles strategically and keep your inventory of toggles as low as possible. Use them wherever necessary, but make sure there is a process for vetting whether toggles are the appropriate method for solving a particular problem.
Don’t let old toggles hang around in your code. Prune them as soon as their lifecycle has run its course. The more idle toggles your code has, the greater the management overhead that falls on your team. You can manage toggle removal by adding code cleanup tasks to your team’s backlog or building the process into your management platform.
Keep toggle scope as small as possible
Since toggling can be so powerful, it is often tempting to put large swaths of code under the control of a complex series of toggles. Resist this urge and keep feature toggling within as small a scope as possible to complete any given task.
If a toggle overlaps more than one feature at a time, it can be confusing for the rest of your team and a nightmare to debug weeks or months down the road when it begins to impact other teams’ work.
Consider our configurator example again. Our dev team is building four separate widgets that users will manipulate within the configurator tool. In this scenario, we would recommend setting up five toggles: one for the configurator itself and one for each widget. Code the widget toggles with a dependency on the configurator toggle. In this framework, if one of the widgets fails to load correctly, the others will still be served to the user.
Feature toggles can transform your entire development process
Feature toggles are powerful methods for developing, testing, and operating code features within a continuous integration and continuous delivery framework. They are a simple method that helps your team deliver higher quality, more stable code according to agile principles.
In this article, we walked through how feature toggles work, what types of toggles you can create, and how you can employ them in your agile process — or try them out in any development process. We also shared some of our recommended best practices for making sure your company gets the most from using feature toggles.
Start small and scale up
There is no reason you can’t start using feature toggles today. Start small and scale up your usage as your team gets comfortable with how they work. If you’re starting to code a brand new feature from your backlog, consider setting up a release toggle in trunk code, so you don’t have to branch. If you’re beginning market testing, consider setting up an experiment toggle for some split testing.
Once your team has a good handle on how they want to use feature toggles, consider whether a feature management platform can streamline their administration. Streamlining development and testing was what we had in mind when we developed our release and feature management platform.
AB Tasty allows your team to use a single tool to streamline toggle workflows and communication. Regardless of a team’s tasks or focus, our feature management product has everything it takes to deliver the right features in the right way.