In this article, we’ll cover how to implement feature flags in Java using our Java SDK and also discuss other open-source Java frameworks available on Github. If your are using the Spring framework, this article will suit you well.
Overview of the feature flag pattern
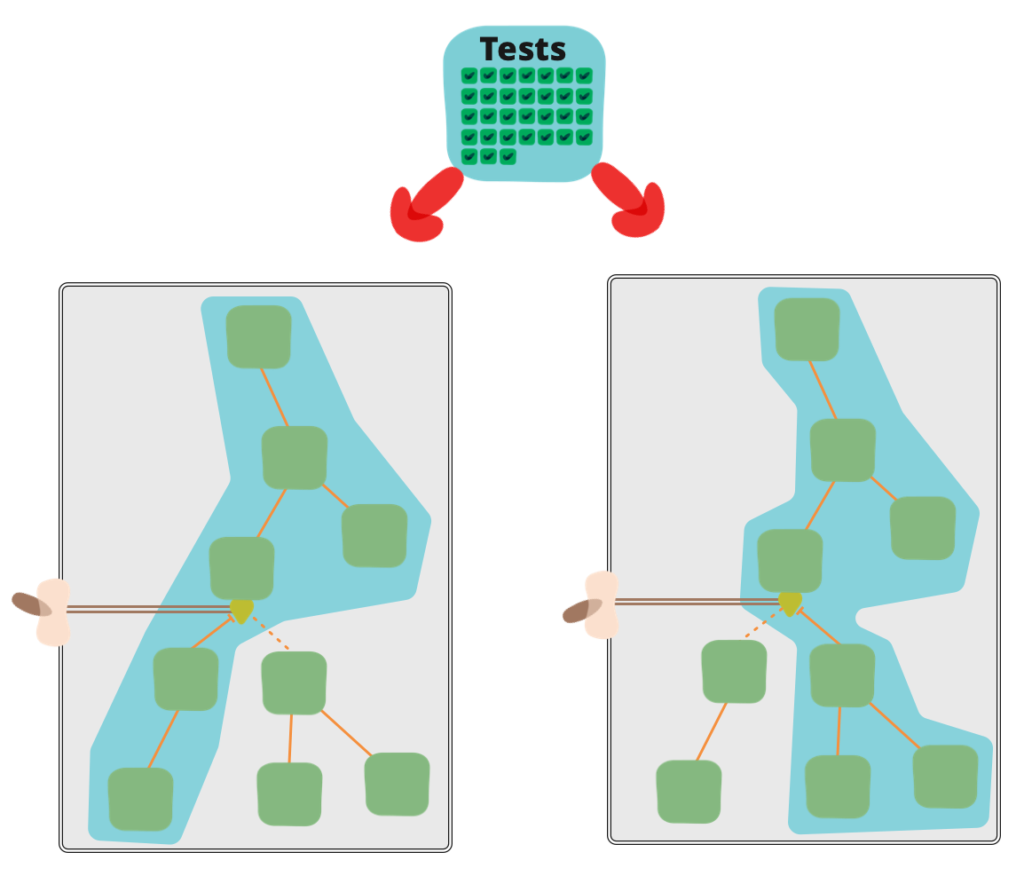
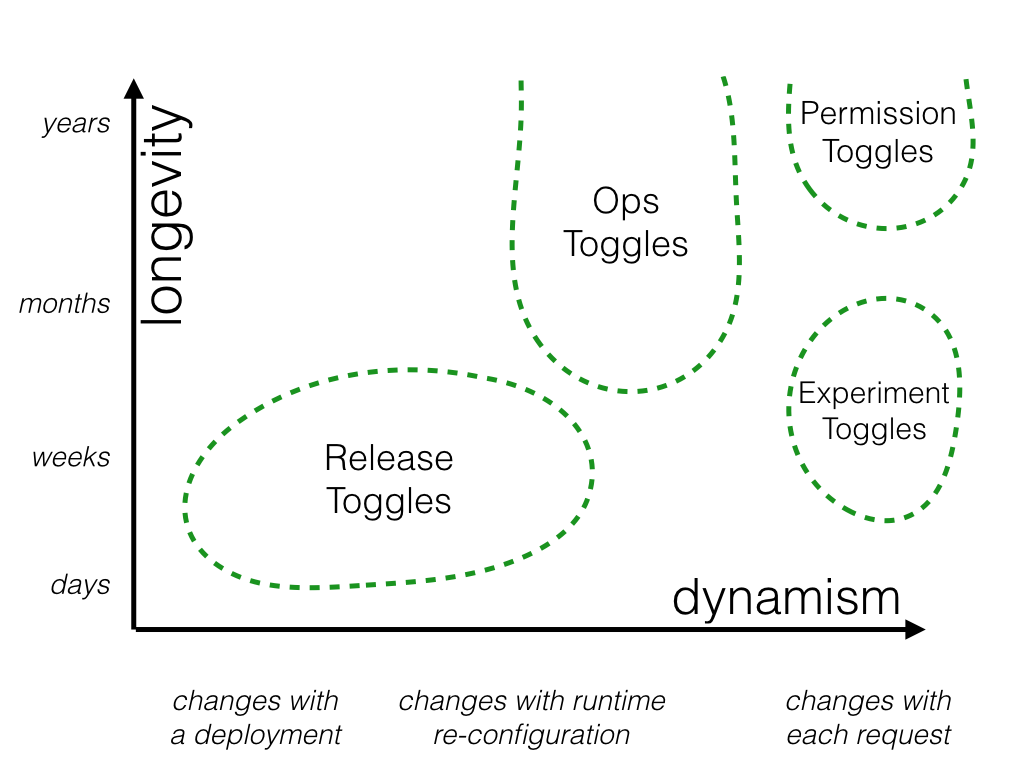
Feature flags are a powerful software development tool that turns certain functionalities on and off without the need to deploy new code, and without any service disruptions. Feature flags can be used for a wide range of purposes, from kill switch to targeted releases (ex: ring deployments, canary deployments), through feature testing. Thus, a feature flag ranges from a simple IF statement to more complex decision trees, which act upon different variables.
AB Tasty offers an enterprise-grade feature flag management platform that keeps you in control of your release strategies.
As its core, it provides a Decision API to assign and retrieve feature flag values for your users (e.g. what value a flag should be for a specific user), so you don’t have to mess with complex configuration files or manage a dedicated infrastructure to store all the different flag values.
The “Decision” part in the name refers to built-in intelligence that is key to maintain flag values consistency between different user sessions or for instance when an anonymous users gets authenticated to your application.
White this REST API is language-agnostic by design, we provide several server and client-side SDKs. Here, we’ll discuss the Java SDK that includes preconfigured methods to implement the Decision API. Refer to our developer documentation for more details.
Setting feature flags with AB Tasty Java SDK
Using our cloud-based feature management service is a 2- step process. First, in your codebase, you wrap your features once with flags using methods from the Java SDK. Once this is done, you remotely configure your flags (values, segments…) from the dashboard. Let’s see both steps in details.
Setting up the Java SDK
Installation and initialization
First, you need to add the Java repository to your dependency manager. You can use Maven or Gradle build tools to do so:
<pre><code class="language-maven line-numbers"><!--
// Gradle
maven { url 'https://abtasty.jfrog.io/artifactory/flagship-java' }

// Maven
<repositories>
    <repository>
        <id>com.abtasty</id>
        <url>https://abtasty.jfrog.io/artifactory/flagship-java</url>
    </repository>
</repositories>
--></code></pre>
Then, import the Java SDK using either Maven or Gradle dependency management:
<pre><code class="language-maven line-numbers"><!--
// Gradle
implementation 'com.abtasty:flagship-java:1.0.0'

// Maven
<dependency>
    <groupId>com.abtasty</groupId>
    <artifactId>flagship-java</artifactId>
    <version>1.0.0</version>
</dependency>
--></code></pre>
To initialize and start the SDK, simply call the start function of the class, in the most appropriate location for your application. You need to pass two parameters: your environment id and your API authentication key. Both values are available from the user interface (UI), once you are logged in.
<pre><code class="language-java line-numbers"><!--
Flagship.start("YOUR_ENV_ID", "YOUR_API_KEY");
--></code></pre>
The start method also accepts a third argument to create a custom configuration, ex:
<pre><code class="language-java line-numbers"><!--
Flagship.start("YOUR_ENV_ID", "YOUR_API_KEY", new FlagshipConfig()
    .withFlagshipMode(Flagship.Mode.DECISION_API)
    .withLogManager(new CustomLogManager())
    .withLogLevel(LogManager.Level.ALL)
    .withTimeout(200));
--></code></pre>
Creating a new visitor
Next, you’ll have to create a new visitor.
The visitor instance is a helper object that lets you manage the context and campaigns for a user identified by a unique ID.
The user context is a property dataset which defines the current user of your app. This dataset is sent and used by the Decision API as targeting criterias for campaign assignment.
For example, if you want to enable or disable a specific feature based on a VIP status, you would pass this attribute as a key-value pair in the user context so that the Decision API can enable or disable the corresponding feature flag for the user.
<pre><code class="language-java line-numbers"><!--
Visitor visitor = Flagship.newVisitor("YOUR_VISITOR_ID", new HashMap<String, Object>() {{
    put("isVip", true);
--></code></pre>
The first parameter of the method is the Unique visitor identifier, while the second is the initial user context.
You can also update the visitor context when required. The following method from the Visitor instance allows you to set new context values matching the given keys.
<pre><code class="language-java line-numbers"><!--
Visitor visitor = Flagship.newVisitor("YOUR_VISITOR_ID", new HashMap<String, Object>() {{
    put("isVip", false);
}});

visitor.updateContext("isVip", true);
--></code></pre>
Managing feature flag assignment
The synchronizeModifications() method of the visitor instance automatically calls the Decision API to run feature flag assignments according to the current user context.
<pre><code class="language-java line-numbers"><!--
Visitor visitor = Flagship.newVisitor("YOUR_VISITOR_ID")
visitor.updateContext("isVip", true)
visitor.synchronizeModifications().whenComplete((instance, error) -> {
    // Asynchronous non blocking call
    // Synchronization has been completed. Do stuff here...
});
--></code></pre>
Once the campaign has been assigned and synchronized, all the modifications are stored in the SDK. You can retrieve these modifications using the getModification method from the Visitor instance. It retrieves a modification value by its key. If no modification matches the given key or if the stored value type and default value type do not match, default value will be returned.
<pre><code class="language-java line-numbers"><!--
Visitor visitor = Flagship.newVisitor("YOUR_VISITOR_ID")
visitor.updateContext("isVip", true)
visitor.synchronizeModifications().whenComplete((instance, error) -> {
    Boolean displayVipFeature = visitor.getModification("displayVipFeature",  false);
});
--></code></pre>
The getModification method accepts a third argument, that, if set to true will automatically report on our server that the current visitor has seen this specifc variation. It is also possible to call activateModification() later.
<pre><code class="language-java line-numbers"><!--
Visitor visitor = Flagship.newVisitor("YOUR_VISITOR_ID")
visitor.updateContext("isVip", true)
visitor.synchronizeModifications().whenComplete((instance, error) -> {

    Boolean displayVipFeature = visitor.getModification("displayVipFeature", false, true); //send an activation event.

    // or

    Boolean displayVipFeature = visitor.getModification("displayVipFeature", false);
    visitor.activateModification("displayVipFeature");
});
--></code></pre>
Measuring events and metrics
Our Universal Collect protocol provides a unified hit format to send data back to our server-side solution for reporting purposes. The format of the hit is based on the Google Analytics measurement protocol. By sending hits to our platform, you can measure the impact of a feature on different metrics such as pageviews, screenviews, transactions or generic events.
To send hits, you must call the sendHit method from the Visitor instance:
<pre><code class="language-java line-numbers"><!--
// Pageview hit
Page page = new Page("https://www.my_domain_com/my_page")
visitor.sendHit(page);

// Sreenview hit
Screen screen = new Screen("screen location")
    .withResolution(200, 100)
    .withLocale("fr_FR")
    .withIp("127.0.0.1")
    .withSessionNumber(2);
visitor.sendHit(screen);

// Transaction hit
Transaction transaction = new Transaction("#12345", "affiliation")
    .withCouponCode("code")
    .withCurrency("EUR")
    .withItemCount(1)
    .withPaymentMethod("creditcard")
    .withShippingCosts(9.99f)
    .withTaxes(19.99f)
    .withTotalRevenue(199.99f)
    .withShippingMethod("1day");
visitor.sendHit(transaction);

// Generic Event hit
Event event = new Event(Event.EventCategory.ACTION_TRACKING, "action")
    .withEventLabel("label")
    .withEventValue(100);
visitor.sendHit(event);
--></code></pre>
For more details, refer to our Java SDK references.
Setting up flags in our UI interface
The first step is to sign up to our app.
You can refer to this short video that goes through all the process of a feature flag setup or read the detailed instructions below.
<p><script src="https://fast.wistia.com/embed/medias/a0r6tvay8z.jsonp" async=""></script><script src="https://fast.wistia.com/assets/external/E-v1.js" async=""></script></p>
<div class="wistia_responsive_padding" style="padding: 56.25% 0 0 0; position: relative;">
<div class="wistia_responsive_wrapper" style="height: 100%; left: 0; position: absolute; top: 0; width: 100%;">
<div class="wistia_embed wistia_async_a0r6tvay8z videoFoam=true" style="height: 100%; position: relative; width: 100%;">
<div class="wistia_swatch" style="height: 100%; left: 0; opacity: 0; overflow: hidden; position: absolute; top: 0; transition: opacity 200ms; width: 100%;"><img style="filter: blur(5px); height: 100%; object-fit: contain; width: 100%;" src="https://fast.wistia.com/embed/medias/a0r6tvay8z/swatch" alt="" aria-hidden="true" /></div>
</div>
</div>
</div>
Creating your feature flag use case
To create a feature flag from the dashboard, apply the following steps:
- Go to the dashboard.
- Click the + button.
- Choose an existing project or create a new one
- Click the “Add a use case” button.
You are presented with a list of different templates or use cases (ex: progressive rollout, A/B test…)
Choose the “Feature toggling” template.
Entering the basic information
First, you need to enter the basic information of your feature flag use case:
The feature name: use the most representative name for your feature, because this is the one you’ll need to remember in case you want to find it later.
The feature description: explain exactly what your feature deployment is about and what its purpose for your business is.
The primary/secondary metric to follow (optional) which will serve as a point of reference to analyze performance. For more information, refer to Configuring KPIs.
Defining flags
This is where you configure the flags and their values based on your different scenarios. Think of it as the config file mentioned in the first method, but that you manage remotely from the cloud. Important: flag names you specify here should match the ones used in your codebase.
Defining targeting
During this step, you can define which users will be assigned to your different flag values. This is a segmentation engine built into the platform that makes it easy to assign flags conditionally based on user traits (or attributes) that you have access to in your codebase. Refer to this article about feature flag targeting for more information. The 3 following options are available:
- All Users if you want all your users to progressively see your feature.
- Users by ID if you want only users with a specific ID to see your feature.
- Key if you only want users matching this key value to see your feature.
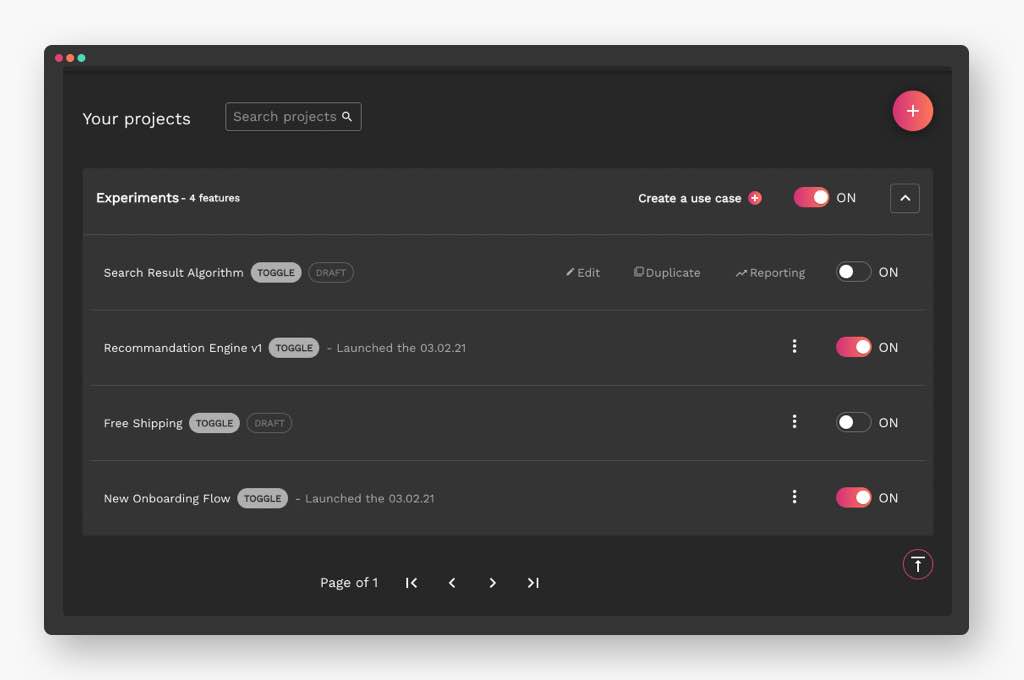
Enabling your feature
Once you have configured your feature, it is OFF by default to allow you to check that it is correctly configured. Back to the dashboard, you can activate your feature ON when you are ready!
And that’s it. Now, provided changes to your codebase have been deployed, you can activate/deactivate feature flags, remotely change their values and have your Java Application react instantly to these changes.
Open-source feature flag frameworks for Java
For the sake of completeness, we list here open source alternatives if you are using Java. While there are pros and cons to each approach, the third-party vendor option is probably the most efficient method for large teams with evolving use cases that don’t want to deal with the challenges of an in-house system.
Keep reading: The Journey of Feature Flag Implementation (Build vs. Buy) where we discuss the pros and cons of different options when it comes to choosing between to build, use an open-source project or buy a feature flag management solution.
FF4J – Feature Flipping for Java
FF4j, is an implementation of the Feature Toggle pattern for Java. It provides a rich set of features:
- Enable and disable features at runtime – no deployments.
- Enable features not only with flag values but also drive access with roles and groups.
- Implement custom predicates to evaluate if a feature is enabled.
- Keep your code clean and readable: Avoid nested if statements but use annotations.
- Each action (create, update, delete, toggles) can be traced and saved in the audit trail for troubleshooting.
- Administrate FF4j (including features and properties) with the web UI.
- Wide choice of databases technologies to store your features, properties and events.
- (Distributed) Cache Evaluating predicates may put pressure on DB (high hit ratio).
940 stars on Github. View repository.
togglz – Feature Flags for the Java platform
Togglz is another implementation of the Feature Toggles pattern for Java.
- Modular setup. Select exactly the components of the framework you want to use. Besides the main dependency, install specific integration modules if you are planning to integrate Togglz into a web application (Servlet environment) or if you are using CDI, Spring, Spring Boot, JSF.
- Straight forward usage. Just call the isActive() method on the corresponding enum to check if a feature is active or not for the current user.
- Admin console. Togglz comes with an embedded admin console that allows you to enable or disable features and edit the user list associated with every feature.
- Activation strategies. They are responsible for deciding whether an enabled feature is active or not. Activation strategies can, for example, be used to activate features only for specific users, for specific client IPs or at a specified time.
- Custom Strategies. Besides the built-in default strategies, it’s easy to add your own strategies. Togglz offers an extension point that allows you to implement a new strategy with only a single class.
- Feature groups. To make sure you don’t get lost in all the different feature flags, Togglz allows you to define group for feature that are just used for a visual grouping in the admin console.
940 stars on Github. View repository.
Unleash
Unleash is an open-source feature management platform. It provides an overview of all feature toggles/flags across all your applications and services. You first need to setup an Unleash server that you self-host, and then use a client SDK to connect your application to the server. A Java Client SDK is available and provides features such as:
- Boolean feature toggles (on/off)
- Canary release (Gradual rollout)
- Targeted release
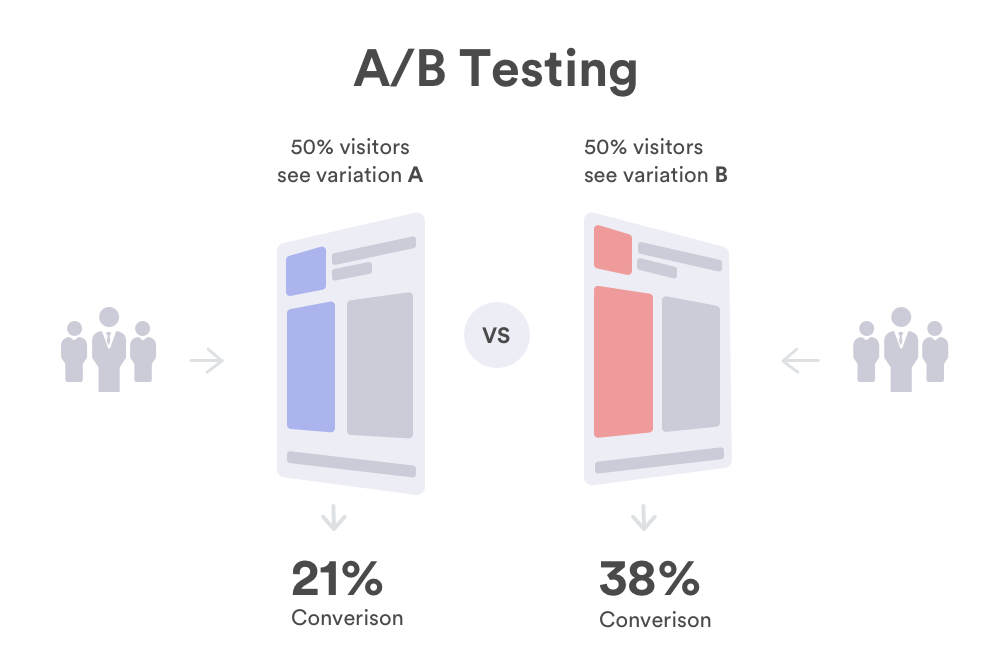
- Experimentation (A/B testing)
- Kill switches
- Custom activation strategies
- Privacy first (GDPR) where end-user data never leaves your application
- Audit logs
- Addons integrating with other popular tools (Slack, Teams, Datadog, etc.)
- Dashboard to manage technical debt
- Flexible architecture and can be hosted anywhere
- Docker image available
3,828 stars on Github. View repository.