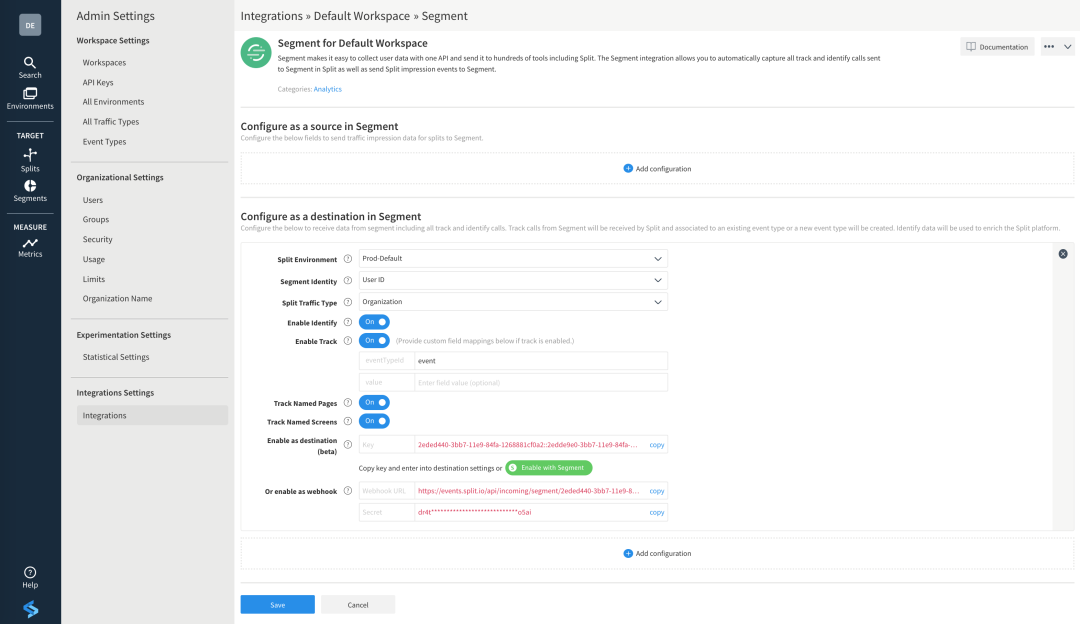
At AB Tasty, we think, breathe, eat, drink, and sleep experimentation – all in the name of improving digital experiences. Over the coming months, we’re going to peel back a layer to take a closer look at what’s under the hood of experimentation: the data. Data drives the experimentation cycle – all of the ideation, hypotheses, statistical management, and test-result analysis. It’s no secret that today’s world runs on data, and the development of your digital experience should be no different.
Customers today – whether speaking of a business buyer or an everyday consumer – prioritize experience over other aspects of a brand. Over the coming months, we’ll be talking with some of our partners and data experts at AB Tasty to explore how brands can use data to better profile customers, understand their needs, and forge valuable emotional connections with them, as well as to measure overall digital impact and build a data-based, customer-centric vision.
Before we jump right in, let’s take a moment to center our discussions of data within a privacy-conscious scope.
Every marketer knows that nothing is more precious than customer data, but acquiring it has become increasingly thorny. Europe’s far-reaching General Data Protection Regulation (GDPR), enforced in 2018, was a game-changer, requiring companies to get consent before collecting personal data. The California Consumer Privacy Act (CCPA) soon followed, giving consumers the right, among other things, to opt-out from the sale of their data.
Even if you think your business isn’t subject to such regulations, you might need to consider compliance anyway. E-commerce has erased national borders, allowing goods and services to be purchased with little regard for their origin. The globalization of brands means that an influencer in Pennsylvania who posts about your products could drive Parisian customers to your site, and suddenly you’re collecting data subject to GDPR guidelines – which require customer consent for use.
Leveraging the right customer data
Understanding your customers and their needs and changing behaviors is key to delivering timely, relevant messages that boost loyalty and drive revenue. Whether your company sells yoga mats, yams, or yacht insurance, you need data to enhance their experience with you and strengthen your relationship with them.
But how can you leverage the data you need while ensuring your customers continue to trust you? In recent years, consumers have grown skeptical of handing over their personal data. According to a 2021survey by KMPG, 86% of consumers questioned said they feel a growing concern about data privacy. And they should be: the same survey showed that 62% of business leaders felt that their companies should do more to protect customer data.
Thanks to the well-deserved death of third-party cookies, marketers are now seeking the data they need by forging consent-driven first-party relationships with their audiences. While this is a step in the right direction, data privacy needs to go further.
Enhancing brand value through consent- and privacy-oriented processes
Consumers are more likely to buy from companies with transparent privacy practices that clearly explain how personal data is collected, used, and stored. Giving or withholding consent for the use of their data should be effortless, and if requested, customers should know that brands will not only delete all the data they’ve stored, but also remove any access privileges they may have granted to partners or third parties.
By making consent and preferences easily manageable, a multitude of data can be shared at every customer touchpoint, revealing customer behaviors, preferences, attitudes, and values. To deal with this omnichannel data, a Consent Management Platform (CMP) can help you collect and handle personal information in a privacy-first way. A CMP enables you to maintain consent logs across all customer-facing channels, ensuring that the personal data processing is always in line with the data subject’s preferences, adding an ethical dimension to the customer experience.
Ethical handling of customer data is mission-critical if brands are to succeed today. From big tech to retail, companies of every stripe are taking an ethical and privacy-centered approach to data, because, as anarticle in the Harvard Business Review aptly put it, “Privacy is to the digital age what product safety was to the Industrial Age.”
Customer data can help you deliver relevant, personalized, and innovative experiences.
It can build your brand by generating new leads, predicting sales and marketing trends, and enabling you to create the personalized messages that customers love. But unless your data is protected and unbreachable, your customer base is at risk.
At AB Tasty, we’re actively committed to ensuring compliance with all relevant privacy regulations and to being entirely transparent with our users with regard to the consensual first-party and impersonal statistical data we collect when they visit our site. We strive to ensure that our partner agencies and SMEs take accountability and responsibility for the use of their customers’ personal data and respond rapidly should customers want to opt-out or be forgotten.
In this series of articles, we’ll be looking at using data to get value from anonymous visitors, using experimentation to discover customer needs, creating emotional connections to customers with data, and using data to measure your digital impact – all of this featuring data experts from the industry to guide us on our journey. See you soon!
In modern software development, speed and agility are crucial when it comes to developing and releasing software. However, when you have a large team of developers working simultaneously, branching and merging code can become messy fast.
Therefore, teams need to have a process in place to implement multiple changes at once. This is where having an efficient branching strategy becomes a priority for these teams.
If you’re looking to enhance your team’s development workflow and streamline release processes, book a free demo to see how AB Tasty can help.
What is a branching strategy?
Branches are primarily used as a means for teams to develop features giving them a separate workspace for their code. These branches are usually merged back to a master branch upon completion of work. In this way, features (and any bug and bug fixes) are kept apart from each other allowing you to fix mistakes more easily.
This means that branches protect the mainline of code and any changes made to any given branch don’t affect other developers.
A branching strategy, therefore, is the strategy that software development teams adopt when writing, merging and deploying code when using a version control system.
It is essentially a set of rules that developers can follow to stipulate how they interact with a shared codebase.
Such a strategy is necessary as it helps keep repositories organized to avoid errors in the application and the dreaded merge hell when multiple developers are working simultaneously and are all adding their changes at the same time.
Such merge conflicts would eventually deter shipping code quickly and thus hindering from creating and maintaining an efficient DevOps process as the whole purpose of DevOps is creating a fast workflow that would allow for the release of small batches of code.
Thus, adhering to a branching strategy will help solve this issue so that developers can work together without stepping on each other’s toes. In other words, it enables teams to work in parallel to achieve faster releases and fewer conflicts by creating a clear process when making changes to source control.
When we talk about branches, we are referring to independent lines of code that branch off the master branch, allowing developers to work independently before merging their changes back to the code base.
In this post, we will outline some of the branching strategies that teams use in order to organize their workflow where we will look at their pros and cons and which strategy you should choose based on your needs, objectives and your team’s capabilities.
Why you need a branching strategy
As mentioned above, having a branching strategy is necessary to avoid conflicts when merging and to allow for the easier integration of changes into the master trunk.
A branching strategy aims to:
Enhance productivity by ensuring proper coordination among developers
Enable parallel development
Help organize a series of planned, structured releases
Map a clear path when making changes to software through to production
Maintain a bug-free code where developers can quickly fix issues and get these changes back to production without disrupting the development workflow
In short, implementing effective Git branching strategies is crucial for streamlined collaboration. Complementing this with robust Feature Experimentation allows teams to test and deploy features confidently, ensuring optimal performance across all channels
Git branching
Branches are not just exclusive to Git. However, in this article we focus on Git due to the many advantages this model of branching offers.
Consequently, before we delve into the various branching strategies out there, including Git branching strategies, we will take a look at how Git actually handles branches and why it’s a standout among other VCS tools.
Git branches allow developers to diverge from the main branch by creating separate branches to isolate code changes. The default branch in Git is the master branch.
The biggest advantage of a Git branch is that it’s ‘lightweight’, meaning that data consists of a series of snapshots so with every commit you make, Git takes a picture of what your files look like at that moment and stores a reference to that snapshot. This means that these branches aren’t just copies of the file system but simply a pointer to the latest commit.
Meanwhile, other VCS tools store information as a list of file-based changes which may slow things down and use up significant space.
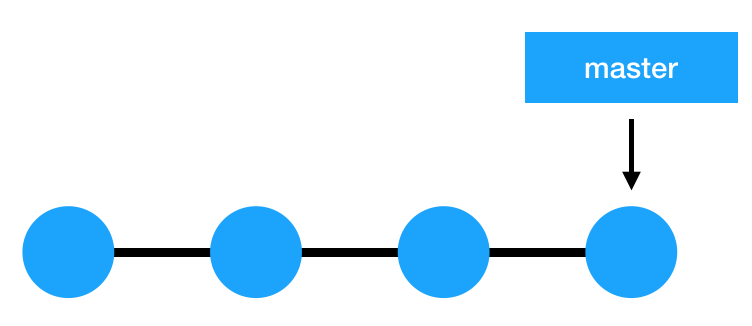
In Git, a branch is essentially a reference or a pointer to the latest commit in a given context; it’s not a container for commits. As you create new commits in the new branch, Git creates new pointers to track the changes. Git branches, then, can be seen as a pointer to a snapshot of your changes.
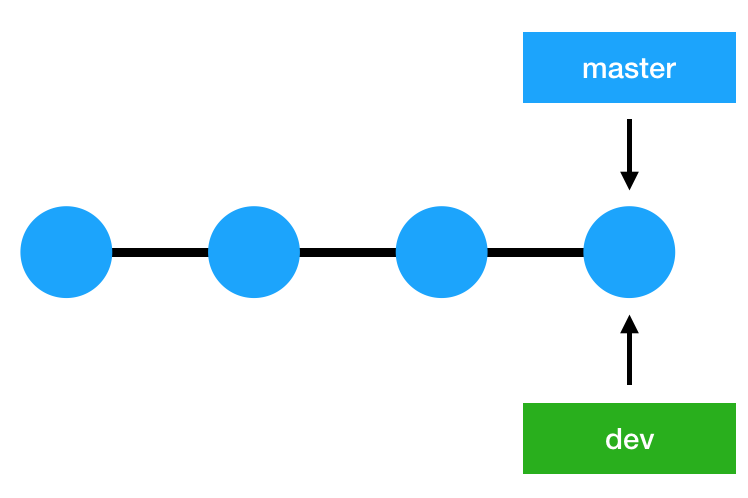
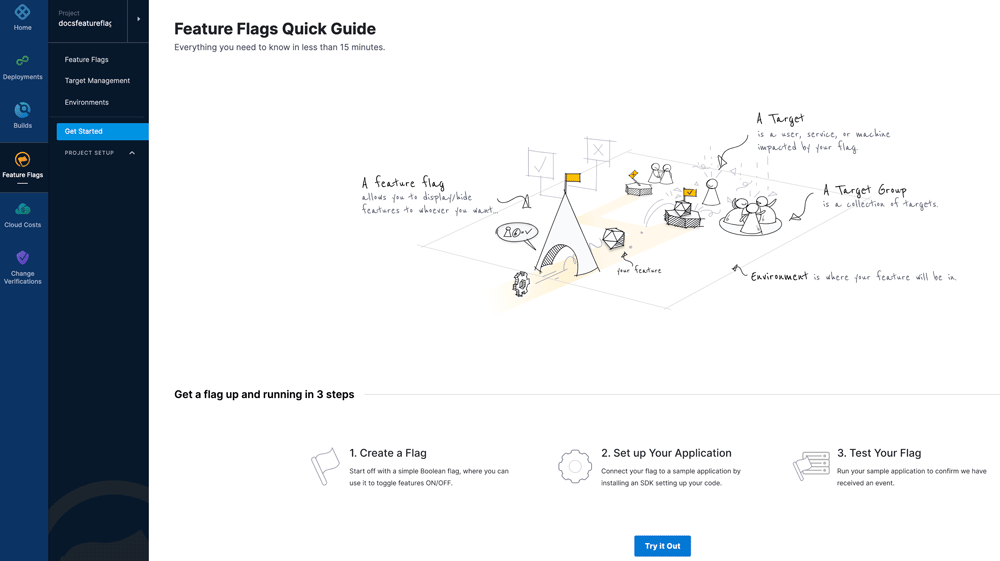
The images below illustrate this concept, where the top image shows the master branch and a pointer pointing to the last commit and the image right below it shows what happens when you create a new branch called ‘dev’- a new pointer now points to the latest commit.
To sum up, the Git branching model is lightweight compared to other version control systems; this is why it’s so easy and cheap to create branches in Git, as the whole code doesn’t need to be copied to the branch creating a large amount of duplicate files, as opposed to other VCS tools.
What are some common Git branching strategies?
GitFlow
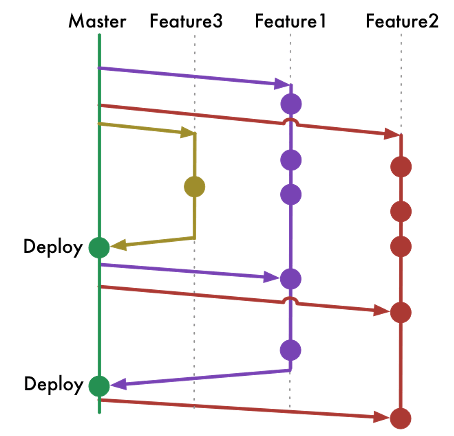
Considered to be a bit complicated and advanced for many of today’s projects, GitFlow enables parallel development where developers can work separately from the master branch on features where a feature branch is created from the master branch.
Afterwards, when changes are complete, the developer merges these changes back to the master branch for release.
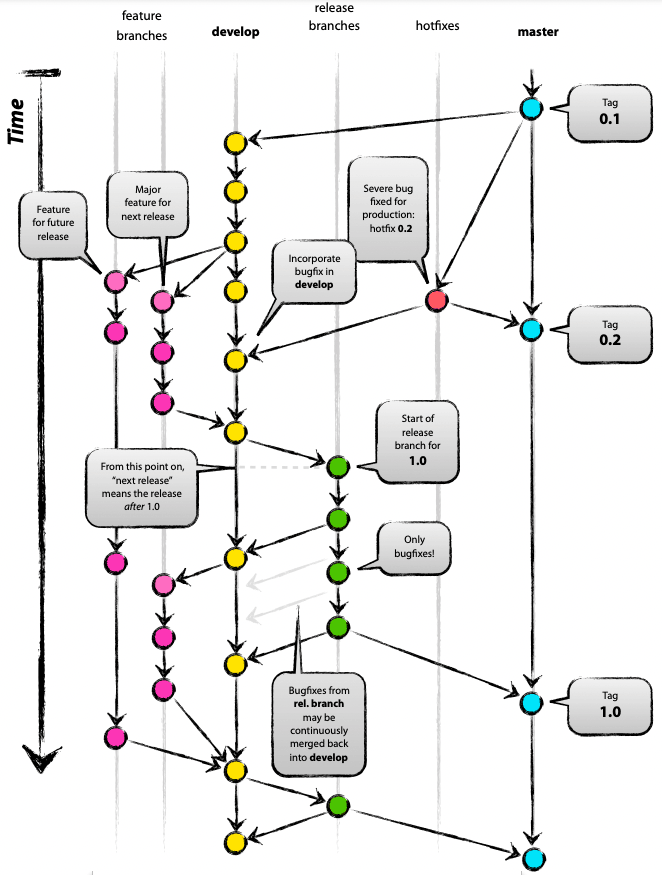
This branching strategy consists of the following branches:
Master
Develop
Feature- to develop new features that branches off the develop branch
Release- help prepare a new production release; usually branched from the develop branch and must be merged back to both develop and master
Hotfix- also helps prepare for a release but unlike release branches, hotfix branches arise from a bug that has been discovered and must be resolved; it enables developers to keep working on their own changes on the develop branch while the bug is being fixed.
The main and develop branches are considered to be the main branches, with an infinite lifetime, while the rest are supporting branches that are meant to aid parallel development among developers, usually short-lived.
Author: Vincent Driessen source License: Creative Commons BY-SA
GitFlow pros and cons
Perhaps the most obvious benefit of this model is that it allows for parallel development to protect the production code so the main branch remains stable for release while developers work on separate branches.
Moreover, the various types of branches make it easier for developers to organize their work. This strategy contains separate and straightforward branches for specific purposes though for that reason it may become complicated for many use cases.
It is also ideal when handling multiple versions of the production code.
However, as more branches are added, they may become difficult to manage as developers merge their changes from the development branch to the main. Developers will first need to create the release branch then make sure any final work is also merged back into the development branch and then that release branch will need to be merged into the main branch.
In the event that changes are tested and the test fails, it would become increasingly difficult to figure out where the issue is exactly as developers are lost in a sea of commits.
Indeed, due to GitFlow’s complexity, it could slow down the development process and release cycle. In that sense, GitFlow is not an efficient approach for teams wanting to implement continuous integration and continuous delivery.
Thus, in that case a much simpler workflow such as GitHub Flow is recommended.
GitHub Flow
GitHub Flow is a simpler alternative to GitFlow ideal for smaller teams as they don’t need to manage multiple versions.
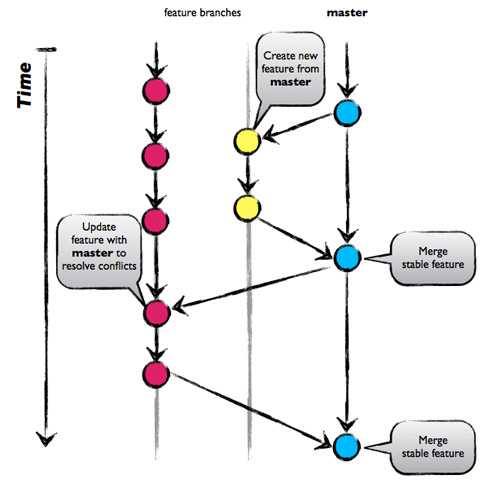
Unlike GitFlow, this model doesn’t have release branches. You start off with the main branch then developers create branches, feature branches that stem directly from the master, to isolate their work which are then merged back into main. The feature branch is then deleted.
The main idea behind this model is keeping the master code in a constant deployable state and hence can support continuous integration and continuous delivery processes.
GitHub Flow pros and cons
Github Flow focuses on Agile principles and so it is a fast and streamlined branching strategy with short production cycles and frequent releases.
This strategy also allows for fast feedback loops so that teams can quickly identify issues and resolve them.
Since there is no development branch as you are testing and automating changes to one branch which allows for quick and continuous deployment.
This strategy is particularly suited for small teams and web applications and it is ideal when you need to maintain a single production version.
Thus, this strategy is not suitable for handling multiple versions of the code.
Furthermore, the lack of development branches makes this strategy more susceptible to bugs and so can lead to an unstable production code if branches are not properly tested before merging with the master-release preparation and bug fixes happen in this branch. The master branch, as a result, can become cluttered more easily as it serves as both a production and development branch.
A further disadvantage is as this model is more suited to small teams and hence, as teams grow merge conflicts can occur as everyone is merging to the same branch and there is a lack of transparency meaning developers cannot see what other developers are working on.
GitLab Flow
GitLab Flow is a simpler alternative to GitFlow that combines feature-driven development and feature branching with issue tracking.
With GitFlow, developers create a develop branch and make that the default while GitLab Flow works with the main branch right away.
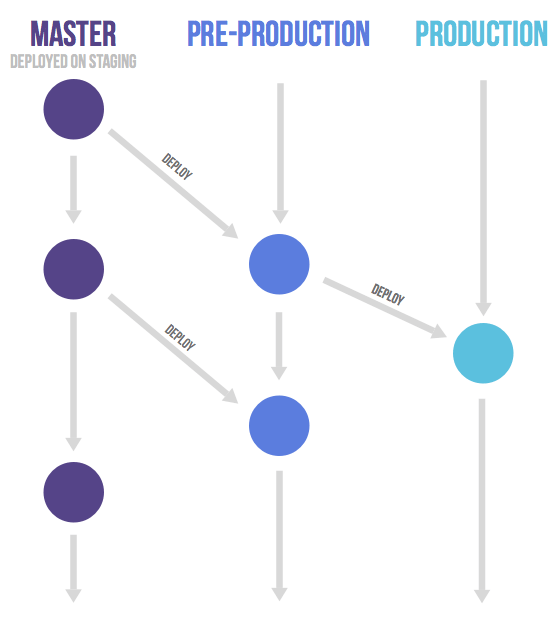
GitLab Flow is great when you want to maintain multiple environments and when you prefer to have a staging environment separate from the production environment. Then, whenever the main branch is ready to be deployed, you can merge back into the production branch and release it.
Thus, this strategy offers propers isolation between environments allowing developers to maintain several versions of software in different environments.
While GitHub Flow assumes that you can deploy into production whenever you merge a feature branch into the master, GitLab Flow seeks to resolve that issue by allowing the code to pass through internal environments before it reaches production, as seen in the image below.
Therefore, this method is suited for situations where you don’t control the timing of the release, such as an iOS app that needs to go through the App store validation first or when you have specific deployment windows.
Trunk-based development
Trunk-based development is a branching strategy that in fact requires no branches but instead, developers integrate their changes into a shared trunk at least once a day. This shared trunk should be ready for release anytime.
The main idea behind this strategy is that developers make smaller changes more frequently and thus the goal is to limit long-lasting branches and avoid merge conflicts as all developers work on the same branch. In other words, developers commit directly into the trunk without the use of branches.
Consequently, trunk-based development is a key enabler of continuous integration (CI) and continuous delivery (CD) since changes are done more frequently to the trunk, often multiple times a day (CI) which allows features to be released much faster (CD).
This strategy is often combined with feature flags. As the trunk is always kept ready for release, feature flags help decouple deployment from release so any changes that are not ready can be wrapped in a feature flag and kept hidden while features that are complete can be released to end-users without delay.
As we’ve seen, trunk-based development paves the way for continuous integration as the trunk is kept constantly updated.
It also enhances collaboration as developers have better visibility over what changes other developers are making as commits are made directly into the trunk without the need for branches. This is unlike other branching methods where each developer works independently in their own branch and any changes that occur in that branch can only be seen after merging into the main branch.
Because trunk-based development does not require branches, this eliminates the stress of long-lived branches and hence, merge conflicts or the so-called ‘merge hell’ as developers are pushing small changes much more often. This also makes it easier to resolve any conflicts that may arise.
Finally, this strategy allows for quicker releases as the shared trunk is kept in a constant releasable state with a continuous stream of work being integrated into the trunk which results in a more stable release.
However, this strategy is suited to more senior developers as this strategy offers a great amount of autonomy which non-experienced developers might find daunting as they are interacting directly with the shared trunk. Thus, for a more junior team whose work you may need to monitor closely, you may opt for a Git branching strategy.
Additionally, in fast-paced environments using trunk-based development, feature flags can provide the flexibility needed to ship incomplete features safely.
How to choose the best branching strategy for your team
When first starting out, it’s best to keep things simple and so initially GitHub Flow or Trunk-based development may work best. They are also ideal for smaller teams requiring only a single version of a release to be maintained.
GitFlow is great for open-source projects that require strict access control to changes. This is especially important as open-source projects allow anyone to contribute and so with Git Flow, you can check what is being introduced into the source code.
However, GitFlow, as previously mentioned, is not suitable when wanting to implement a DevOps environment. In this case, the other strategies discussed are a better fit for an Agile DevOps process and to support your CI and CD pipeline.
The following table summarizes the strategies discussed in this article and which strategy is appropriate in which context:
Product type and its release method
Team size
Collaboration maturity
Applicable mainstream branch mode
All
Small team
High
Trunk-Based Development (TBD)
Products that support continuous deployment and release, such as SaaS products
Middle
Moderate
GitHub-Flow and TBD
Products with a definite release window and a periodic version release cadence, such as iOS apps
Middle
Moderate
Git-Flow and GitLab-Flow with release branch
Products that are demanding for product quality and support continuous deployment and release, such as basic platform products
Middle
Moderate
GitLab-Flow
Products that are demanding for product quality and have a long maintenance cycle for released versions, such as 2B basic platform products
Large
Moderate
Git-Flow
To sum up, there is no such thing as the perfect strategy. The strategy you choose will depend on your team and the nature and complexity of your project and so this should be evaluated on a case-by-case basis.
It’s also fine to start off with one strategy and adapt it over time according to your needs. Needless to say, whatever strategy you end up choosing should aim to increase your team’s productivity by giving them a clear and consistent strategy to organize their work.
💡 Pro Tip: Want to personalize developer experiences across branches or environments? Explore our Personalization Guide for insights.
You’ve spent months building your brand and getting your website just right, but it’s all for nothing if you can’t turn your hard work into sales. And landing pages are one of the best resources you can use to optimize your conversions. Well-designed landing pages can lead customers to specific products or services, encourage them to take immediate action and capture contact details to build your customer base.
Landing pages are highly effective conversion tools (Source)
Landing pages have conversion rates ranging from 3% to 11.45% and higher, depending on the features they include. How well your page performs depends entirely on how well you’ve designed it and running tests on your page can help you continuously find the winning formula.
What is a landing page?
Landing pages are website pages designed to target a specific visitor according to a particular demographic, interest, or buying behavior. Your landing page should attract leads in the most effective way possible and then convert your visitors into buyers or nudge them towards taking another kind of action.
Landing pages are designed to encourage exploration and could have a number of goals. Technically, any page on your website can become a landing page for a campaign, but this could distract your customers and send them down a rabbit hole instead of focusing on the action you want them to take. Good landing pages have a singular focus or call to action (CTA), making them excellent marketing and lead generation tools.
Why is landing page design so important?
Landing pages let you nudge your leads straight towards a conversion through strategically placed call to action elements like links, forms, buttons, and others. A well-designed landing page lures visitors through a message that piques their interest, like a discount, a piece of content they’d like to read, or a free trial to test a product.
Landing pages target customers based on specific demographics, like browsing behavior (Source)
While it doesn’t fully show off your brand’s personality, it does lay the groundwork for getting to know it better. When a customer clicks on a call to action, they want to find more information about whatever has caught their eye, and that’s when you’ll convert them from a visitor to a solid lead or even a paying customer.
Aside from optimizing your users’ actions, landing pages make it easy to track visitors and modify your pages as required. Through A/B testing, one item on your landing page is changed on the variation to determine the impact of the change.
The importance of lead capture landing pages
Lead capture landing pages (sometimes called squeeze pages) can also gather important customer details (such as names, email, phone numbers). Lead capture landing pages offer your customers something of interest (e.g., a free trial or e-book) in exchange for completing a short form that collects their personal information.
You can use these personal details to target them in the future, with email campaigns, social media advertising, or follow-up calls by your sales representatives. Targeting potential customers strengthens the likelihood of a conversion down the line.
The essential elements of a landing page
A landing page should always have one conversion goal. From headlines to images to buttons, every element should bring you closer to that objective.
Clear and effective copywriting
An excellent landing page needs punchy, clear copywriting to convert. You should describe the benefits of your product/service and what your company does as concisely as possible. Don’t overstuff your landing page with copy that doesn’t add value!
A few copywriting tips to bear in mind:
Always direct your visitors to the primary call to action with your copy.
Keep sentences short and to the point.
Avoid using too many adverbs (quickly, obviously, actually).
Instead of passive voice, use active voice to inspire action.
Edit your work to delete anything that adds more detail than necessary.
Visually attractive and clear CTAs
Your call to action (CTA) is the most important element on your landing page. When you create your CTA, use copy that inspires the visitor to continue along their journey with you. Compare generic calls to action like “Click Here” or “Submit” to powerful statements like “Yes, I want to save money” or “Update my wardrobe.” The latter sounds better!
Always make sure that your CTA button stands out from the other elements on the page. Follow the example set by the Dutch watch brand Cluse: When their team noticed the bounce rate for their landing pages was high and that not many users advanced to the product display pages, it became evident that the CTA on the page wasn’t clear enough.
By changing the call to action used in their landing page design to best match practice guidelines, they instantly saw an uplift in conversions and sales. The winning variation increased the click-through rate to their product display page by 2.39% and realized a 1.12% uplift in transactions.
Eye-catching headers
Good landing pages have simple, compelling and uncluttered headers. If you include an image, make sure it’s related to your product or service. Keep all the action above the fold and use directional cues to steer visitors to that all-important CTA button. Additionally, you should avoid including distracting elements like links or phone numbers.
Social proof
People will conform to the majority in order to be accepted or liked. This is known as social proof. If a prospect sees that another person likes a product or has had a positive experience with your company, your odds of conversion go up.
When you’re browsing a landing page and see a testimonial from an industry expert you respect, that’s social proof. When you’re cruising a pricing page and you see that an industry giant is already using the tool, that’s social proof. When you sign up for a demo because you know the tool solved the exact problem you have for a similar company, that’s social proof.
Think of it as borrowing third-party influence to sway potential customers. Brightlocal found that the average consumer reads at least ten reviews before trusting a business. Your odds of converting goes up when you see that others had used the product before them and were happy with the end result.
Social proof may include customer reviews, a list of existing customers, user testimonials and awards you may have earned. Take a page from Decathlon’s playbook: By testing different options, you can also identify which works best for winning over your customers!
A unique selling proposition (USP)
What makes you different from everyone else? You don’t need to be more advanced or offer huge discounts; you just need a convincing brand promise. Are you the fastest? Most reliable? Most knowledgeable? You only have a few lines of copy and limited visuals to get your point across, so be short and sharp.
Hero images
First impressions are essential — and when it comes to website optimization, they’re more important than ever! A hero image is a large banner that appears at the top of your page, usually occupying the full length of the screen. Look for an image that represents (or is relevant) to your product or company. You can even include a call to action and/or a text overlay to guide your users down the conversion funnel.
Additional information in the footer
Remember that even though you never want to distract customers from the call to action, you’ll still want them to find more information about your company if they don’t convert immediately.
Keep your calls to action and more compelling arguments above the fold, but include additional information like newsletter sign-ups, links to your social media pages, or ‘About us’ pages in the footer for customers that need to know a little more about you before proceeding.
Landing pages should be simple and focus on the call to action (Source)
How to design and optimize your landing pages
Now that you understand some of the best practices for designing high-converting landing pages, let’s dig into the nitty-gritty of your landing pages’ design. Here are ten best practices to design a landing page that converts successfully:
1. Identify your target audience and their needs
Designing a visually stunning landing page doesn’t necessarily mean it’s effective. Truly great landing pages understand what visitors are looking for and provide quality content tailored to your target audience. Before designing your page, establish who it’s for and what they would like to know. Keep testing variations of the page to see which elements resonate the most with your audience and your landing page can become a powerful conversion tool.
2. Use strategic and relevant hero images
There should be a clear connection between your brand and the hero image you display on your landing page. Misplaced images can confuse visitors or create a poor impression of the brand. Make sure that the image you use fosters an instant connection between you and your users by either answering a question, nudging them to advance down the conversion funnel, or just encouraging them to find out more about you.
3. Refine your headlines
We’ve already spoken about the role copywriting plays in conversion, so make sure that you continually test and refine your headlines. Landing page headlines promote your value proposition, while the subheadings provide further explanations. Keep these short, sharp and to the point. If you aren’t sure which value proposition to promote, try testing different versions to see which version resonates the most with visitors and results in the most click-throughs.
4. Keep navigation simple
Landing pages have to be optimized to create the best user experience possible. Keeping navigation simple, intuitive and straightforward will boost user retention and lead generation while driving your core message home. ECCO Shoes are a great example of this: By making their call to action button larger and repositioning it above the fold, cutting a few visual distractions and adding icons highlighting special offers like free delivery, their new landing page was able to outperform the original by over 17%!
5. Harmonize your colors
Colors can evoke powerful emotions or cause confusion. Use color strategically and sparingly on your landing page so it highlights the most important elements like your call to action, add-to-cart button or contact forms. You can also use negative space to break up the page and make it easier to digest the most important information.
6. Place your important elements above the fold
The ‘above the fold’ section is the part of your website that’s visible in the browser without scrolling down. It’s the first thing people see, so make sure you grab their attention with compelling imagery, copy and headers.
7. Make sure it displays properly across devices
Today’s consumers are using a host of different devices and operating systems. This means your website has to display properly across all of them if you want their business. Ensure that your landing pages are optimized to display correctly on all available platforms.
8. Optimize your site’s load times
Your site’s loading time affects your user experience and your Google ranking. Slow websites contribute to high bounce rates and cart abandonment. You can optimize your load times by enabling compression, using web-friendly imagery and keeping redirects to a minimum.
9. Improve your SEO to increase traffic and conversions
SEO (Search Engine Optimization) is a complex subject, but anyone can make small tweaks to their landing page to improve their ranking. Ensure that your title tags and meta-descriptions are accurate and relevant to what visitors will find on your page. Always include the main keywords you want to rank for, but don’t overstuff your page with them; it will negatively affect your user experience and Google may penalize you for it.
Effective landing pages can lead to increased sales (Source)
10. Perform testing on your landing pages
A/B testing allows you to compare two versions of the same page to see which version resonates the most with your users. By changing an element on one page, you can compare the two to see which changes will increase conversions. You can learn more about testing on your landing page in this article, or try our A/B testing tool.
A/B testing has numerous benefits for your landing pages and your business because it reveals incredible insights that can be used to:
Improve user engagement by learning which messages/images resonate with customers;
Present more relevant messages and content that customers actively respond to;
Reduce bounce rates by improving relevance;
Increase conversion rates;
Deliver quick results and improvements that provide a return on investment.
Common landing page mistakes
We’ve covered what you should do when you are designing your landing page, but there are also a few things you should avoid doing:
Multiple CTAs: Too many calls to action dilute your message and decrease the likelihood of performing a conversion.
Broken CTAs: If your call to action doesn’t link to the right page or function properly, all of your efforts are wasted.
Low-resolution images/no images: Copy alone won’t sell your product or service. Use high-resolution, web-optimized images to boost your brand and convey your message visually.
Poorly written copy: Spelling mistakes and grammatical errors impact the trust that consumers have in your brand.
Lengthy forms: If your lead capture forms are too long, your customers will get frustrated and may give up halfway through. You’ll lose the information — and their business.
Examples of great landing page design
While landing page design is an ongoing process and you need to keep constantly optimizing it, there are a few brands with really great landing pages to inspire your own.
Coinbase uses a stylish and focused lead generation page with a clear message and unique value proposition. While trading cryptocurrency is a complex topic, the landing page simply asks you to enter your email address to get started. This example works because the call to action is clear, the copy is straightforward and the design is uncluttered.
Xero uses negative space and compelling copy to get its message across. There are two call to action buttons (with the same message) to steer visitors in the right direction. Xero’s page is attractive and colorful, uncluttered and emphasizes the call to action button, making it highly effective.
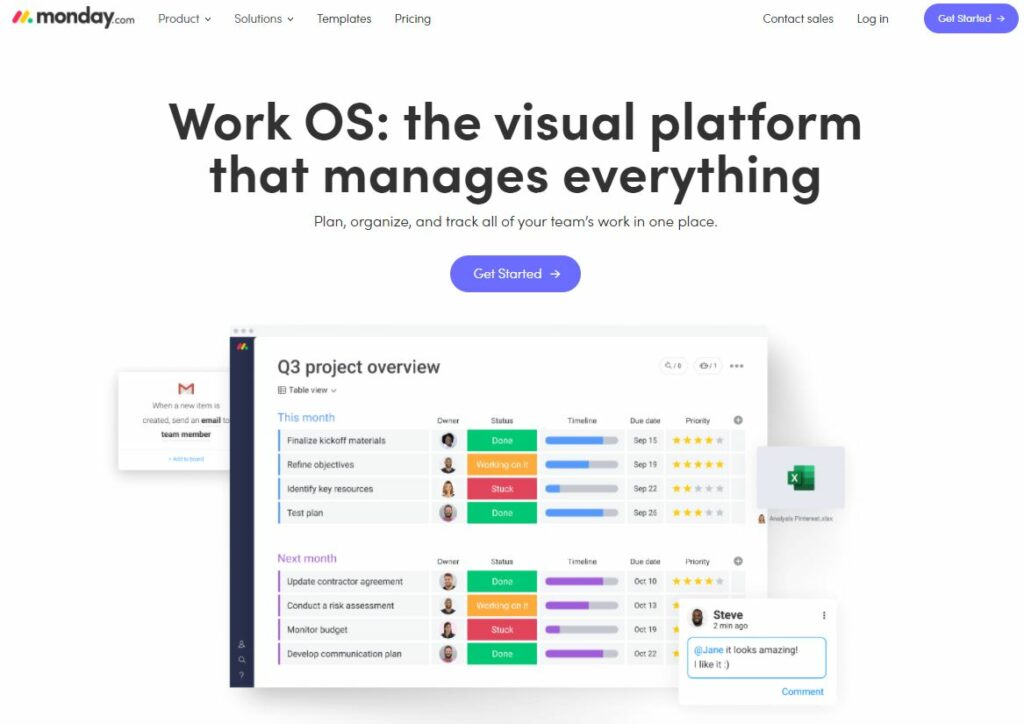
Monday.com uses colorful buttons to encourage visitors to create their free account. They’ve also added compelling social proof messages by mentioning the number of visitors to the site. This use of social proof and a clear, uncluttered layout — coupled with direct, pointed copy — increases their landing page’s ability to convert.
Astra uses compelling copy in their click-through button that assures users that they can secure your website against hackers in just three minutes. They’ve also added some big-name logos in their footer to build trust in the brand. The tagline, ‘Are you next?’ is compelling, with a solid and distinct call to action leading prospects to the sign-up page.
Take your landing pages to the next level
These tips provide a great starting point for designing a high-converting landing page, but no one gets it right the first time. Building an effective landing page requires ongoing optimization and innovation to determine what resonates with your audience.
Continuously testing your pages leads to new insights and continual improvements (Source)
Experimentation can help your brand improve the performance of your landing pages. Continuously testing your pages leads to new insights and improvements that’ll help you constantly adapt to new customer preferences even as they are being formed.
Looking for inspiration to take your landing pages to the next level? Check out our e-book, “50 Tests You Should Know For Website Optimization”: It contains 50 successful experiments from e-commerce businesses who have continuously optimized their websites to offer relevant and personalized experiences.
During software development, software goes through a series of stages. Testing, for its part, is a critical stage of the software development life cycle as it can determine the quality of the software that is to be released to live production environments.
In this article, we will be focusing on test environments and the types of testing that can be run in such environments and why test environments are an important part of your software pre-release strategy.
What is a test environment?
Once software tests are designed, they need an interface where they can be run or executed; this is what is referred to as a test environment.
A test environment is basically a combination of hardware, software, data and configurations in order to run tests.
Test environments need to be configured according to the needs of the software being tested and must be set to ensure that the software operates in the right conditions. In other words, there is no one-size-fits-all solution as it is the code that dictates the environment’s setup.
Thus, no two test environments are the same as they require a different setup to test different parts of the code- the parts that make the whole.
Certain test cases may also require the environment to be prepared according to a particular set of data. This is what is referred to as a test bed. Thus, a test bed is a test environment prepared with test data to help you identify cases requiring a particular data setup.
The main purpose of such environments is to allow QA teams to check system components and uncover errors and issues so the environment must closely replicate real user conditions. Once issues are detected, they can be fixed without affecting real users and negatively impacting their experience.
The elements of a test environment include the following:
The software to be tested
Test data
Network configuration
Device on which the software is to be tested
Database server
Types of environments
Before we delve deeper into test environments, we will first discuss the types of environments that precede and follow test environments. In this context, environments refer to the server location of the application or software, which are divided according to the state of the software.
Generally speaking, there are four types of environments in software development:
Development
Testing
Staging
Production
We will briefly go through each of these environments to better understand how they are linked to distinct stages in the release process.
Development environment
As the name suggests, this is where the development of the software takes place. It is the first environment where developers write the first lines of code and do all the code updates.
This environment usually consists of a server that is shared by several developers working together on the same project.
Therefore, when multiple developers are involved, a developer would have a copy of the source code on their own machine and then changes are submitted to the repository which are then integrated into the trunk or branch.
A number of preliminary testing takes place at this stage before moving on to the next stages.
For example, if developers have adopted a continuous integration methodology for their software development process then several changes daily would be committed to the trunk.
Testing environment
The testing environment allows QA engineers to test new and changed code whether via automated or non-automated techniques.
Development environments are ever-changing as developers keep adding new functionalities which makes it difficult for QA teams to run time-consuming tests so a testing environment is where they can execute more complex and time-consuming tests.
The code at this stage usually goes through more than one QA environment where unit tests are first conducted and the code is moved to further test environments.
Thus, you can either run tests one after the other or you can create several testing environments that allow for parallel testing to take place, depending on the sophistication of your testing environment.
More details about the different types of software tests will be discussed in the next sections.
Nonetheless, the focus here is testing individual components rather than the entire application, to check the compatibility between old and new code, the system’s performance and so on.
If there is a test failure, the faulty code can be removed in this environment. Thus, testers can ensure the quality of the code by finding any bugs and reviewing all bug fixes. However, if all tests pass, the test environment can automatically move the code to the next deployment environment.
Staging environment
This environment is a nearly exact replica of the production environment so it seeks to mirror an actual production environment as closely as possible to ensure the software works correctly.
The staging environment is often restricted to a small number of selected users and so it is limited to certain IPs and developer teams.
The purpose of this environment is to test on a near-production level but in a non-production environment to verify that the application will behave correctly after deployment. Thus, it represents a safe space away from the public eye to make sure everything works as expected; it is kept invisible from end-users.
The focus here is to test the application or software as a whole. In other words, staging environments are where you can conduct tests to ensure that no problems come up in production and limit negative impact on users there so that when the software is deployed to the production environment, there will be fewer errors to fix.
Examples of the kind of test that can be run in this environment include smoke testing and in particular load testing since it can be difficult to replicate high volumes of traffic in a staging environment to test the software or application under stress.
However, keep in mind that a staging environment is not meant to be a substitute for a real-world production environment.
To ensure your product works as it should, you need both a testing and staging environment, where the testing environment makes sure that every component does its job while the staging environment ensures that your software would behave correctly in an environment almost exactly the same as production.
While you can run many tests in a staging environment, the best way to truly determine how a feature performs is to test it on users in real-time, for example, through testing in production.
Production environment
This is where the software is produced and is running on a production server. It has officially gone live to real users.
When deploying a new release to production, rather than immediately deploying to all users, the release can be deployed in phases to a segment of your users first to see how it performs to catch and fix any additional bugs before deploying to the rest of your users.
In other words, just because you’re in the production environment, it doesn’t mean tests have to end here. You can and should still be testing in production. This can be done with the help of feature flags, which allow you to safely test in production on a pre-selected number of users.
Now that we’ve covered the main environments a software progresses through in its lifecycle, we will turn back to test environments and the type of testing that can be conducted in that particular environment.
Why is software testing required?
While we’re big advocates of testing in production, we acknowledge that some cases require dedicated test environments before moving forward onto production environments.
Before we move further to the types of software tests, it is important to shed light on why software testing is an essential modern software development practice. Choosing to skip this process is not advisable and may end up negatively impacting your products and business.
Before we move further to the types of software tests, it is important to shed light on why software testing is an essential modern software development practice. Choosing to skip this process is not advisable and may end up negatively impacting your products and business.
Below are just some of the reasons why software testing is so imperative nowadays:
Cost effective– testing your software will end up saving you money in the long run as testing the software will allow you to uncover bugs early on when it would cost less to fix them.
Security– software testing ensures that the software you’re releasing is free of any issues and thus you can guarantee your customers that your products are trust-worthy and safe to use.
Product quality-as software goes through continuous and diversified levels of testing, this ensures that bugs are detected along the software’s development process resulting in higher quality products.
Customer satisfaction– one of the main reasons tests are conducted are to ensure they provide the best user experience possible by making sure that the releases are stable and without any issues thereby achieving customer satisfaction.
Continuous delivery– an efficient setup of software testing would allow developers to push code changes into a CI/CD pipeline to go through the various levels of testing. If the code passes the tests, it can be automatically into production and if it fails it would notify developers so that they fix the issue. In other words, setting up automated testing allows you to maintain continuous delivery and to deliver higher-quality releases to end-users quickly.
Meanwhile, having a test environment to run these tests is essential as it provides you with a dedicated environment where you can isolate the code and verify the behavior of the application so it provides you with accurate feedback about the quality and performance of the software you’re testing.
Types of software testing
There are different types of tests that help analyze various elements of the software such as performance, security and user experience.
While a staging environment allows teams to replicate real testing conditions, tests will still need to be run beforehand to test its individual components to make sure that it all works well together to satisfy quality assurance requirements.
Below, we will highlight some of the most common tests which can be run during the software’s lifecycle:
Performance testing
These tests measure how fast an application responds to an interaction and so various aspects of the application such as page load speeds, stability and reliability are tested so that developers can make improvements as needed.
System integration testing
The main purpose of this testing is to ensure that all modules of an application work together smoothly and can communicate with each other. The interaction with the database is also tested.
Thus, it is all about making sure that the individual parts can function together as a whole.
User acceptance testing (UAT)
This testing is conducted to ensure that the application meets the business requirements of users and to ensure that functionalities of the application achieves customer satisfaction. UAT requires the whole application to be up and running and so usually represents the final stage of testing.
This type of testing also usually requires a staging environment- identical to a production environment but not accessible to end-users.
Alpha testing
After user acceptance testing is carried out within the development and product teams, testing can be expanded to include other kinds of users.
During Alpha testing, the release is tested outside of the teams involved in the project. It is typically conducted on internal users or employees within the organization and is usually followed by beta testing.
This test helps identify any bugs or issues before finally releasing the software to the end-user.
It attempts to simulate a real user environment by carrying out the same tasks and operations that the actual user will perform within the release to make sure it satisfies all of its functionalities.
Beta testing
In this testing environment, the software is released to a limited number of real-world users outside the organization to obtain their feedback which is then forwarded back to developers to optimize and improve the release as needed before releasing to all users.
It also tests the application or software under stress, where such load testing will help uncover any bugs that were not previously spotted.
As we’ve seen, testing is an essential part of the software development life cycle and so test environments must be efficient and reliable to ensure the quality of your products and they must be well-managed.
In this section, we’ll highlight some of the essential best practices for test environment management:
First, it is important you start testing early on in the development process. In other words, don’t wait too long to run tests on every commit.
Otherwise, when teams don’t test early, they end up with a number of bugs later on and at that point fixing these bugs would require a lot of time, cost and effort.
Second, try to reduce manual processes by introducing more automation as that will save you time and resources while your team can dedicate their time to building and improving the product instead of tedious manual tasks.
Furthermore, before creating yet another new test environment, verify if it’s possible to use an existing one. If you already have an existing infrastructure, then that will go a long way in saving you time and money.
Another thing to verify is that you actually have all the required software and hardware, which includes physical servers, licenses, operating systems, etc.
It also goes without saying that you need to consider how to ensure the maintenance of the test environment such as who’s responsible for its maintenance and how to ensure the reliability of the environment.
The main takeaway here should be to…
Test, test and then test some more starting early on in the software development process.
To reiterate, test environments represent an efficient and a safe space to conduct all your essential and most basic tests.
However, don’t forget that just because you think you have run a sufficient number of tests in your test environment that you should discard testing in production altogether.
Yes, test environments are great for ruling out bugs early on but they are not an actual production environment. The best way to guarantee the quality of your products is to test them on a segment of your users during production, i.e in the production environment.
You can now do this safely with feature flags, which allow you to test on a small segment of users and disable any buggy features instantly.
At AB Tasty, we love to help you improve your customers’ experiences – and we are here to do the same for you on the AB Tasty platform! We’re constantly gathering feedback from our users, and next month, you’ll see us roll out our new navigation based on that feedback.
We’re doing this for a few reasons:
We want to give you the best – and that means further improving the quality of your experience on the platform. 💖
We want you to be able to find exactly what you need, when you need it – which means improving the organization of information, classifying your favorite (and new!) features in an easy-to-navigate way. 🕵️
We want you to have the most intuitive experience possible – by providing you with better guidance from the first time you log in and get you from A to B as quick as can be. 🗺
What does that mean for you?
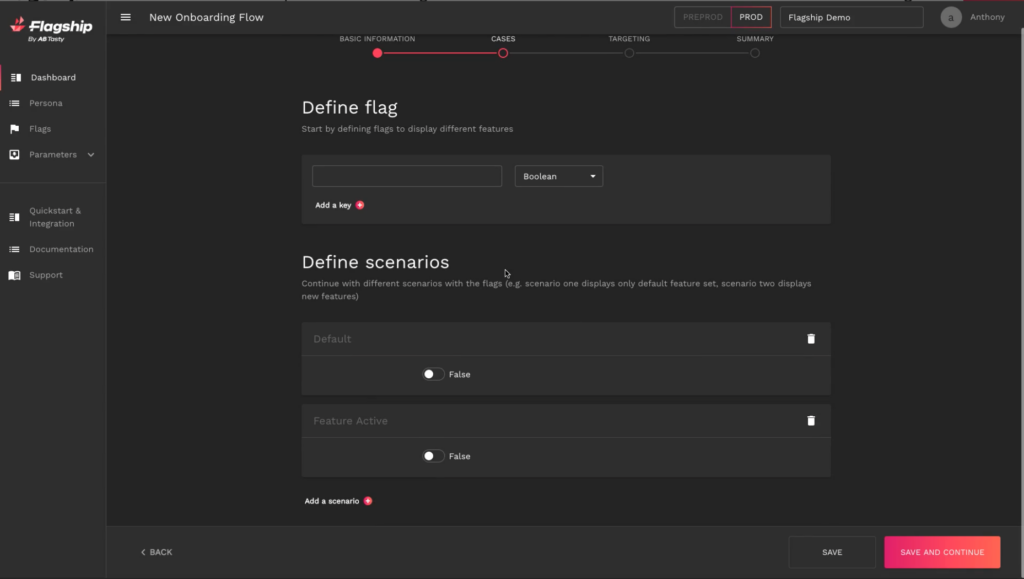
We’ll guide you through the updates in the coming weeks, but here’s a sneak peek of what to expect:
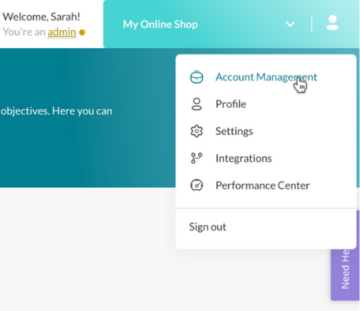
Better visibility with a new sidebar navigation, allowing you to easily access any area of the platform with a single click – and collapse it for more workspace.
We’ve gotten rid of the hamburger menu in favor of giving you more control over where you want to go within the platform – whether it be Tests, Personalization, Audience, Analysis, or ROI – plus a login button to take you directly to Flagship, our feature management solution. 🧭
Improved access to Settings, reorganized to match our customers’ most-used options.
We’ve designed a sleeker look, consolidating settings menu for a cleaner appearance and easier navigation. 💅
New header to accompany you through every step of the workflow, from campaign creation to reporting, giving you a better bird’s eye view of a campaign’s status.
Your step-by-step buttons will remain exactly where they are, but the header will shift to make everything more easily visible to you – including an editable campaign name, status, and reporting, right alongside the tag and account info. 👀
We hope these exciting changes make a big impact on how you use AB Tasty! 💥
We know you might have questions as you go through the new navigation, and we are here to help! We also know you might have feedback – about the new design and beyond – and we invite you, as always, to share it with us on our Canny board, accessible via this link.
When it comes to kickstarting experimentation within an organization, Lukas Vermeer recommends starting small and (keeping it) simple.
Lukas Vermeer took this advice to heart when he dove head-first into the world of AI and machine learning during the early stages of its development, when there was little industry demand. Through consulting for various companies, Lukas discovered his ideal work environment: a scale-up, where he could put his data and machine learning expertise to use.
Enter Booking.com. Lukas joined the Dutch digital travel company during the scale-up phase and went on to lead the experimentation team for eight years, scaling the team from three people to 30 people.
Once the experimentation team at Booking.com had reached maturity, he embarked on a new adventure in 2021 as director of experimentation at Vista. He is building and shaping the experimentation culture and tapping into the potential of their data, to further Vista’s impact as an industry leader in design and marketing solutions for small businesses.
Lukas spoke with AB Tasty’s VP of Marketing Marylin Montoya about the process and culture of experimentation; from the methods to the roles of the teams involved within an organization. Here are some of the key insights from their conversation.
Get strategic about experimentation
Knowing the purpose of your experiment is key. Lukas recommends focusing your efforts on testing big features that can drive real change or impact the company’s bottom line, rather than UI design.
Ask yourself, “What are the biggest questions that are driving your business case at the moment? What are the biggest assumptions that are behind your strategic planning?” he says. Rather than increasing the number of experiments, focus on the correct execution of more significant experiments.
When it comes to building a culture of experimentation within an organization, Lukas suggests using the flywheel method. The first experiment should garner attention by splitting the company’s opinion 50/50, as to whether it will work. This demonstrates that it can be hard to predict the success of experiments, thereby underlining the “unquantifiable value of experimentation.” We need to acknowledge that it is equally valuable to avoid shipping a bad product (that could reduce revenue), as it is to figure out strategically what you should invest in going forward.
Structure your organization for experimentation success
The way your business and teams are structured will impact how seamlessly your experiments are executed. Lukas recommends that the product development team take full ownership of the experiments.
The experimentation team should be facilitating experiments by providing the tools, education and troubleshooting support to the product development team, who can then run their experiments autonomously.
By training product managers in the process of experimentation — such as the different tests and tools available, their strengths and weaknesses, the assumptions they make and when to use them — they can work autonomously to test their ideas and select from a portfolio of experimental methods in order to make a decision.
There is, however, a social aspect to experimentation that should not be ignored. Given the subjective nature of data interpretation and analysis, Lukas highlights the importance of discussing the outcomes and giving feedback on the experimentation process in order to optimize it.
“The whole point of an experiment is to (…) drive a decision, and the decision should be supported by the evidence at hand,” Lukas says. Just as scientists peer-review their papers before publishing, experiments using the scientific method should follow the same guidelines to document the hypothesis, method, results and discussion in the reporting. (An opinion that has been echoed by 1,000 Experiments Club podcast guest Jonny Longden.)
The biggest threat to experimentation culture: leadership or roadmaps?
When people in product development talk about “roadmaps,” they’re not actually roadmaps, Lukas says. It’s more of a linear wishlist of steps that they hope will bring them to the goal. The problem is that there’s rarely alternative routes or redirections should they stray from the original plan.
It’s hard to change direction at the first failed experiment, Lukas explains, due to the “escalation of commitment.” That is, the more time and energy you have invested into something, the more difficult it is to change course.
So, is it time to ditch roadmaps altogether? Lukas advises that roadmaps should simply acknowledge that there is inherent uncertainty. There are many unknowns in product development, and these only become visible once the products are being built and exposed to customers. This is why the build-measure-learn model works, because we take a few steps and then check if we’re heading in the right direction.
Lukas says the goal should not be to “deliver a final product in two months,” rather you should incorporate the uncertainty into the deliverables and word the objective accordingly, for example: to check if customers are responding in the desired way.
What else can you learn from our conversation with Lukas Vermeer?
When to start experimenting and how to build a culture of experimentation
The importance of autonomy for experimentation teams
The three levels of experimentation: method, design, execution
How to accelerate the experimentation process
About Lukas Vermeer
Lukas Vermeer is an expert in implementing and scaling experimentation with a background in AI and machine learning. Currently, Lukas is the director of experimentation at Vista. Prior to this, he spent over eight years at Booking.com, from data scientist, product manager to director of experimentation. He continues to offer his expert consulting services to companies that are starting to implement experimentation. His most recently co-authored paper, “It Takes a Flywheel to Fly: Kickstarting and Keeping the A/B Testing Momentum,” helps companies get started and accelerate experimentation using the “investment follows value follows investment” flywheel.
About 1,000 Experiments Club
The 1,000 Experiments Club is an AB Tasty-produced podcast hosted by Marylin Montoya, VP of Marketing at AB Tasty. Join Marylin and the Marketing team as they sit down with the most knowledgeable experts in the world of experimentation to uncover their insights on what it takes to build and run successful experimentation programs.
The topic of feature flags is gaining popularity with developers and marketers alike using these flags to test and deploy safely in production among other many uses.
In this article, we’ve decided to compile our top picks of the best content out there on feature flags for your reading pleasure.
Whether your team has already been using feature flags to safely release new software or whether you’re just tentatively dipping your toes and looking to get more information on this powerful software development tool, you’re bound to find something in our selection that best suits your needs.
So, without further ado and in no particular order, here are our top picks:
This is certainly one of the most popular articles about feature flags. Indeed, a quick Google search will always include an article from Martin Fowler and his many articles written by him or by colleagues on the software development life cycle and how to build software effectively.
Why we picked it:
It’s a no-brainer. This article, one of the oldest out there first published back in 2016, is a classic and explains in great detail and clarity the topic of feature toggles or flags from their birth to their different categories and implementation techniques.
In our opinion, this is a great article especially for those trying to become more acquainted with this topic. It also uses simplified figures for easier understanding.
This is another great article that breaks down the complexity of feature flags from what they are to their importance and the different ways to implement them.
It’s a good starting point for anyone who’s just embarking on their feature flag learning journey.
GitHub, a provider of internet hosting for software development, provides excellent resources to help developers build and develop software, among which highlight the topic of feature flags.
Why we picked it:
We always think the best way to truly understand something is by providing concrete and practical examples. This is what this article from a company in the industry does.
This article paints a clear picture of the uses and benefits of feature flags by illustrating how GitHub reaps the benefits of these flags in its deployment processes. It explains in great detail how feature flags have allowed them to efficiently work on new features and to test these features, thereby inviting developers to embrace this software development methodology in their own releases.
We’ve often heard about how developers use feature flags as they are the ones coding them. However, product and marketing teams have long started to recognize the benefits of using feature flags themselves to test out their ideas on customers. A sophisticated feature flagging platform, in particular, allows different teams to access and control flags (and not just developers).
Therefore, the author argues that feature flags are a major win not only for developers but also product managers by boosting productivity and reducing the stress of new releases. The article also weighs in on the infamous build vs buy decision.
This article really lays out the value behind feature flags by depicting how each team within an organization utilizes them to solve many issues that usually come up in development, making life much easier for these teams.
Much like the previous article, it highlights the importance of feature flags and how they have revolutionised the Agile development process.
We have carefully crafted a platform to suit both development and product teams and equip them with the right tools to safely deploy code into production and eliminate the risk of new releases.
Why we picked it:
At the risk of tooting our own horn, we think that this article on our blog covers a wide range of use cases that could be implemented using feature flags from preparing for launch to other scenarios where such flags could come in handy, targeted towards both product and development teams.
This article provides an interesting discussion on the benefits of feature flags while acknowledging their potential costs and listing the requirements that should be put in place to carefully manage these flags to avoid the build-up of heavy costs over time. Among such requirements include documenting when a flag is introduced and setting an owner for each flag to be able to make the decision to remove the flag when it is no longer needed.
You might have already come across the dreaded ‘technical debt’. In this article, the engineering team at Uber tackles the dark side of feature flags and how they developed a tool in order to deal with the issue of removing stale feature flags to prevent accumulation of this debt.
Piranha is an open-source tool but it’s currently only available for Objective-C, Swift, and Java programs.
Nonetheless, we think that this article provides a detailed look into the issue of technical debt and why it’s important to keep track of feature flags, particularly stale ones, in your code.
Conclusion
And there it is: our non-exhaustive list of our favorite posts that cover the ever-expanding and fascinating topic of feature flags!
The debate about the best way to interpret test results is becoming increasingly relevant in the world of conversion rate optimization.
Torn between two inferential statistical methods (Bayesian vs. frequentist), the debate over which is the “best” is fierce. At AB Tasty, we’ve carefully studied both of these approaches and there is only one winner for us.
There are a lot of discussions regarding the optimal statistical method: Bayesian vs. frequentist (Source)
But first, let’s dive in and explore the logic behind each method and the main differences and advantages that each one offers. In this article, we’ll go over:
[toc]
What is hypothesis testing?
The statistical hypothesis testing framework in digital experimentation can be expressed as two opposite hypotheses:
H0 states that there is no difference between the treatment and the original, meaning the treatment has no effect on the measured KPI.
H1 states that there is a difference between the treatment and the original, meaning that the treatment has an effect on the measured KPI.
The goal is to compute indicators that will help you make the decision of whether to keep or discard the treatment (a variation, in the context of AB Tasty) based on the experimental data. We first determine the number of visitors to test, collect the data, and then check whether the variation performed better than the original.
There are two hypotheses in the statistical hypothesis framework (Source)
Essentially, there are two approaches to statistical hypothesis testing:
Frequentist approach: Comparing the data to a model.
Bayesian approach: Comparing two models (that are built from data).
From the first moment, AB Tasty chose the Bayesian approach for conducting our current reporting and experimentation efforts.
What is the frequentist approach?
In this approach, we will build a model Ma for the original (A) that will give the probability Pto see some data Da. It is a function of the data:
Ma(Da) = p
Then we can compute a p-value, Pv, from Ma(Db), which is the probability to see the data measured on variation B if it was produced by the original (A).
Intuitively, if Pv is high, this means that the data measured on B could also have been produced by A (supporting hypothesis H0). On the other hand, if Pv is low, this means that there are very few chances that the data measured on B could have been produced by A (supporting hypothesis H1).
A widely used threshold for Pv is 0.05. This is equivalent to considering that, for the variation to have had an effect, there must be less than a 5% chance that the data measured on B could have been produced by A.
This approach’s main advantage is that you only need to model A. This is interesting because it is the original variation, and the original exists for a longer time than B. So it would make sense to believe you could collect data on A for a long time in order to build an accurate model from this data. Sadly, the KPI we monitor is rarely stationary: Transactions or click rates are highly variable over time, which is why you need to build the model Ma and collect the data on B during the same period to produce a valid comparison. Clearly, this advantage doesn’t apply to a digital experimentation context.
This approach is called frequentist, as it measures how frequently specific data is likely to occur given a known model.
It is important to note that, as we have seen above, this approach does not compare the two processes.
Note: since p-value are not intuitive, they are often changed into probability like this:
p = 1-Pvalue
And wrongly presented as the probability that H1 is true (meaning a difference between A & B exists). In fact, it is the probability that the data collected on B was not produced by process A.
What is the Bayesian approach (used at AB Tasty)?
In this approach, we will build two models, Ma and Mb (one for each variation), and compare them. These models, which are built from experimental data, produce random samples corresponding to each process, A and B. We use these models to produce samples of possible rates and compute the difference between these rates in order to estimate the distribution of the difference between the two processes.
Contrary to the first approach, this one does compare two models. It is referred to as the Bayesian approach or method.
Now, we need to build a model for A and B.
Clicks can be represented as binomial distributions, whose parameters are the number of tries and a success rate. In the digital experimentation field, the number of tries is the number of visitors and the success rate is the click or transaction rate. In this case, it is important to note that the rates we are dealing with are only estimates on a limited number of visitors. To model this limited accuracy, we use beta distributions (which are the conjugate prior of binomial distributions).
These distributions model the likelihood of a success rate measured on a limited number of trials.
Let’s take an example:
1,000 visitors on A with 100 success
1,000 visitors on B with 130 success
We build the model Ma = beta(1+success_a,1+failures_a) where success_a = 100 & failures_a = visitors_a – success_a =900.
You may have noticed a +1 for success and failure parameters. This comes from what is called a “prior” in Bayesian analysis. A prior is something you know before the experiment; for example, something derived from another (previous) experiment. In digital experimentation, however, it is well documented that click rates are not stationary and may change depending on the time of the day or the season. As a consequence, this is not something we can use in practice; and the corresponding prior setting, +1, is simply a flat (or non-informative) prior, as you have no previous usable experiment data to draw from.
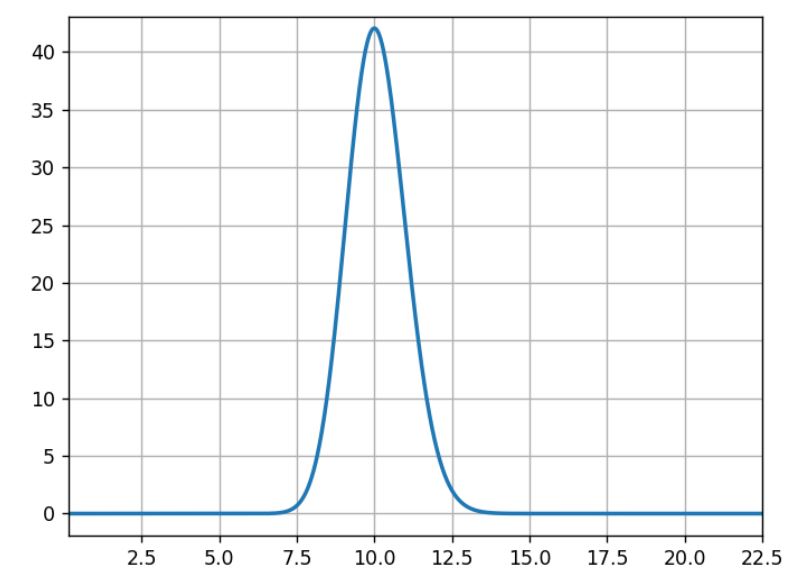
For the three following graphs, the horizontal axis is the click rate while the vertical axis is the likelihood of that rate knowing that we had an experiment with 100 successes in 1,000 trials.
(Source: AB Tasty)
What usually occurs here is that 10% is the most likely, 5% or 15% are very unlikely, and 11% is half as likely as 10%.
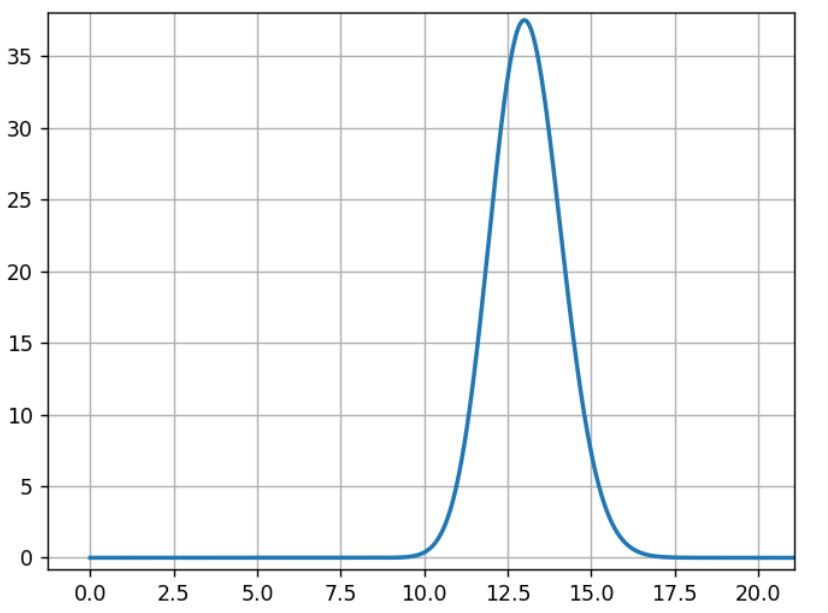
The model Mb is built the same way with data from experiment B:
Mb= beta(1+100,1+870)
(Source: AB Tasty)
For B, the most likely rate is 13%, and the width of the curve’s shape is close to the previous curve.
Then we compare A and B rate distributions.
Blue is for A and orange is for B (Source: AB Tasty)
We see an overlapping area, 12% conversion rate, where both models have the same likelihood. To estimate the overlapping region, we need to sample from both models to compare them.
We draw samples from distribution A and B:
s_a[i] is the i th sample from A
s_b[i] is the i th sample from B
Then we apply a comparison function to these samples:
the relative gain: g[i] =100* (s_b[i] – s_a[i])/s_a[i]for all i.
It is the difference between the possible rates for A and B, relative to A (multiplied by 100 for readability in %).
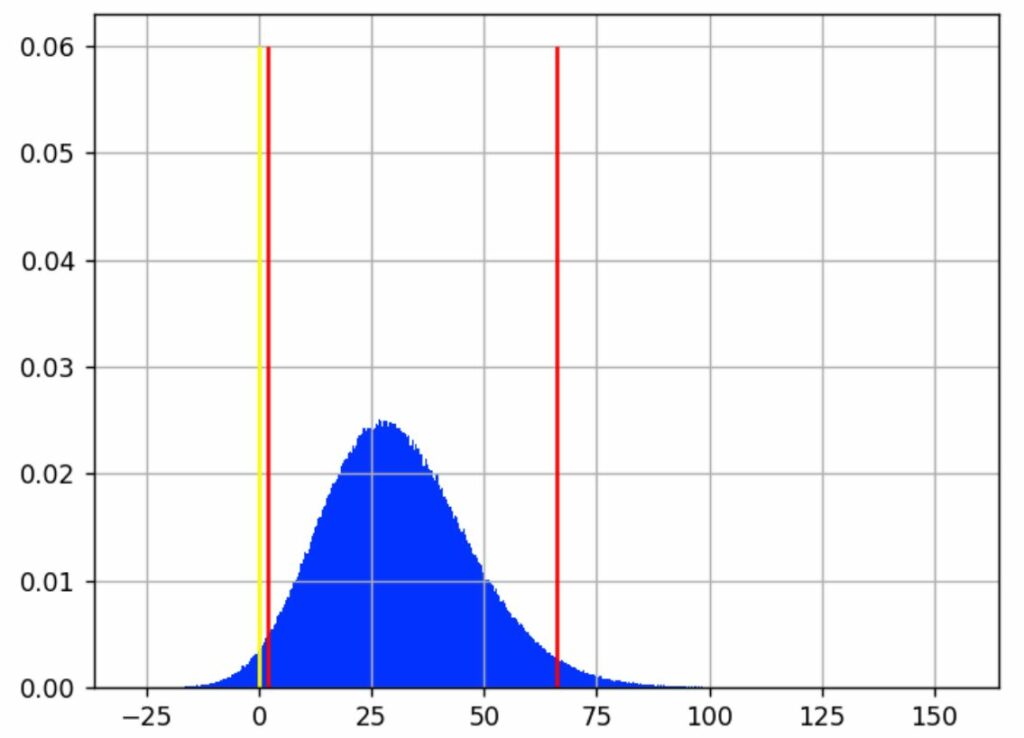
We can now analyze the samples g[i] with a histogram:
The horizontal axis is the relative gain, and the vertical axis is the likelihood of this gain (Source: AB Tasty)
We see that the most likely value for the gain is around 30%.
The yellow line shows where the gain is 0, meaning no difference between A and B. Samples that are below this line correspond to cases where A > B, samples on the other side are cases where A < B.
We then define the gain probability as:
GP = (number of samples > 0) / total number of samples
With 1,000,000 (10^6) samples for g, we have 982,296 samples that are >0, making B>A ~98% probable.
We call this the “chances to win” or the “gain probability” (the probability that you will win something).
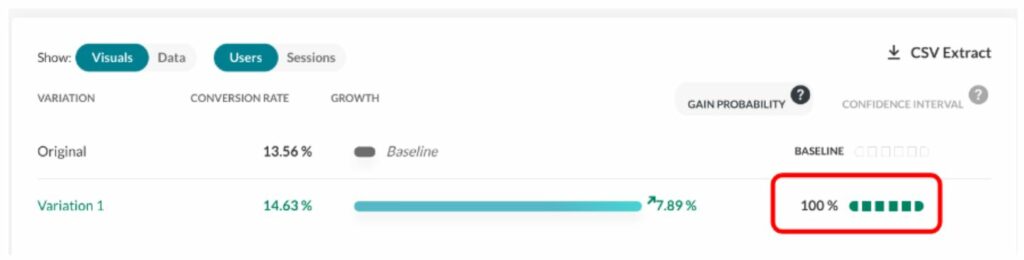
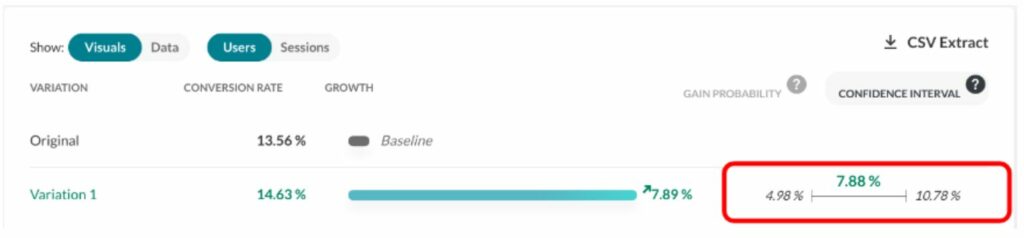
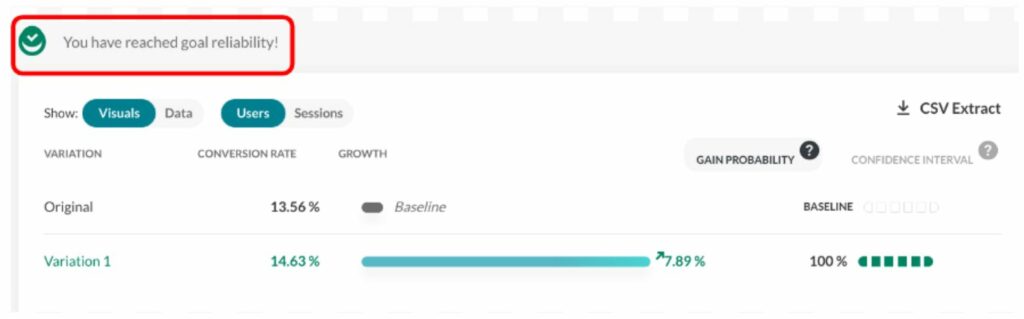
The gain probability is shown here (see the red rectangle) in the report:
(Source: AB Tasty)
Using the same sampling method, we can compute classic analysis metrics like the mean, the median, percentiles, etc.
Looking back at the previous chart, the vertical red lines indicate where most of the blue area is, intuitively which gain values are the most likely.
We have chosen to expose a best- and worst-case scenario with a 95% confidence interval. It excludes 2.5% of extreme best and worst cases, leaving out a total of 5% of what we consider rare events. This interval is delimited by the red lines on the graph. We consider that the real gain (as if we had an infinite number of visitors to measure it) lies somewhere in this interval 95% of the time.
In our example, this interval is [1.80%; 29.79%; 66.15%], meaning that it is quite unlikely that the real gain is below 1.8 %, and it is also quite unlikely that the gain is more than 66.15%. And there is an equal chance that the real rate is above or under the median, 29.79%.
The confidence interval is shown here (in the red rectangle) in the report (on another experiment):
(Source: AB Tasty)
What are “priors” for the Bayesian approach?
Bayesian frameworks use the term “prior” to refer to the information you have before the experiment. For instance, a common piece of knowledge tells us that e-commerce transaction rate is mostly under 10%.
It would have been very interesting to incorporate this, but these assumptions are hard to make in practice due to the seasonality of data having a huge impact on click rates. In fact, it is the main reason why we do data collection on A and B at the same time. Most of the time, we already have data from A before the experiment, but we know that click rates change over time, so we need to collect click rates at the same time on all variations for a valid comparison.
It follows that we have to use a flat prior, meaning that the only thing we know before the experiment is that rates are in [0%, 100%], and that we have no idea what the gain might be. This is the same assumption as the frequentist approach, even if it is not formulated.
Challenges in statistics testing
As with any testing approach, the goal is to eliminate errors. There are two types of errors that you should avoid:
False positive (FP): When you pick a winning variation that is not actually the best-performing variation.
False negative (FN): When you miss a winner. Either you declare no winner or declare the wrong winner at the end of the experiment.
Performance on both these measures depends on the threshold used (p-value or gain probability), which depends, in turn, on the context of the experiment. It’s up to the user to decide.
Another important parameter is the number of visitors used in the experiment, since this has a strong impact on the false negative errors.
From a business perspective, the false negative is an opportunity missed. Mitigating false negative errors is all about the size of the population allocated to the test: basically, throwing more visitors at the problem.
The main problem then is false positives, which mainly occur in two situations:
Very early in the experiment: Before reaching the targeted sample size, when the gain probability goes higher than 95%. Some users can be too impatient and draw conclusions too quickly without enough data; the same occurs with false positives.
Late in the experiment: When the targeted sample size is reached, but no significant winner is found. Some users believe in their hypothesis too much and want to give it another chance.
Both of these problems can be eliminated by strictly respecting the testing protocol: Setting a test period with a sample size calculator and sticking with it.
At AB Tasty, we provide a visual checkmark called “readiness” that tells you whether you respect the protocol (a period that lasts a minimum of 2 weeks and has at least 5,000 visitors). Any decision outside these guidelines should respect the rules outlined in the next section to limit the risk of false positive results.
This screenshot shows how the user is informed as to whether they can take action.
(Source: AB Tasty)
Looking at the report during the data collection period (without the “reliability” checkmark) should be limited to checking that the collection is correct and to check for extreme cases that require emergency action, but not for a business decision.
When should you finalize your experiment?
Early stopping
“Early stopping” is when a user wants to stop a test before reaching the allocated number of visitors.
A user should wait for the campaign to reach at least 1,000 visitors and only stop if a very big loss is observed.
If a user wants to stop early for a supposed winner, they should wait at least two weeks, and only use full weeks of data. This tactic is interesting if and when the business cost of a false positive is okay, since it is more likely that the performance of the supposed winner would be close to the original, rather than a loss.
Again, if this risk is acceptable from a business strategy perspective, then this tactic makes sense.
If a user sees a winner (with a high gain probability) at the beginning of a test, they should ensure a margin for the worst-case scenario. A lower bound on the gain that is near or below 0% has the potential to evolve and end up below or far below zero by the end of a test, undermining the perceived high gain probability at its beginning. Avoiding stopping early with a low left confidence bound will help rule out false positives at the beginning of a test.
For instance, a situation with a gain probability of 95% and a confidence interval like [-5.16%; 36.48%; 98.02%] is a characteristic of early stopping. The gain probability is above the accepted standard, so one might be willing to push 100% of the traffic to the winning variation. However, the worst-case scenario (-5.16%) is relatively far below 0%. This indicates a possible false positive — and, at any rate, is a risky bet with a worst scenario that loses 5% of conversions. It is better to wait until the lower bound of the confidence interval is at least >0%, and a little margin on top would be even safer.
Late stopping
“Late stopping” is when, at the end of a test, without finding a significant winner, a user decides to let the test run longer than planned. Their hypothesis is that the gain is smaller than expected and needs more visitors to reach significance.
When deciding whether to extend the life of a test, not following the protocol, one should consider the confidence interval more than the gain probability.
If the user wants to test longer than planned, we advise to only extend very promising tests. This means having a high best-scenario value (the right bound of the gain confidence interval should be high).
For instance, this scenario: gain probability at 99% and confidence interval at [0.42 %; 3.91%] is typical of a test that shouldn’t be extended past its planned duration: A great gain probability, but not a high best-case scenario (only 3.91%).
Consider that with more samples, the confidence interval will shrink. This means that if there is indeed a winner at the end, its best-case scenario will probably be smaller than 3.91%. So is it really worth it? Our advice is to go back to the sample size calculator and see how many visitors will be needed to achieve such accuracy.
Note: These numerical examples come from a simulation of A/A tests, selecting the failed ones.
Confidence intervals are the solution
Using the confidence interval instead of only looking at the gain probability will strongly help improve decision-making. Not to mention that even outside of the problem of false positives, it’s important for the business. All variations need to meet the cost of its implementation in production. One should keep in mind that the original is already there and has no additional cost, so there is always an implicit and practical bias toward the original.
Any optimization strategy should have a minimal threshold on the size of the gain.
Another type of problem may arise when testing more than two variations, known as the multiple comparison problem. In this case, a Holm-Bonferroni correction is applied.
Why AB Tasty chose the Bayesian approach
Wrapping up, which is better: the Bayesian vs. frequentist method?
As we’ve seen in the article, both are perfectly sound statistical methods. AB Tasty chose the Bayesian statistical model for the following reasons:
Using a probability index that corresponds better to what the users think, and not a p-value or a disguised one;
Providing confidence intervals for more informed business decisions (not all winners are really interesting to push in production.). It’s also a means to mitigate false positive errors.
At the end of the day, it makes sense that the frequentist method was originally adopted by so many companies when it first came into play. After all, it’s an off-the-shelf solution that’s easy to code and can be easily found in any statistics library (this is a particularly relevant benefit, seeing as how most developers aren’t statisticians).
Nonetheless, even though it was a great resource when it was introduced into the experimentation field, there are better options now — namely, the Bayesian method. It all boils down to what each option offers you: While the frequentist method shows whether there’s a difference between A and B, the Bayesian one actually takes this a step further by calculating what the difference is.
To sum up, when you’re conducting an experiment, you already have the values for A and B. Now, you’re looking to find what you will gain if you change from A to B, something which is best answered by a Bayesian test.
In a world where customers increasingly seek to buy into a brand than buy from a brand, it’s critical that companies create experiences that turn customers into loyal fans, rather than regard them as simple business transactions.
Customer satisfaction alone is no longer enough to thrive in today’s economy. The goal is to earn your customers’ fierce loyalty with authenticity and transparency, while aligning your offers and actions with a mission that speaks to them.
By measuring the net promoter score (NPS), businesses gain unique insight into how consumers perceive their customer journey in a number of different ways. Companies that use NPS to analyze customer feedback and identify areas of improvement hold the keys to optimizing rapid and effective business growth.
In this article, we’ll cover why measuring NPS is essential to scaling business sustainably, how to gather and calculate NPS feedback, and best practices to increase response rates and run successful NPS campaigns.
[toc]
What is NPS?
Let’s start with a little history. The Net Promoter Score was officially pioneered and coined by Fred Reichheld in the early 2000s, and has since become an invaluable methodology for traditional and online businesses alike. The value lies in using data to effectively quantify customer loyalty and its effect on business performance — a factor that was previously challenging to measure at scale.
The system works by asking customers a version of this question: How likely are you to recommend our brand/product/service to a friend or colleague? Answers range on a scale of 0-10, from “not at all likely” to “extremely likely.” Depending on their answers, respondents are separated into one of three categories.
Promoters (score 9-10): Loyal customers who keep buying and actively promote and refer your brand to their circle of friends, family, and/or colleagues.
Passives (score 7-8): Customers who’ve had satisfactory or standard experiences with your brand, and are susceptible to competitors’ offers.
Detractors (score 0-6): Unhappy customers who risk damaging your brand with public complaints and negative word-of-mouth.
To calculate the final net promoter score, subtract the percentage of promoters from the percentage of detractors. The metric can range from a low of -100 to a maximum of 100, the latter if every customer was a promoter.
For many e-commerce companies, high customer retention, referral, and positive reviews are all critical drivers of success. NPS helps these businesses understand overall buyer behaviors and identify which customer profiles have the potential to be brand enthusiasts, enabling marketers to adjust their strategy to convert passives into promoters.
Simply put, NPS surveys are a simple and powerful method for companies to calculate how customer experience management impacts their overall business performance and growth.
How to gather NPS feedback
Common methods used to gather NPS feedback are email, SMS, and website pop-ups or chat boxes. Regardless of which method is used, there is a common set of steps to ensure a successful NPS campaign:
Set clear objectives before sending out the NPS survey. Save time and increase the relevance of survey responses by determining exactly what kind of feedback you’re looking for before launching the survey.
Segment recipients with customer behavior profiles. Get specific with your survey questions by customizing them to different audiences based on their unique history and interaction(s) with your brand.
Make surveys short, concise, and timely. Instead of lengthy annual or quarterly feedback requests, increase response rates by sending quick and easy surveys to customers soon after they’ve had meaningful interactions with your brand.
Use an automation tool to optimize survey delivery. Whether it’s with an email marketing platform or website widget integration, using automation tools to design and deliver your NPS surveys streamlines the entire feedback process, while reducing the margin for human error.
Integrating the NPS survey directly into the customer journey on your website increases response rate and relevancy of feedback. To implement a NPS survey like this, try using an intuitive visual editor like AB Tasty with NPS widget capabilities.
AB Tasty’s visual editor enables marketers of all levels to:
Modify visual and interactive elements on the website without any manual coding necessary;
Set up action-tracking to directly measure the performance of variations you’ve created;
Use the NPS widget to customize the content and feel of surveys across one or more pages of the website; and
Track the evolution potential of customer loyalty and benchmark against competitor performance via the NPS report.
Below are two case studies of clients who’ve used the AB Tasty NPS widget with highly successful campaigns to collect customer feedback and gain valuable insight to improve their customer experiences.
How to calculate NPS feedback
So what makes a good NPS score? A general rule of thumb states that anything below 0 means your business has some work to do … and a “good score” falls between 0-30. However, the true value of a NPS score depends on several factors — namely what industry your business is in.
If your NPS score isn’t as high as you’d hoped, don’t fret! There is always room for improvement and the good news is that it’s easy to implement actionable changes to optimize your NPS campaigns, no matter where you are on the scale.
When benchmarking for NPS, look at competitors that are in the same industry and relatively similar size as your company to get the most accurate visualization possible. Look for graphs that map out average NPS data by industry to get more insights on performance and opportunities for improvement in your sector.
It’s important to understand that comparing your business’s results to significantly larger or unrelated brands can lead not only to inaccurate interpretation of the data, but also sets unrealistic and irrelevant goals for customer experience teams.
How to increase your NPS response rate
Reaching your customers with your NPS survey is just one half of the battle. The other half is getting enough customers to actually respond to it, which is critical to calculate an NPS score that accurately reflects your company’s customer satisfaction performance. Here are some tips for boosting your NPS response rate:
Customize your NPS survey. Take the time to brand your survey with the proper fonts and colors, following your brand design guide. Given the fact that the average person sees upwards of 6,500 ads in a day, information overload is a real struggle for consumers and marketers alike. A consistent look and feel from your survey helps customers recognize and trust your brand, making it an easy transition to take the next step in their customer journey.
Personalize the message. Studies show that personalized subject lines increase email open rates by 26%. If you’re sending the survey in an email, use merge fields or tags to automatically add each recipient’s name into the subject line or body of the email.
Use responsive design. 75% of customers complete surveys on their phone. Make sure your survey is fully functional and accessible from all devices (i.e., desktop, mobile, and tablet), as well as on as many operating systems and internet browsers as possible.
Offer incentives for completing the survey. From gift cards, cash, and promo codes to raffles, offering monetary rewards is an easy method to increase engagement, especially for longer surveys. However, this should be researched and done carefully to avoid review bias and more seriously, legal issues.
Why you should use NPS
Taking customer feedback seriously is important business. As of 2020, 87% of people read online reviews for local businesses, and 79% said they trust online reviews as much as a personal recommendation from friends or family. This means your customers’ perception of your brand can literally make or break it.
It’s clear that looking at sales revenue as the sole determiner of success is not sustainable for long-term business growth. Neither is assuming that several user case scenarios represent the majority without the data to prove it.
NPS is an especially powerful metric for e-commerce, as it uses data to help businesses identify truly relevant areas for improvement and opportunities to build a strong and loyal customer base that is so vital to thrive in this sector.
Building a strong relationship with your customer base and incentivizing brand promoters is crucial to succeeding in the e-commerce market
Rather than guesstimating what priorities should be, businesses can use longer surveys with open-ended questions to evaluate how their customers feel about specific aspects of the business (e.g., products, website, and brand) and target strategy accordingly.
When calculated correctly, NPS is the key to determining the likelihood of repeat business and acquisition driven by brand promoters. Marketing and product teams can boost customer retention and increase sales with customized products they know buyers want. Happy customers love loyalty programs and referral rewards, which also bring in new business with significantly less spend than cold advertising.
When is the ideal time to send users an NPS survey
Deciphering what time customers are most likely to open emails, or when they’re more responsive to brand communications, is one of the biggest challenges for marketing teams.
Some studies suggest that the best time of the week to send emails is Tuesday at 10am. Although as many marketers know from experience, a one-time-fits-all solution doesn’t truly exist (though we wish it did!).
Depending on your industry and audience, your brand’s ideal time to hit send will likely change over time — and experimentation and optimization are the best ways to stay on top of it.
Identifying the right time to send customer satisfaction surveys requires continual testing of different elements like message personalization and audience segmentation
However it is possible to find ideal times based on data you likely already have: by focusing on meaningful interactions between brand and customer.
One of the optimal times to send a NPS survey is shortly after customers have had a meaningful interaction with the brand. This could be after a customer finishes a purchase cycle, receives a product, or even speaks with customer service.
During this time, the customer experience is still top-of-mind, which means they are more likely to complete a feedback survey with higher chances of providing more detailed — and honest — insights.
It’s also better to send short surveys more frequently. Asking for smaller amounts of feedback more often than once or twice a year enables you to monitor customer satisfaction with a quicker response time.
With regular feedback surveys, businesses can catch onto unhappy customers early on and make prompt changes to address problems in the customer journey, increasing customer retention.
Another benefit of this practice is that businesses can also identify highly successful campaigns throughout the year and prioritize resources on scaling strategies that are already proven to work well.
Do’s and don’ts for running an effective NPS campaign
Do:
Add open-ended questions. If you want more qualitative insight to support your business decisions, ask customers for specific input, as Eurosport did in this campaign.
Send from a person. Humans value real connections. Increase NPS response rate by sending surveys with the name and email of a real employee, not an automatic “no-reply” bot address.
Integrate your NPS survey into the user journey. To boost your reach beyond email surveys, use an NPS widget on your website for increased response rate and in-depth responses. Match your survey’s design to flow with the product page UX.
Don’t:
Disrupt the customer journey. Don’t overdo it with pop-up surveys or make them difficult to close, this can distract customers from their website experience and increase bounce rate.
Ask only one question. Don’t ask for just a 0-10 score. To collect actionable insight, add a follow-up question after the NPS score to ask why they gave that rating.
Not share NPS results. Transparency makes cross-team collaboration more effective and creative. NPS data is valuable for not only customer-facing teams, but also marketing and product teams to improve the customer experience.
Optimize your NPS strategy
In summary, NPS is incredibly user-friendly and simple to implement. This metric helps brands gain actionable insight into their customer loyalty and satisfaction, and identify opportunities to significantly boost customer retention and acquisition.
NPS widgets and automated feedback collection enable cross-team collaborators to work more cohesively on customer experience campaigns
Businesses can use this data to run their operations better and smarter, and also improve cross-team collaboration on enhancing the customer experience. Regular testing and following best practices enable teams to continually improve their NPS strategy and reach higher response rates.
Ready to integrate your next NPS campaign directly into your website and customer journey? With an intuitive interface and no-code visual editor, AB Tasty enables you to fully customize the entire NPS survey live on your website, and experiment with different triggers to optimize your NPS strategy.
Our NPS widget makes it easy to scale this process quickly within even the fastest growing companies — give it a spin today.
Feature management tools have become valuable for modern development teams. With such tools, teams now have a way to push releases safely and quickly with more confidence than ever before.
These tools provide a safe and efficient way to toggle features on and off targeting a specific set of users while fixing bugs without any disruption to users.
Furthermore, many of these tools provide an easy-to-use dashboard that can be used by all teams, even the less technical product teams, allowing them to release features at their own pace without relying too much on development teams to do it for them.
Feature management softwares, in that sense, pave the way for feature testing enabling product teams to experiment and test their ideas so that they may deliver high quality software that customers actually want.
Undoubtedly, with the many benefits that come with such tools, there are many options to choose from that you may find yourself at a loss at which one to opt for.
In this post, we will list the many tools out there and their main features so that you can decide which is best suited for your organization and unique needs.
What is feature management?
First, we will start off with what exactly we mean by the term ‘feature management’ before we move onto our list.
The term feature management encompasses software development tools that allow teams to better manage the rollout and roll back of features.
These tools provide a framework for feature flag-driven development meaning that teams can use flags on a wide scale to manage features across a wide variety of use cases.
Teams that implement such tools see higher productivity and an increase in software quality as they enable continuous testing of releases through gradual roll out of these releases to subsets of users.
As already mentioned, this allows teams, particularly product teams, to continuously test out their ideas through techniques such as A/B testing and experimentation and optimize products accordingly.
The core of feature management: Feature flags
Just as a quick recap of feature flags: feature flags are basically if-else statements that decouple deployment from release providing teams with full control over which users see which features.
When you’re just starting out, you’ll implement a feature flag from a config file with an easy on/off toggle to test and roll out new features.
However, at some point, things may become more complicated as your use cases evolve making flags harder to manage.
As you start to realize the value of feature flags in your experimentation roadmap, adopting the right feature management tool will help you manage hundreds, if not thousands, flags across several teams. Eventually, you will need to retire some of these flags, lest they accumulate into technical debt.
The key to managing all these active flags in your system is to opt for a more comprehensive feature flag management tool.
Feature flag management tools: Our top picks
Without further ado, we will present you with a list of tools that are worth looking into. Note that there is no particular order to this list.
Instead, we will lay out the tools highlighting their main features (and when they might come particularly handy) so you can decide which one best suits your objectives and teams’ capabilities.
LaunchDarkly
Launchdarkly is a feature management platform that is jam-packed with features for safe testing in production. The platform is made to integrate seamlessly into your existing software development workflow.
Some of the features you can expect from the platform:
Target specific users based on built-in user attributes
Run sophisticated A/B/n tests for data-driven product decisions
Integrate with other tools to enhance monitoring and collaboration
A number of SDKs that can be used for a variety of programming languages and platforms
The platform was built with developers in mind so that they may ship code whenever they want but is also suited for all teams across an organization so that they can also control and release software. It’s a good choice for those looking for advanced feature management capabilities to run more sophisticated experiments.
Pricing
The platform offers 3 tiers of pricing based on team size with basic functionality on the starter plan and more advanced functionalities at the enterprise level. They come with a 14-day free trial period. However, the payment is distributed per number of seats so you are limited to the number of seats per account and reach is capped at a maximum of 1000 client-side monthly active users (MAUs) in the cheaper plans.
Split
Split is a feature delivery platform ‘built by developers for developers’. The platform can be easily adapted to your workflow allowing teams to set up and manage flags to streamline deployment of features and maximize business impact throughout the feature delivery lifecycle.
Some of the core features of this platform include:
Provides instant alerts for performance issues with any features released
Comes with a kill switch to disable a faulty feature
Allows for user targeting through percentage rollouts to minimize blast radius
Pairs with a number of data pipelines to measure impact of each feature
Scales across multiple teams and environments
This solution is ideal for engineering teams that want to deliver features quickly and safely through ‘impact-driven development’. By helping to reduce the engineering cycle duration, this frees up engineering teams to solve business and customer problems.
It is also suited for teams working in more ‘sensitive’ industries that are looking to have extra security to protect and have control of the data that is sent to the platform.
Pricing
Split offers a free plan that accommodates up to 10 seats and a Platform Edition plan based on the number of Monthly Tracked Keys (MTKs) evaluated by the platform. It includes 25 seats and a 30 day trial.
Optimizely
Optimizely is a digital experience platform that provides teams with insights to personalized experiences. Although it’s not primarily a feature management tool, it provides these teams with feature management capabilities to test features. These include feature flags that allow you to run A/B tests, staged rollouts and target rollouts by audience.
Among the features you can find in this platform include:
Manages all features in one place within a single interface
Ability to switch off features without redeploying code
Offers a Stats Engine that deviates from traditional statistical methods for more accurate and actionable results that is a better fit for digital data
Provides a marketer-friendly UI for marketing teams to manage features and tests independently
This platform is suitable for teams looking for a full stack experimentation platform beyond feature management. It is particularly suited to product and marketing teams so that they can run advanced A/B tests across all customer touchpoints to uncover insights for better decision-making.
Pricing
While pricing is not revealed (it must be requested), there are 3 plans that companies can consider, among which include the Intelligence Cloud plan which offers feature management capabilities. Optimizely also offers free feature flagging as part of Optimizely Rollouts, on top of the paid Optimizely Full Stack, which comes with unlimited seats and feature flags.
CloudBees
CloudBees is a software delivery platform whose purpose is to enable automation so that developers can focus on creating and delivering software. The platform also comes with a feature management solution that allows for progressive delivery of features with advanced user testing based on any criteria in your database.
Other notable features that come with the feature management solution include:
Percentage rolling releases that provides feedback from live users
Customer data security-locally available attributes for targeting are not transmitted back to the platform
Kill switch without redeploying when a feature doesn’t work as expected
Developer-friendly workflows allowing developers to edit flags without using dashboards
Visibility of feature flag usage across all teams
This tool is ideal for large organizations with multiple teams seeking to improve visibility and governance across these teams in order to enhance collaboration and speed of software delivery.
Pricing
CloudBees’ feature management solution comes with the usual 3 plans other tools have adopted, beginning with a free Community plan for up to 15 users user followed by Team, up to a maximum of 25 users, and Enterprise plans for more than 25 users.
Harness
Harness is a software delivery platform that also provides feature flags as part of its product, which was designed for developers to be used as a simple and scalable feature management solution.
Some features that come with this platform include:
End-to-end visibility from build to release
Native integration with CI/CD
Integrates to existing developer workflow tools such as Jira and Slack
Reusable feature templates that can be standardized across different features
This tool is ideal for developers looking to automate their processes including flag life cycle management for future feature releases. It is also suited for teams wanting to manage all their processes in a single, integrated pipeline.
Pricing
Harness feature flags comes with 3 plans, starting with the free plan with just 2 developer licenses and up to 25K client-side MAUs followed by the Team, limited to 50 developer licenses and Enterprise plans that comes with a 14-day free trial.
AB Tasty
Last but not certainly not least is our own feature flagging platform to safely turn features on or off but that’s not all it is. AB Tasty is your one-stop solution for all your experimentation needs that was made with not only developers in mind but also to satisfy your product and marketing needs. It also comes with dedicated support to help you get set up.
Our server-side solution is designed for modern teams to deploy releases faster multiple times a day and reduce the risk that usually comes with testing in production.
The platform comes packed with features, which include:
Update flags without the need to change code or redeploy
User targeting and progressive rollouts based on user attributes- time-based deployment and gradual percentage rollout
Ready-to-use templates to speed up workflows
Kill switch in case an issue comes up
Visual dashboard to comfortably analyze feature performance, set goals and track them with real-time reports
Full visibility over all flags to easily create and manage flags
Server-side A/B tests with deep-level modifications beyond cosmetic changes
Option of rollback KPI to automatically turn off a feature/flag if metric crosses a certain threshold
Our feature flagging platform is particularly great for product teams wanting to delve into more advanced server-side A/B testing and experimentation as the easy-to-use dashboard can be used by all teams across an organization without any fuss.
The platform basically allows you to designate who has access to the platform determined by ‘role’ so that people across your team can track the different flags for easier and more efficient management.
Pricing
When it comes to pricing, there is a Premium plan and a custom-priced Enterprise plan based on the number of monthly active users. Unlike most other tools’ pricing plans, the plans come with a longer, 30-day free trial period to get a taste of AB Tasty and what it can do for you.
Our feature management solution comes with a host of features to help you advance your experimentation capabilities to release your software quickly and safely.
That depends. All the tools listed offer teams great capabilities, most prominent is releasing features safely and quickly through progressive delivery. If this will be the main focus for you, then opting for a simple solution focusing on toggling flags on or off is a good option.
However, if you’re looking for more advanced features, specifically for product and marketing teams to be able to test various releases across the full software stack, particularly on the server-side, and monitor their performance by tracking KPIs then going for a platform that offers deeper experimentation options is the best way to go.
All in all, it will ultimately depend on where you are in your experimentation roadmap and how far you want to delve into it.