In our guide to DevOps, we discussed the increasing importance of this concept within the modern software development world.
To recap, DevOps can be seen as a cultural shift and a tactical approach that enables teams to collaborate more effectively in order to deliver high quality software faster than ever before.
In that sense, the main objectives of a DevOps methodology are to:
- Increase speed to market
- Continuously optimize software through continuous feedback loops
- Break down barriers and remove silos between development and operations
With that said, in order to adopt DevOps practices, it’s important to keep in mind that it all starts with the culture within an organization itself as well as the people who are implementing these practices.
What is a DevOps culture?
DevOps is not a specific term or set of processes but more so about people and culture.
When we talk about building a DevOps culture, we’re not just referring to continuous integration and continuous delivery practices and automated testing. While these practices fall under the concept of DevOps, that’s not all this concept encompasses.
A DevOps culture is basically adopting the values that reinforce DevOps principles and incorporating its best practices and tools. You can look at it as a set of values that places emphasis on building an environment of continuous learning and encouraging open communication and feedback through cross-team collaboration.
In other words, a DevOps culture at its core means enhancing collaboration between development and operations teams to increase shared responsibility and accountability when it comes to software releases. It’s about those teams adopting a shared culture and mindset that allows them to focus on quality of software and speed of delivery.
The concept of DevOps also stresses the idea of continuous improvement by instilling such a culture of collaborative efforts throughout the software development life cycle.
The foundation that makes up a DevOps culture, then, is increased collaboration, transparency and communication between these teams that previously worked more in isolation to foster productivity.
How can you successfully achieve a DevOps culture?
Many organizations assume that since they have technology and workflow processes in place, they are successfully implementing DevOps.
However, as we’ve stated above, DevOps is much more than that. Sure, adopting these practices may improve the development process and increase velocity but these practices will only be effective if your team is not just blindly following a set of instructions because they are told to. You will need to establish the right team culture and mind-set that involves unified workflows to build better software.
A DevOps culture requires an environment transformation that fosters collaboration, trust and respect between team members and different teams. It’s important to ensure that teams share equal responsibilities and accountability throughout the project lifecycle.
Building a strong cultural foundation first based on these principles will allow your team to apply them much more easily in their day-to-day workflows so that DevOps becomes embedded within the organization as a whole.
Consequently, unless these organizations actually adopt the cultural changes that come with DevOps, teams will find great difficulty in realizing the true promise of DevOps.
What does it take to build this kind of culture?
There are a number of principles that make up a culture of DevOps and applying them will help ensure that the implementation of such a culture will be truly successful.
Below, we will outline some of these principles:
As mentioned previously, one of the objectives of DevOps is to break down traditional barriers and friction between development and operations teams.
Thus, to build a solid DevOps culture, communication and collaboration are imperative. To improve and facilitate communication and collaborative efforts between different teams, these teams must have a shared vision and goals that they can work towards.
How exactly can this be achieved?
By getting leadership to lay the groundwork for such a culture to flourish within an organization. Cultural change will only happen with top-down motivation so the idea is to start from the top and gradually make your way to the bottom.
In other words, it is important that senior stakeholders and leaders are involved and in full support of building an effective DevOps culture as good leadership tends to set the example for open communication by encouraging cross-team cooperation.
Leaders need to be advocates for DevOps, spreading its values across the organization as well as its benefits so that teams understand why it needs to be implemented across all workflows.
However, DevOps is not a one-size-fits-all solution and so it’s not necessarily implemented the same way across different organizations. Every organization will have its own unique DevOps journey.
Needless to say, one DevOps team will not look the same as another. DevOps will only succeed if it’s aligned with what makes sense for your team and organization.
One common trait that all good leaders share, on the other hand, is providing the resources and the set of practices necessary for teams to perform their jobs effectively while allowing each team to flourish in its own right.
Good leaders will also provide the kind of environment that will stimulate experimentation and promote knowledge sharing in order to nourish your DevOps culture.
- Invest in the right people for your team
Just as important as good leadership, it’s equally important to establish the right team who understand the value of DevOps and will also advocate for it.
A cultural shift to DevOps starts with people and processes foremost. Focus on getting people with a problem-solving approach who are willing to learn and embrace your company’s culture and ensure they fit in with organizational DevOps vision so that they, in turn, can confidently lead this cultural change.
Afterall, your DevOps team will serve as the foundation on which all your DevOps efforts are built. The better different teams and team members collaborate with each other, the higher the quality of the end-product will be.
Therefore, every single member of your team must be willing to open up the lines of communication and enhance their collaborative efforts that will allow them to work together towards common goals.
In other words, implementing a DevOps culture will be more about changing your team’s habits and communication habits than just what tools they use.
This means you will need to begin assembling a team with a diverse background and expertise. Team members that come from different backgrounds can open up new ways of thinking and problem solving paving the way for innovative thinking.
- Work towards common goals
One of the first questions you should ask yourself early on in your DevOps journey is what exactly the primary goal is.
Once that’s determined, it’s imperative that all teams have a clear understanding of where the organization is headed and that they’re all aligned around common objectives to have the right mindset in place.
This will help better orient your DevOps culture shift and will also help make better decisions when developing and deploying software as they use these goals to determine the kind of projects they should prioritize and products they work on that best meet business objectives.
This will include not only goals at the organizational level but also at team and project levels. Which goals you set will depend on the needs of your team and project such as reducing time to market or increasing efficiency. It will depend on the pain points and problems that your teams are facing, which is why ongoing communication is imperative.
Again, leadership will play a huge role in communicating goals at all levels of the organization and sharing the overall vision to make sure all teams are on the same page.
- Provide appropriate training and education
So you’ve lined up a great team but it’s not enough to get people with the right mindset. They will also need to receive the training and education necessary to be a productive member of the team.
As previously mentioned, leaders will need to be advocates for DevOps to educate on how and where DevOps practices add value to each team member and the organization as a whole.
DevOps teams will need to be involved throughout the software development lifecycle all the way from planning and building the software to deploying it. This will require that each team member has a well-rounded set of skills. As a result, teams will need to be trained on DevOps processes as well as the tools that will be used to carry out these processes.
Nevertheless, honing in technical skills should not be the sole focus. It’s just as important for teams to receive training on how to improve soft skills, primarily improving communication skills to enable cross-functional collaboration.
Training and education should be an ongoing endeavor for all teams and team leaders should make it a priority to check in often with team members to help them improve whenever necessary and open up lines of communication to create a safe space where everyone can freely participate.
An essential part of DevOps is to encourage open communication between teams while at the same time giving them the space to be more autonomous and take ownership of their projects.
This instills a sense of shared responsibility as previously-drawn barriers are broken down and there’s a realization among everyone that they’re all in this together as they work towards ensuring the best possible outcome.
However, just as important as successes are, teams should also be encouraged to experiment with new processes and technologies to allow for continuous and faster innovation.
Therefore, failure should serve as a learning opportunity instead of pointing fingers and playing the blame game. Instead of talking negatively about things that didn’t work, teams can look at them as lessons to constantly improve.
By embracing failure, organizations can foster a culture of continuous learning and improvement so that team members are always learning and improving their skills as well as working towards further improving collaborative and communication efforts.
They can also incorporate these learnings to increase customer satisfaction and accelerate innovation to better meet fast-changing customer and market demands.
- Automate wherever possible
A key aspect of a DevOps culture is automation in order to develop and deploy software more efficiently and reliably.
By automating processes, teams are able to continuously improve products and respond quickly to customer feedback.
Without automation, teams will need to perform numerous manual and repetitive tasks which could result in more delays and errors. On the other hand, automation frees up teams to focus on continuous improvement and innovation without worrying about tedious tasks which leads to better satisfaction for both consumers and teams.
Consequently, within any DevOps culture, it’s essential to have the right tools and technology at hand to ensure teams can perform their tasks and contribute to the software development and release processes as efficiently as possible.
In the long run, automation will save you time, money and resources and includes automation of vital processes such as infrastructure maintenance, software deployment and continuous testing to validate your releases.
These tools should also play a large part in helping facilitate communication between all teams and team members and enhance their productivity.
However, as already stated, remember that DevOps is not just about what set of tools you adopt but also the mindset of your team.
DevOps: A gradual cultural shift that should be implemented organization-wide
Implementing a DevOps culture is so important today as it paves the way for open communication, collaboration and transparency which all serve to help you deliver better, more optimized products.
Building the right DevOps culture for your organization is not a process that happens overnight.
There are many key steps to take before fully embracing such a culture including preparing your teams for this shift by providing them with the necessary training and tools as well as instilling the DevOps culture mindset that comes with it.
A DevOps culture will not truly thrive unless your teams can come together and work collaboratively across common goals to deploy reliable software faster. This will require the support and commitment of leadership to create the right environment that promotes a DevOps culture and allow teams to make a seamless transition to the DevOps mentality.
In other words, a true DevOps culture cannot be achieved unless the entire organization comes together as a tight-knit unit. Only then can you and your team reap the benefits of a DevOps culture that will ultimately deliver business value and drive growth.


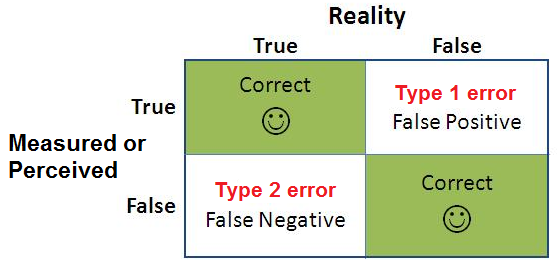


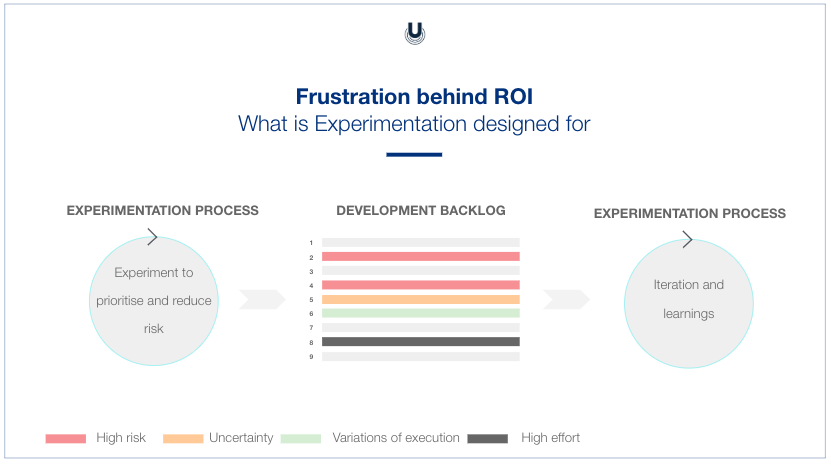
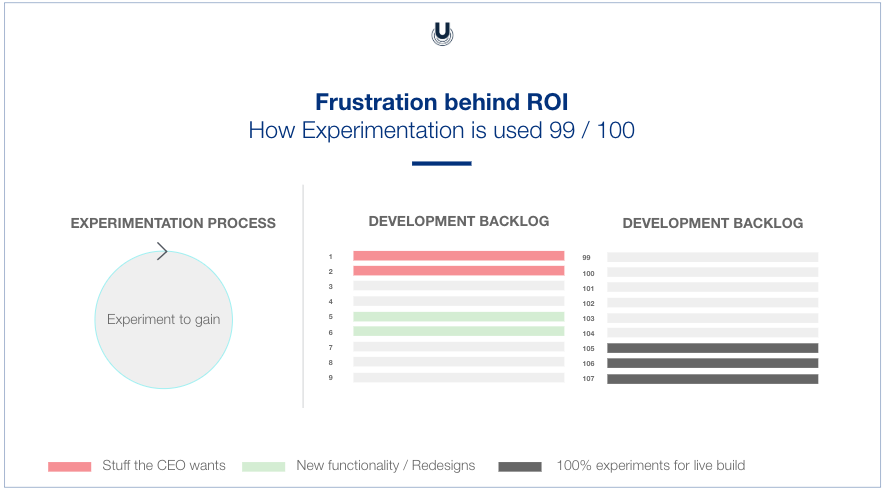
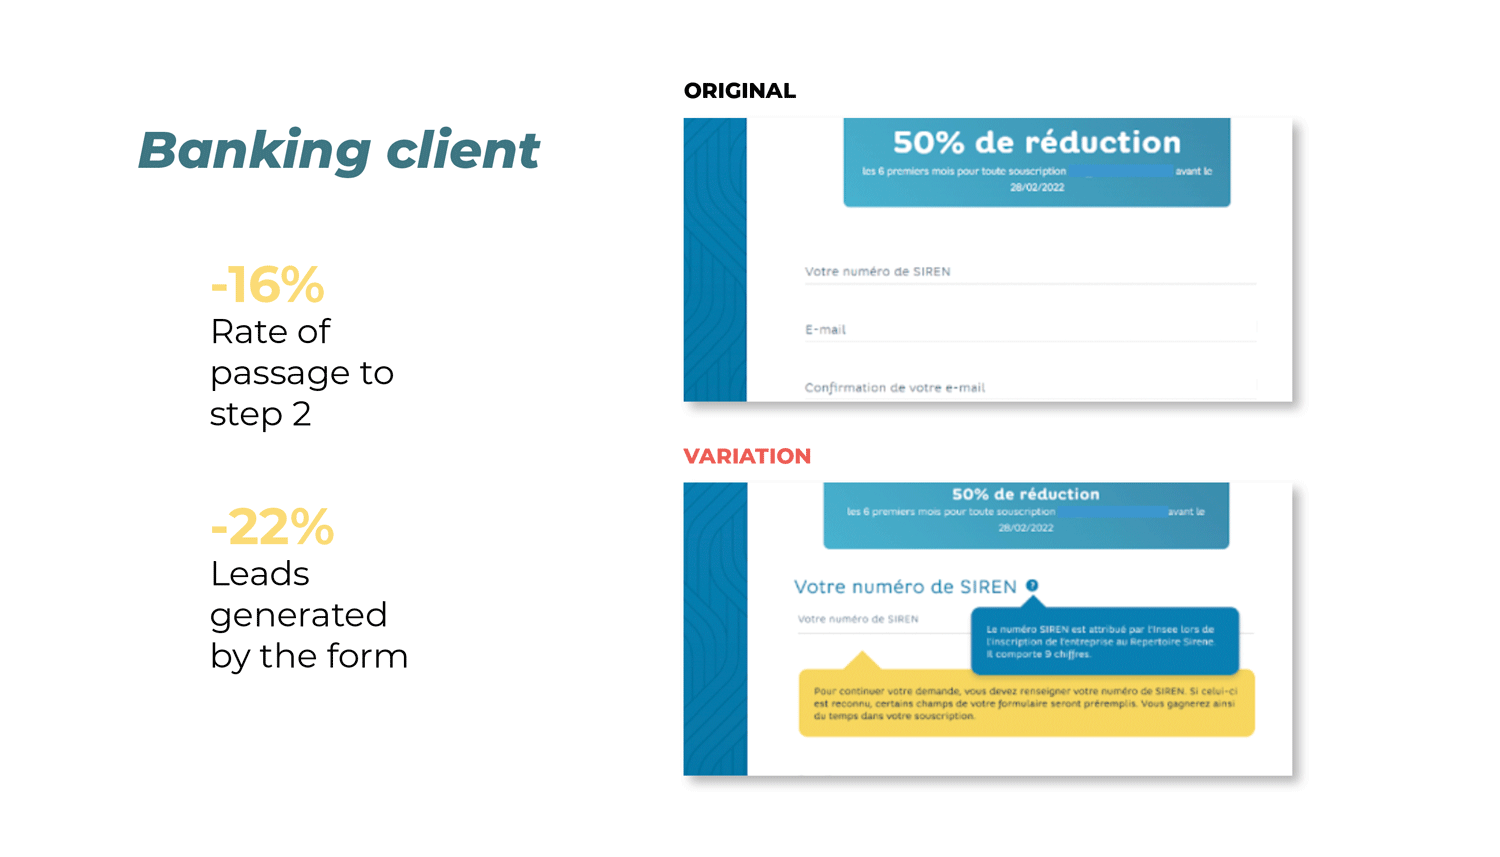
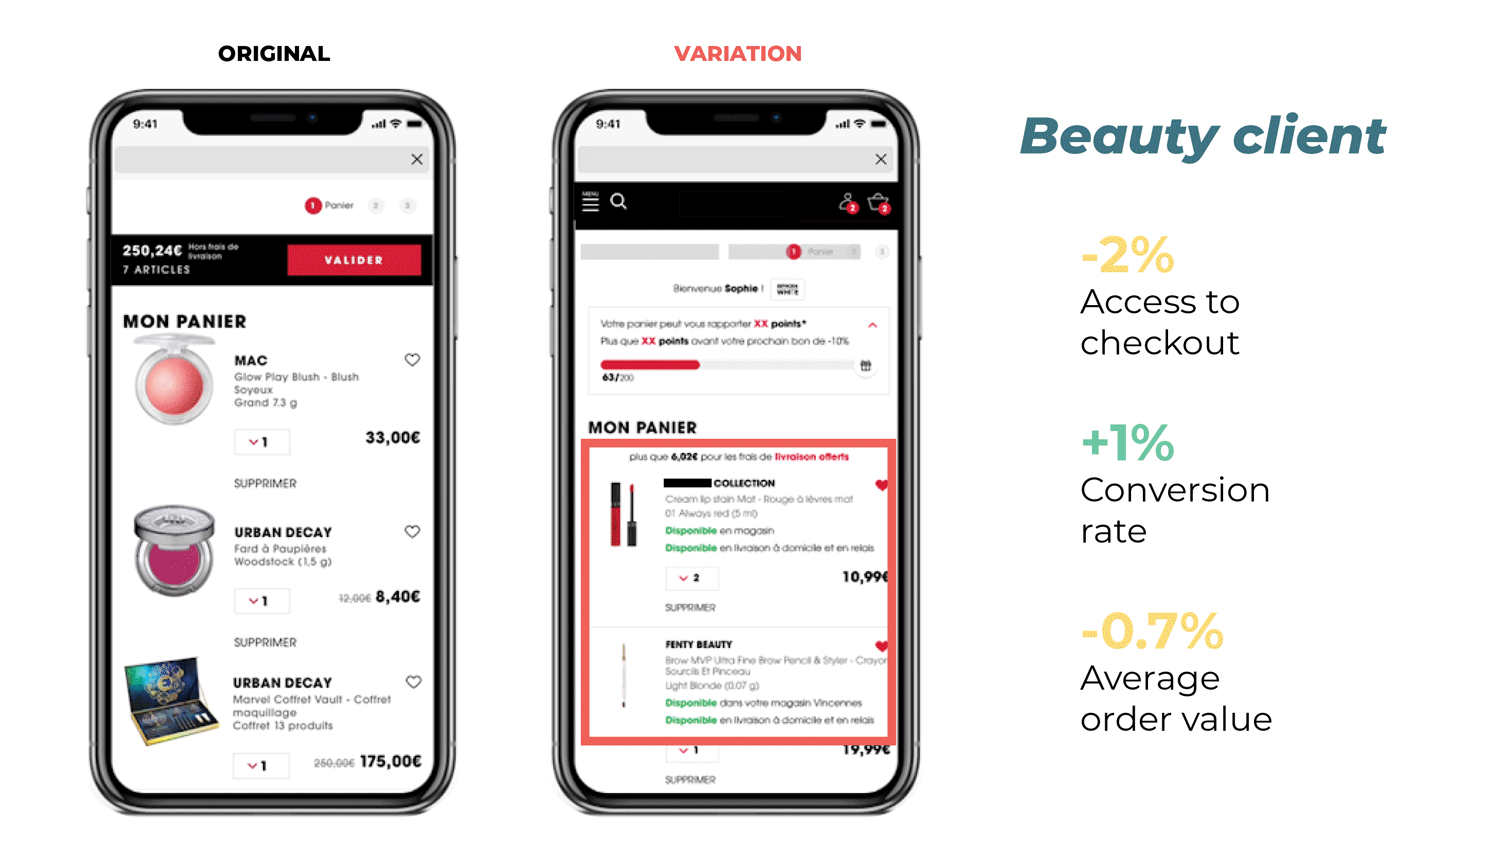
 You launch an A/B test to see if the variation (B) could outperform your control version (A).